Sony CPD-100ES Service Manual - Page 5
Setting the Color Temperature, Data to Factory-preset Levels
 |
UPC - 027242533660
View all Sony CPD-100ES manuals
Add to My Manuals
Save this manual to your list of manuals |
Page 5 highlights
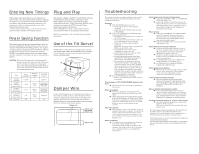
Adjustments Adjusting the Picture Size The adjustment data becomes the individual setting for each input signal received. 1 Press the SIZE button. The "SIZE" OSD appears. SIZE SIZE 32 68 2 For vertical adjustment Press the ¨ >/. buttons. > . . . to enlarge . . . . to diminish For horizontal adjustment Press the > ?// buttons. ? . . . to diminish / . . . to enlarge To erase the "SIZE" OSD, press the SIZE button again. The "SIZE" OSD automatically disappears 10 seconds after you release the buttons. To reset, press the RESET button while the OSD is on. Adjusting the Picture Rotation The adjustment data becomes the common setting for all input signals. 1 Press the GEOM button. The "GEOMETRY" OSD appears. GEOM GEOMETRY 32 68 2 Press the ¨ >/. buttons. > . . .to rotate clockwise . . . . to rotate counterclockwise To erase the "GEOMETRY" OSD, press the GEOM button again. The "GEOMETRY" OSD automatically disappears 10 seconds after you release the buttons. To reset, press the RESET button while the OSD is on. Adjusting the Pincushion The adjustment data becomes the individual setting for each input signal received. 1 Press the GEOM button. The "GEOMETRY" OSD appears. GEOM GEOMETRY 32 68 2 Press the > ?// buttons. ? . . . to diminish the picture sides / . . . to expand the picture sides To erase the "GEOMETRY" OSD, press the GEOM button again. The "GEOMETRY" OSD automatically disappears 10 seconds after you release the buttons. To reset, press the RESET button while the OSD is on. Setting the Color Temperature The selected color temperature becomes the common setting for all input signals. 1 Press the COLOR button. The "COLOR TEMPERATURE" OSD appears. COLOR COLOR TEMPERATURE VAR I ABLE 5000K 9300K 50 2 Adjust with the > ?// and ¨ >/. buttons. To select 5000K or 9300K Press the > ?// buttons. The selected color temperature is indicated in yellow. ? . . . to select 5000K / . . . to select 9300K To obtain the desired color temperature between 5000K and 9300K Press the ¨ >/. buttons. Resetting the Adjustment Data to Factory-preset Levels To reset an adjustment item Press the button of the adjustment item you want to reset, and then press the RESET button before the OSD (On Screen Display) disappears. To reset all adjustment data at once (for the received signal) Press the RESET button when no OSD is shown. RESET To reset all adjustment data to factorypreset levels Press and hold the RESET button for more than 2 seconds. All adjustment data are reset to factory-preset levels. RESET > . . . for higher temperature . . . . for lower temperature Your most recent adjusted color temperature will be recalled by pressing the ¨ >/. button. To erase the "COLOR TEMPERATURE" OSD, press the COLOR button again. The "COLOR TEMPERATURE" OSD automatically disappears 10 seconds after you release the buttons. To reset, press the RESET button while the OSD is on. CPD-100ES - 5 - 6 7
-
 1
1 -
 2
2 -
 3
3 -
 4
4 -
 5
5 -
 6
6 -
 7
7 -
 8
8 -
 9
9 -
 10
10 -
 11
11 -
12
-
13
-
14
-
15
-
16
-
17
-
18
-
19
-
20
-
21
-
22
-
23
-
24
-
25
-
26
-
27
 |
 |
