Sony CX150 Operating Instructions - Page 27
To operate with the Control Panel, or the Remote Commander of, VPL-CX100/CX120/CX150 - vpl lcd projector
 |
UPC - 027242728158
View all Sony CX150 manuals
Add to My Manuals
Save this manual to your list of manuals |
Page 27 highlights
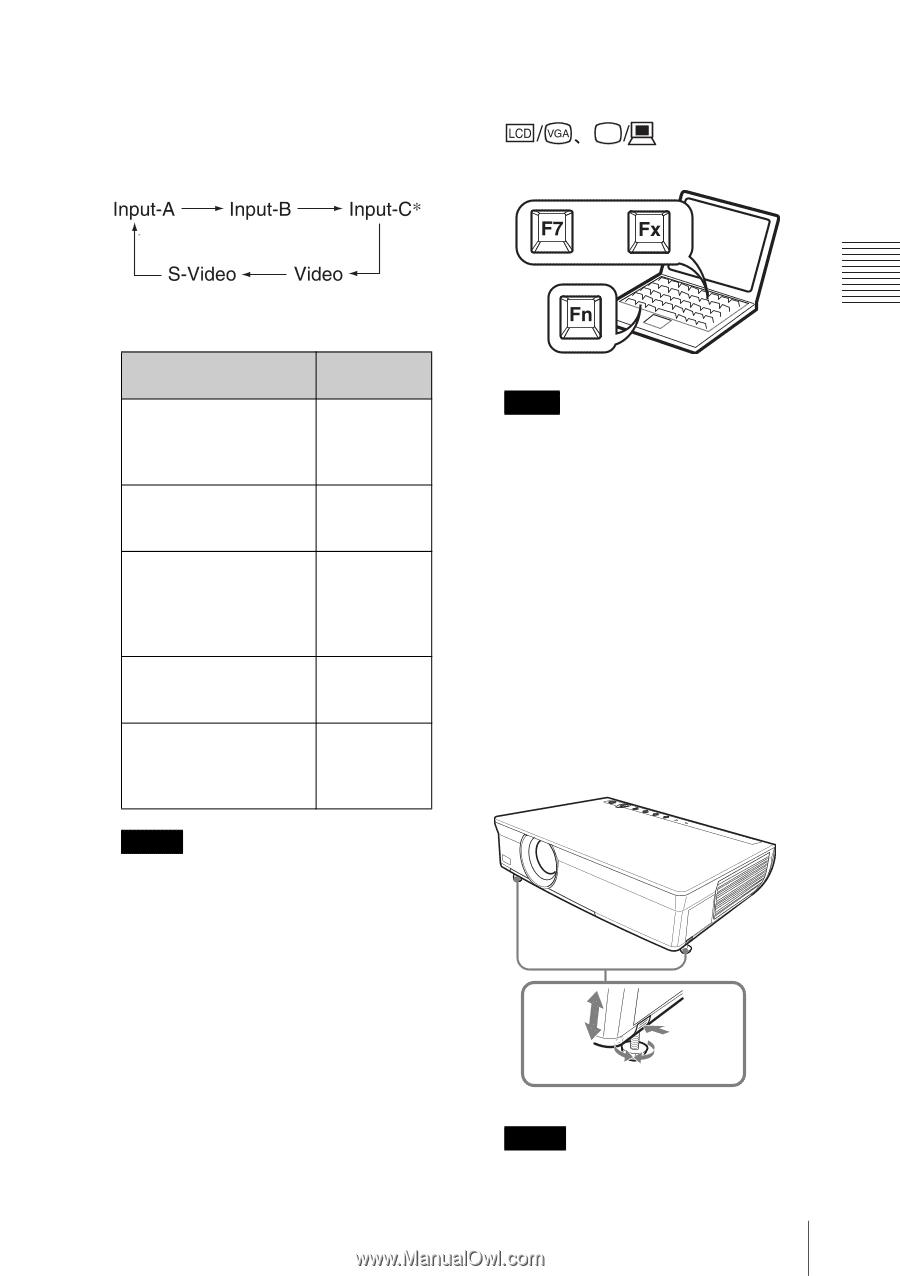
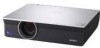
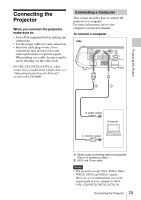
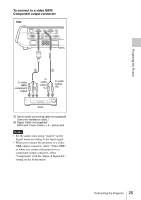
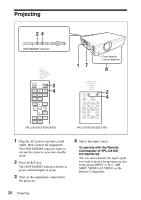
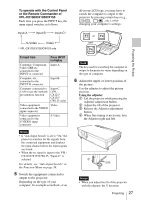
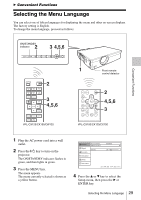
To operate with the Control Panel or the Remote Commander of VPL-CX100/CX120/CX150 Each time you press the INPUT key, the input signal switches as follows: all-in-one LCD type, you may have to switch the computer to output to the projector by pressing certain keys (e.g., , etc.), or by changing your computer's settings. Projecting the Picture * VPL-CX125/CX155/CW125 only or and To input from Press INPUT to display Computer, Component, Video GBR etc. connected to the INPUT A connector Input-A Computer, etc. connected to the INPUT B connector Input-B Computer connected to LAN to use the network presentation function Input-C (VPLCX125/ CX155/ CW125 only) Video equipment Video connected to the VIDEO input connector Video equipment connected to the S VIDEO input connector S-Video Notes • If "Auto Input Search" is set to "On," the projector searches for the signals from the connected equipment and displays the input channel where the input signals are found. • When the no signal is input to the VPLCX125/CX155/CW125, "Input-C" is selected. For details, see "Auto Input Search" in the Function Menu on page 39. 5 Switch the equipment connected to output to the projector. Depending on the type of your computer, for example a notebook, or an Note The key used for switching the computer to output to the projector varies depending on the type of computer. 6 Adjust the upper or lower position of the picture. Use the adjuster to adjust the picture position. Using the adjuster 1 Lift the projector while pressing the Adjuster adjustment button. 2 Adjust the tilt of the projector. 3 Release the Adjuster adjustment button. 4 When fine-tuning is necessary, turn the Adjuster right and left. 2 13 4 Notes • When you adjust the tilt of the projector with the adjuster, the V keystone Projecting 27
-
 1
1 -
2
-
3
-
4
-
5
-
6
-
7
-
8
-
9
-
10
-
11
-
12
-
13
-
14
-
15
-
16
-
17
-
18
-
19
-
20
-
21
-
 22
22 -
 23
23 -
 24
24 -
 25
25 -
 26
26 -
 27
27 -
 28
28 -
 29
29 -
 30
30 -
 31
31 -
 32
32 -
33
-
34
-
35
-
36
-
37
-
38
-
39
-
40
-
41
-
42
-
43
-
44
-
45
-
46
-
47
-
48
-
49
-
50
-
51
-
52
-
53
-
54
-
55
-
56
-
57
-
58
-
59
-
60
-
61
-
62
-
63
-
64
-
65
-
66
-
67
-
68
-
69
-
70
 |
 |