Sony DAV-HDX287WC Operating Instructions
Sony DAV-HDX287WC - Bravia Theater System Manual
 |
View all Sony DAV-HDX287WC manuals
Add to My Manuals
Save this manual to your list of manuals |
Sony DAV-HDX287WC manual content summary:
- Sony DAV-HDX287WC | Operating Instructions - Page 1
4-142-219-11(1) DVD Home Theatre System Operating Instructions DAV-HDX287WC ©2009 Sony Corporation - Sony DAV-HDX287WC | Operating Instructions - Page 2
accompanying the appliance. Owner's Record The model and serial numbers are located on the rear exterior of the unit. Record the serial number in the space provided below. Refer to them whenever you call upon your Sony dealer regarding this product. Model No. DAV-HDX287WC Serial No Date of - Sony DAV-HDX287WC | Operating Instructions - Page 3
Install in accordance with the manufacturer's instructions. 8) Do not install . 14) Refer all servicing to qualified service personnel. Servicing is required when the apparatus Sony Corporation has determined that this product meets the ENERGY STAR® guidelines for energy efficiency. For the wireless - Sony DAV-HDX287WC | Operating Instructions - Page 4
"DVD VIDEO," and the "CD" logos are trademarks. "BRAVIA" is a trademark of Sony Corporation. "PLAYSTATION" is a trademark of Sony Computer Entertainment Inc. "S-AIR" and its logo are trademarks of Sony Corporation. MPEG Layer-3 audio coding technology and patents licensed from Fraunhofer IIS and - Sony DAV-HDX287WC | Operating Instructions - Page 5
can enjoy surround speaker sound wirelessly. • S-AIR receiver (supplied): You can enjoy system sound in another room. The surround amplifier can be purchased as an option (the S-AIR product lineup differs depending on the area). Notes or instructions for the surround amplifier or S-AIR receiver in - Sony DAV-HDX287WC | Operating Instructions - Page 6
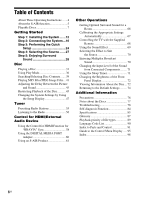
About These Operating Instructions ....... 4 About the S-AIR function 5 Playable Discs 7 Getting Started Step 1: Installing the System .......12 Step 2: Connecting the System ...16 Step 3: Performing the Quick Setup 24 Step 4: Selecting the Source .......27 Step 5: Enjoying Surround Sound 28 - Sony DAV-HDX287WC | Operating Instructions - Page 7
• DVD+R/DVD+RW in DVD VIDEO format VR (Video Recording) mode VIDEO CD Super Audio CD • DVD-R/DVD-RW in VR (Video Recording) mode (except for DVD-R DL) • VIDEO CD ( image file format. (DCF "Design rule for Camera File system": Image standards for digital cameras regulated by Japan Electronics and - Sony DAV-HDX287WC | Operating Instructions - Page 8
7 • CD-ROM recorded in PHOTO CD format • Data part of CD-Extra • CD Graphics disc • DVD Audio • DATA CD/DATA DVD that does not contain MP3 files or JPEG image files • DVD-RAM • Blu-ray Disc Also, the system cannot play the following discs: • A DVD VIDEO with a different region code (page 9) • A disc - Sony DAV-HDX287WC | Operating Instructions - Page 9
DVD labeled with the same region code. A DVD VIDEO labeled ALL will also play on this system. If you try to play system will play a DVD or VIDEO CD according to the disc contents the software producers designed, some playback features may not be available. Be sure to read the operating instructions - Sony DAV-HDX287WC | Operating Instructions - Page 10
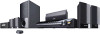
• FM wire antenna (aerial) (1) • Foot pads (1 set) • Center speaker (1) • Surround speakers (2) or • Wireless transceivers (2) • Speaker cords (6, red/white/ green/gray/blue/purple) • Video cord (1) • Operating Instructions • Quick Setup Guide • Setup Disc (DVD) • DIGITAL MEDIA PORT adapter (TDM - Sony DAV-HDX287WC | Operating Instructions - Page 11
) batteries (supplied) by matching the 3 and # ends on the batteries to the markings inside the compartment. To use the remote, point it at the remote sensor on the unit. Note • Do not leave the remote in an extremely hot or humid place. • Do not use a new battery with an old one. • Do not - Sony DAV-HDX287WC | Operating Instructions - Page 12
Started Step 1: Installing the System Positioning the system For the best possible surround sound, place all speakers at the same distance from the listening position (A). The distance can be between 1.0 to 7.0 meters. If you cannot place the center speaker and surround speakers at the same - Sony DAV-HDX287WC | Operating Instructions - Page 13
Getting Started Attaching the foot pads to the subwoofer Attach the foot pads (supplied) to the bottom of the subwoofer to stabilize the subwoofer and prevent it from slipping. , Remove the foot pads from the protective cover. 13US - Sony DAV-HDX287WC | Operating Instructions - Page 14
cord with the color tube to 3, and the speaker cord without the color tube to #. Color tube Front left speaker (L): White Front right speaker (R): Red Center speaker: Green Surround left speaker (L): Blue Surround right speaker (R): Gray 1 Prepare screws (not supplied) that are suitable for the - Sony DAV-HDX287WC | Operating Instructions - Page 15
Getting Started 3 Hang the speakers on the screws. 5 mm (7/32 inch) 10 mm (13/32 inch) Hole on the back of the speaker Rear of the speaker 15US - Sony DAV-HDX287WC | Operating Instructions - Page 16
another component with a volume control, turn down the volume of the other components to a level where sound is not distorted. Connecting the speakers The connector of the speaker cords and the color tube are color-coded depending on the type of speaker. Connect the speaker cords to match the color - Sony DAV-HDX287WC | Operating Instructions - Page 17
on the jacks on your TV, select the connection method. SPEAKER CENTER SUBWOOFER TV DIGITAL IN OPTICAL COAXIAL C Component video cable (not supplied) ANTENNA AM FM COAXIAL 75 SPEAKER FRONT R SUR R FRONT L HDMI OUT SUR L DMPORT 0D.C7A5VMAX - Sony DAV-HDX287WC | Operating Instructions - Page 18
an audio signal to the unit from the TV. To listen to TV sound via the system, perform this connection. SPEAKER CENTER SUBWOOFER TV DIGITAL IN OPTICAL COAXIAL E Digital optical cord (not supplied) SPEAKER FRONT R SUR R FRONT L HDMI OUT SUR L DMPORT 0D.C7A5VMAX ANTENNA AM FM COAXIAL 75 - Sony DAV-HDX287WC | Operating Instructions - Page 19
enjoy connected components via the system's speakers. Portable audio source (not supplied): G DIGITAL MEDIA PORT adapter: H (TDM-iP20 is supplied. You can also use other DIGITAL MEDIA PORT adapters.) G Stereo mini-plug cord (not supplied) SPEAKER CENTER SUBWOOFER TV DIGITAL IN OPTICAL COAXIAL - Sony DAV-HDX287WC | Operating Instructions - Page 20
the speakers of the system through the connected TV. Connect the components as follows. TV VCR, digital satellite receiver, PlayStation, etc. System VCR, digital satellite receiver, PlayStation, etc. :Signal flow Select the component on the TV. For details, refer to the operating instructions - Sony DAV-HDX287WC | Operating Instructions - Page 21
supplied) Note • Keep the AM loop antenna (aerial) and cord away from the system or other AV components, as noise may result. • Be sure to fully extend as possible. Tip • Adjust the direction of the AM loop antenna (aerial) for best AM broadcast sound. • If you have poor FM reception, use a 75-ohm - Sony DAV-HDX287WC | Operating Instructions - Page 22
receiver. To transmit sound from the unit, you need to insert the wireless transceivers into the unit, surround amplifier, and S-AIR receiver. For details of S-AIR products, see "Using an S-AIR Product" (page 61). SPEAKER FRONT R HDMI FRONT OUT L DMPORT 0D.C7A5VMAX EZW-RT10 ANTENNA AM FM - Sony DAV-HDX287WC | Operating Instructions - Page 23
wall outlet (mains), connect all the speakers to the unit. Wall outlet (mains mains lead) of the S-AIR receiver to a wall outlet on the unit. The system turns on. 2 Press SYSTEM MENU. 3 Press X/x Press SYSTEM MENU. The system menu turns off. Tip • When you purchase the system new, or if the system is - Sony DAV-HDX287WC | Operating Instructions - Page 24
PAUSE MODE: AUTO C/X/x/c, DISPLAY 1 Turn on the TV. 2 Press so that the signal from the system appears on the TV screen. Control for HDMI function (page 58) is set to on. • [OFF]: The Control for HDMI function is set to off. The Setup Display for selecting the speaker formation appears. SPEAKER - Sony DAV-HDX287WC | Operating Instructions - Page 25
The environment of the room in which the system is installed may affect measurements. When the measurements differ considerably from the status of the speaker installation, perform the speaker settings manually by following "Settings for the speakers" (page 52). 11 Unplug the calibration mic, press - Sony DAV-HDX287WC | Operating Instructions - Page 26
OUT jack. For details, refer also to the operating instructions supplied with the TV/projector, etc. 1 Press FUNCTION +/- repeatedly until "DVD" appears in the front panel display. 2 Press DISPLAY while the system is in stop mode. The Control Menu display appears on the TV screen. 3 Press X/x to - Sony DAV-HDX287WC | Operating Instructions - Page 27
FM" y "TUNER AM" y "TV/VIDEO" y "DMPORT" y "AUDIO" y ... Function "DVD" "TUNER FM"/ "TUNER AM" "TV/VIDEO" "DMPORT" "AUDIO" Source Disc that is played by the system FM/AM radio (page 55) TV or component that is connected to the TV/ VIDEO jacks on the rear panel DIGITAL MEDIA PORT adapter (page - Sony DAV-HDX287WC | Operating Instructions - Page 28
. 4 Press . The setting is made. 5 Press SYSTEM MENU. The system menu turns off. Note • When TV program sound is monaural, sound is output only from the center speaker. Selecting surround sound effects based on your listening preference 1 Press SYSTEM MENU. 2 Press X/x repeatedly until "DEC. MODE - Sony DAV-HDX287WC | Operating Instructions - Page 29
was recorded/encoded. DIRECT STANDARD) "A.F.D. MULTI" (AUTO FORMAT DIRECT MULTI) • 2 channel source: The system outputs 2 channel sound from the front and surround speakers by assigning the 2 channel sound to the surround left and right channels. • Multi-channel source: The system outputs sound - Sony DAV-HDX287WC | Operating Instructions - Page 30
effect "HP VIRTUAL" (HEADPHONE VIRTUAL) Effect The system outputs the sound from the headphones by adding a surround effect regardless of sound format or number of channels. To turn the surround effect off Select "A.F.D. STD," "2CH STEREO," or "HP 2CH" for "DEC. MODE." Note • When the bilingual - Sony DAV-HDX287WC | Operating Instructions - Page 31
instructions MUTING STEP /, / /m/ M/ X VOLUME +/- ./> H x 1 Turn on your TV. 2 Switch the input selector on the TV to this system. 3 Press "/1. The system turns on. Unless the system remote or DISC 15 on the unit. 7 Adjust the volume by using VOLUME +/ - on the remote or the VOLUME control - Sony DAV-HDX287WC | Operating Instructions - Page 32
23). - [CONTROL FOR HDMI] is set to [OFF] (page 58). - "S-AIR STBY" is set to "STBY OFF" (page 63). To use the headphones Connect the headphones to the PHONES jack on the unit. The sound of the system is muted. You can also connect the headphones to the PHONES jack on the surround amplifier. (The - Sony DAV-HDX287WC | Operating Instructions - Page 33
"ILLUM ON": On. • "ILLUM OFF": Off. 4 Press . The setting is made. 5 Press SYSTEM MENU. The system menu turns off. Displaying multi-angles and subtitles To change the angles If various angles (multi-angles) for a scene are recorded on a DVD VIDEO, you can change the viewing angle. Press ANGLE during - Sony DAV-HDX287WC | Operating Instructions - Page 34
5.1 channel Surround (L/R) LFE (Low Frequency Effect) 1: ENGLISH DOLBY DIGITAL 3 / 2 .1 Front (L/R) + Center LCR channel playback area and a multi-channel playback area. You can select the playback area you want to listen to. 1 Press DISPLAY while the system is in stop mode. The Control - Sony DAV-HDX287WC | Operating Instructions - Page 35
ENTER] in Step 3 may appear as [Press SELECT] in the operating instructions supplied with the disc. In this case, press H. Tip • To play without using the system enters standby mode (DATA CD/ DATA DVD only). - you change or reset the settings on the Setup Display. - you change the parental control - Sony DAV-HDX287WC | Operating Instructions - Page 36
playback (Multi-disc Resume) This system recalls the point where you stopped current disc only. 1 Press DISPLAY. The Control Menu display appears on the TV screen. 2 7. TRACK - - 0: 00:00 T - - 01 02 03 04 05 06 Tracks recorded on a disc 4 Press c. The cursor moves to the track row [T] (in this - Sony DAV-HDX287WC | Operating Instructions - Page 37
select [OFF] in Step 3. To play the same program again, select [ON] in Step 3 and press . To turn off the Control Menu display Press DISPLAY repeatedly until the Control Menu display is turned off. To change or cancel a program 1 Follow Steps 1 to 3 of "Creating your own program." 2 Press X/x to - Sony DAV-HDX287WC | Operating Instructions - Page 38
Menu display Press DISPLAY repeatedly until the Control Menu display is turned off. Note • You cannot use Repeat Play with a VIDEO CD or Super VCD with PBC playback. • When the system is playing a DATA CD/DATA DVD which contains MP3 files and JPEG image files, and their playing time is not the - Sony DAV-HDX287WC | Operating Instructions - Page 39
feature. Control Menu display is turned off. Disc This function is only available for DVD-VRs with a playlist created. 1 Press DISPLAY while the system is in stop mode. The Control originally recorded. 4 code. 1 Press DISPLAY. (If [MEDIA] is set to [MUSIC/PHOTO], press DISPLAY twice.) The Control - Sony DAV-HDX287WC | Operating Instructions - Page 40
. 5 Press . The system starts playback from the selected number. Tip • When the Control Menu display is turned off, you can search for a chapter (DVD VIDEO/DVD-R/DVDRW) or track (VIDEO CD/Super Audio CD/CD) by pressing the number buttons and . To search for a scene using the time code 1 In Step - Sony DAV-HDX287WC | Operating Instructions - Page 41
could damage your speaker system. • The system does not play back audio in MP3PRO format. • The system can recognize of folders appears on the TV screen. 3 Press DISPLAY. The Control Menu display appears on the TV screen. 4 Press X/x to select system starts playing the selected file. You can turn - Sony DAV-HDX287WC | Operating Instructions - Page 42
folder list. To return to the previous display Press O RETURN. To turn on/off the display Press DVD MENU. Other operations See "Other operations" RETURN. To play the next or previous JPEG image file Press c/C when the Control Menu display is not displayed. Note that you can select the next folder - Sony DAV-HDX287WC | Operating Instructions - Page 43
screen. 3 Press DISPLAY. The Control Menu display appears on the TV screen The system starts playing the selected folder. You can turn the folder list on/off by pressing DVD MENU repeatedly. Note • If you play a large MP3 file and JPEG image file at the same time, the sound may skip. Sony - Sony DAV-HDX287WC | Operating Instructions - Page 44
DISPLAY. (If [MEDIA] is set to [MUSIC/PHOTO], press DISPLAY twice.) The Control Menu display appears on the TV screen. 2 Press X/x to select then press . TV screen. • [MODE 3]: The JPEG image file stretches out from the center of the TV screen. • [MODE 4]: The JPEG image files randomly cycle - Sony DAV-HDX287WC | Operating Instructions - Page 45
to play restricted discs. 1 Press FUNCTION +/- repeatedly until "DVD" appears in the front panel display. 2 Press DISPLAY while the system is in stop mode. The Control Menu display appears on the TV screen. 3 Press X/x to select [SETUP], then press . The options for [SETUP] appear. 4 Press - Sony DAV-HDX287WC | Operating Instructions - Page 46
Area Code List" (page 90) using the number buttons. 10 Press X/x to select [LEVEL], then press . The selection items for [LEVEL] are displayed. 11 Press X/x to select the desired level, then press . [PARENTAL CONTROL] setting is complete. The lower the value, the stricter the limitation. To turn - Sony DAV-HDX287WC | Operating Instructions - Page 47
in the front panel display. 2 Press DISPLAY while the system is in stop mode. The Control Menu display appears on the TV screen. 3 Press [HDMI SETUP] (page 50) • [AUDIO SETUP] (page 51) • [SYSTEM SETUP] (page 52) • [SPEAKER SETUP] (page 52) Example: [VIDEO SETUP] Selected item VIDEO SETUP TV - Sony DAV-HDX287WC | Operating Instructions - Page 48
on the DVD VIDEO, one of the recorded languages will be automatically selected (depending on the disc, the language may not be selected automatically). Tip • If you select [OTHERS t] in [MENU], [AUDIO], and [SUBTITLE], select and enter a language code from "Language Code List" (page 90) using the - Sony DAV-HDX287WC | Operating Instructions - Page 49
function. [4:3 LETTER BOX]: Select this when you connect a 4:3 standard TV. The system displays a wide picture with bands on the upper and lower portions of the TV aspect ratio on your TV, change the setting on your TV, not the system. [FULL]: Select this when you can change the aspect ratio on your - Sony DAV-HDX287WC | Operating Instructions - Page 50
Function for "BRAVIA" Sync" (page 58). [ON]: On. You can operate mutually between components that are connected with an HDMI cable. [OFF]: Off. x [VOLUME LIMIT] If you change the output method of the TV to the system speakers via the TV menu (or by pressing THEATER), the System Audio Control (page - Sony DAV-HDX287WC | Operating Instructions - Page 51
[SPEAKER FORMATION] You can select the position of the speakers for better surround sound. For details, see "Getting Optimal Surround Sound channels priority when you play a DVD VIDEO on which multiple audio formats (PCM, DTS, Dolby Digital, or MPEG audio) are recorded. [OFF]: Off. [AUTO]: The system - Sony DAV-HDX287WC | Operating Instructions - Page 52
. [GRAPHICS]: A preset picture stored in the system appears. [BLUE]: The background is blue. [BLACK]: The background is black. 52US Settings for the speakers [SPEAKER SETUP] To obtain the best possible surround sound, set connection of the speakers and their distance from your listening position - Sony DAV-HDX287WC | Operating Instructions - Page 53
select this. [NONE]: Select this if no center speaker is used. [SURROUND] [YES]: Normally select this. [NONE]: Select this if no surround speakers are used. [SUBWOOFER] [YES] Note • When you change the [CONNECTION] setting, the [STANDARD] of [SPEAKER FORMATION] setting remains the same, but the - Sony DAV-HDX287WC | Operating Instructions - Page 54
3. 5 Press C/X/x/c repeatedly to set [TEST TONE] to [OFF] after adjusting the speaker level. Tip • To adjust the volume of all the speakers at one time, turn the VOLUME control on the unit, or press VOLUME +/- on the remote. • To return to the default setting when changing a setting, select the item - Sony DAV-HDX287WC | Operating Instructions - Page 55
tuning, make sure to turn down the volume to minimum. Current station Current band and preset number FM FM 10 : 88.00 MHz SONY RADIO Station name 1 change the AM tuning interval, first tune in any AM station, then turn off the system by pressing "/1 on the unit. Press "/1 on the unit while pressing - Sony DAV-HDX287WC | Operating Instructions - Page 56
tuning stops automatically when the system receives the radio station. To stop the automatic tuning manually, press TUNING +/- or MONO": Monaural reception. 5 Press . The setting is made. 6 Press SYSTEM MENU. The system menu turns off. Naming preset stations You can enter a name for preset stations. - Sony DAV-HDX287WC | Operating Instructions - Page 57
. 8 Press SYSTEM MENU. The system menu turns off. When SONY RADIO" 2 Frequency Ex. "FM1 87.50" 3 The "FM MODE" setting Ex. "STEREO" When the station name is not set 1 Frequency Ex. "FM1 87.50" 2 The "FM MODE" setting Ex. "STEREO" x "TUNER AM" When the station name is set 1 Station name Ex. "SONY - Sony DAV-HDX287WC | Operating Instructions - Page 58
are convenient buttons on the system's remote for operating the TV, such as THEATER, ONE-TOUCH PLAY, TV [/1. For details, see "Controlling the TV with the Supplied Remote" (page 68) and refer to the operating instructions of the TV. ONE-TOUCH TV THEATER PLAY BRAVIA Sync Note • Depending on the - Sony DAV-HDX287WC | Operating Instructions - Page 59
, refer to the operating instructions of the TV. • Depending on the status of the system (ex. while using other than "DVD" or "TV/VIDEO" functions, or playing a CD), the system may not turn off automatically. Enjoying TV sound from the speakers by this system (System Audio Control) You can enjoy TV - Sony DAV-HDX287WC | Operating Instructions - Page 60
volume by the remote of the TV. • If you turn the system off or set the function of the system to other than "TV/VIDEO" or "DVD," TV sound is output from the TV speakers. You can also operate the System Audio Control function via the TV menu. For details, refer to the operating instructions of the - Sony DAV-HDX287WC | Operating Instructions - Page 61
unit: This is for receiving sound. - Surround amplifier: You can enjoy surround speaker sound wirelessly. - S-AIR receiver: You can enjoy system sound in another room. Room A S-AIR main unit S-AIR sub unit (surround amplifier) Room B S-AIR sub unit (S-AIR receiver) Note • You cannot operate this - Sony DAV-HDX287WC | Operating Instructions - Page 62
between the unit and S-AIR sub unit (ID setting) For the surround amplifier For the S-AIR receiver Simply by matching the ID of the unit and the S-AIR sub unit, you can establish sound transmission. To set the ID of the unit 1 Press "/1 on the unit. The system turns on. 2 Press SYSTEM MENU. 3 Press - Sony DAV-HDX287WC | Operating Instructions - Page 63
is downmixed to 2 channel. To set "S-AIR MODE" via the remote Press S-AIR MODE. The S-AIR mode appears in the front panel display. Each time you press S-AIR MODE, the S-AIR mode changes. To control the system from the S-AIR receiver You can control the system from the S-AIR receiver by using the - Sony DAV-HDX287WC | Operating Instructions - Page 64
the unit" (page 62). • To set the ID of the S-AIR receiver, refer to the operating instructions of the S-AIR receiver. • To set the ID of the surround amplifier, refer to the operating instructions of the surround amplifier. 3 Press SYSTEM MENU. 4 Press X/x repeatedly until "PAIRING" appears in the - Sony DAV-HDX287WC | Operating Instructions - Page 65
channel 1 - S-AIR ID B: equivalent channel for IEEE 802.11b/g channel 6 - S-AIR ID C: equivalent channel for IEEE 802.11b/g channel 11 • The transmission may be improved by changing the transmission channel (frequency) of the other wireless system(s). For details, refer to the operating instructions - Sony DAV-HDX287WC | Operating Instructions - Page 66
room, you cannot install some speakers. For better surround sound, Sony recommends that first you decide the position of the speakers. 1 Press FUNCTION +/- repeatedly until "DVD" appears in the front panel display. 2 Press DISPLAY while the system is in stop mode. The Control Menu display appears - Sony DAV-HDX287WC | Operating Instructions - Page 67
. • The environment of the room in which the system is installed may affect measurements. When the measurements differ considerably from the status of the speaker installation, perform the speaker settings manually by following "Settings for the speakers" (page 52). 10 Press C/c to select [YES] or - Sony DAV-HDX287WC | Operating Instructions - Page 68
, but the [SUBWOOFER] level in [SPEAKER SETUP] returns to the default setting when you perform [AUTO CALIBRATION]. Controlling the TV with the Supplied Remote You can control the TV (Sony only) by using the following buttons. Use these buttons (other than TV [/1, THEATER, TV INPUT, and TV VOL - Sony DAV-HDX287WC | Operating Instructions - Page 69
DMPORT BOOSTER indicator turns off. Enjoying the sound at low volume You can enjoy sound effects or dialogue, as you would in a movie theater, even at low not output from the center speaker, or you are using the headphones, the system optimally adjusts the volume. To turn off the sound effect Press - Sony DAV-HDX287WC | Operating Instructions - Page 70
the desired mode appears in the front panel display. • "AUTO": The system automatically selects "MOVIE" (the MOVIE indicator lights up) or "MUSIC" ( to the unit or surround amplifier. • When changing the sound mode while using the S-AIR receiver, sound from the S-AIR receiver may skip. Enjoying - Sony DAV-HDX287WC | Operating Instructions - Page 71
input level. The output level is changed. • "ATT OFF": Normal input level. 5 Press . The setting is made. 6 Press SYSTEM MENU. The system menu turns off. Using the Sleep Timer You can set the system to turn off at a preset time, so you can fall asleep listening to music. You can preset the time in - Sony DAV-HDX287WC | Operating Instructions - Page 72
dark. 4 Press . The setting is made. 5 Press SYSTEM MENU. The system menu turns off. 72US Viewing Information About the Disc Viewing the playing has an ID3 tag, the system will display an album name or title name from the ID3 tag information. The system can support ID3 ver 1.0/1.1/2.2/2.3. ID3 ver - Sony DAV-HDX287WC | Operating Instructions - Page 73
. • Playing time of MP3 files may not be displayed correctly. Tip • When the system is playing a VIDEO CD with PBC functions, the playing time is displayed. Viewing the Press DISPLAY repeatedly during playback to display text recorded in the DVD/Super Audio CD/CD. The DVD/Super Audio CD/CD - Sony DAV-HDX287WC | Operating Instructions - Page 74
] to the default settings. 1 Press FUNCTION +/- repeatedly until "DVD" appears in the front panel display. 2 Press DISPLAY while the system is in stop mode. The Control Menu display appears on the TV screen. 3 Press X/x to select [SETUP], then press . The options for [SETUP] appear. 4 Press - Sony DAV-HDX287WC | Operating Instructions - Page 75
] and press c. 7 Press C/c to select [YES]. You can also quit the process and return to the Control Menu display by selecting [NO] here. 8 Press . Do not press [/1 while resetting the system as it takes a few seconds to complete. Note • The [MEDIA], [INTERVAL], [EFFECT], and [MULTI/2CH] settings - Sony DAV-HDX287WC | Operating Instructions - Page 76
, panel, and controls with a soft cloth slightly moistened with a mild detergent solution. Do not use any type of abrasive pad, scouring powder or solvent such as alcohol or benzine. If you have any questions or problems concerning your system, please consult your nearest Sony dealer. On cleaning - Sony DAV-HDX287WC | Operating Instructions - Page 77
instructions of the other wireless system(s). • The transmission distance differs depending on the usage of environment. Find a location where transmission between the S-AIR main unit and sub unit is most effective, and install the S-AIR cloth. Wipe the disc from the center out. • Do not use solvents - Sony DAV-HDX287WC | Operating Instructions - Page 78
you experience any of the following difficulties while using the system, use this troubleshooting guide to help remedy the problem before requesting repairs. Should any problem persist, consult your nearest Sony dealer. Note that if service personnel changes some parts during repair, these parts may - Sony DAV-HDX287WC | Operating Instructions - Page 79
It may solve the problem (page 26). Connect the the picture output from your system goes through your VCR to speakers are used with a CRT-based TV or projector, install the speakers at least 0.3 meters (1.0 ft) from the TV set. • If the color irregularity persists, turn off the TV set once, then turn - Sony DAV-HDX287WC | Operating Instructions - Page 80
channel. It may be monaural or stereo even if the sound track is recorded in Dolby Digital or MPEG audio format. The sound comes from the center • Depending on the disc, the sound may come from the center speaker only. speaker only. No sound is heard from the center speaker. • Check the speaker - Sony DAV-HDX287WC | Operating Instructions - Page 81
. (page 7). • The region code on the DVD does not match the system. • Moisture has condensed inside the unit and may cause damage to the lenses. Remove the disc and leave the unit turned on for about half an hour. The MP3 file cannot be played. • The DATA CD is not recorded in ISO 9660 - Sony DAV-HDX287WC | Operating Instructions - Page 82
be turned off. • The DVD prohibits turning off subtitles. The angles cannot be changed. • Multi-angles are not recorded on the DVD being played (page 33). • The DVD prohibits changing the angles. A disc cannot be ejected and • Contact your Sony dealer or local authorized Sony service facility - Sony DAV-HDX287WC | Operating Instructions - Page 83
sure that the connected TV is compatible with the System Audio Control System Audio Control function. function. • For details, see "Using the Control for HDMI Function for "BRAVIA" Sync" (page 58). The S-AIR function Symptom Remedy S-AIR connection is not established (sound transmission is not - Sony DAV-HDX287WC | Operating Instructions - Page 84
appear on the TV screen. Although this is not a malfunction and for Sony service use only, normal system operation will not be possible. Turn off the system, and then turn on the system again to operate. VER.X.XX First 3 characters of the service number C 13 C 31 E XX (XX is a number) Cause and/or - Sony DAV-HDX287WC | Operating Instructions - Page 85
to rated output. Amplifier Section Surround mode (reference) RMS output power FL/FR/C/SL/SR*: 144 watts (per channel at 3 ohms, 1 kHz 7/8 in × 3 5/8 in) (w/h/d) 0.7 kg (1 lb 9 oz) Center (SS-CT91) Speaker system Speaker unit Rated impedance Full range Bass reflex, Magnetically Shielded 65 mm (2 5/8 - Sony DAV-HDX287WC | Operating Instructions - Page 86
in × 3 1/8 in) (w/h/d) 0.7 kg (1 lb 9 oz) Surround (SS-TS92) Speaker system Speaker unit Rated impedance Dimensions (approx.) Mass (approx.) Full range Bass wireless transceiver inserted Mass (approx.) 5.2 kg (11 lb 8 oz) Wireless transceiver (EZW-RT10/EZW- RT10A) Communication system S-AIR - Sony DAV-HDX287WC | Operating Instructions - Page 87
2 channel sound. Compared with the former Dolby Surround system, Dolby Surround Pro Logic reproduces left-to-right panning more naturally and localizes sounds more precisely. To take full advantage of Dolby Surround Pro Logic, you should have one pair of surround speakers and a center speaker. The - Sony DAV-HDX287WC | Operating Instructions - Page 88
for the NTSC system). The overall . S-AIR (Sony Audio used by wireless LANs and Bluetooth channels) tracks are recorded 2 channel area4) Multi-channel area4) Super Audio CD layer 1)You can play the CD layer on a conventional CD player. 2)Since both layers are on one side, it is not necessary to turn - Sony DAV-HDX287WC | Operating Instructions - Page 89
Playback priority of file types The table below describes the playback priority of file types under the [MEDIA] setting. File type [MUSIC/PHOTO] JPEG image files only JPEG image files MP3 files only MP3 files MP3 files and JPEG image files MP3 files and JPEG image files with slide show [ - Sony DAV-HDX287WC | Operating Instructions - Page 90
1557 Ukrainian 1564 Urdu 1572 Uzbek 1581 Vietnamese 1587 Volapük 1613 Wolof 1632 Xhosa 1665 Yoruba 1684 Chinese 1697 Zulu 1703 Not specified Parental Control Area Code List Code Area 2044 Argentina 2047 Australia 2046 Austria 2057 Belgium 2070 Brazil 2079 Canada 2090 Chile 2092 China 2115 Denmark - Sony DAV-HDX287WC | Operating Instructions - Page 91
indicated in parentheses. Front panel A "/1 (on/standby) (24, 74) B DISC 1-5 buttons/indicators (31) C Front panel display (93) D (remote sensor) (11) E MOVIE/MUSIC indicator (70) F VOLUME control (31) G DMPORT BOOSTER (69) H PHONES jack (31) I AUDIO IN/A.CAL MIC jack (19, 24, 67) J FUNCTION (27 - Sony DAV-HDX287WC | Operating Instructions - Page 92
Rear panel SPEAKER CENTER SUBWOOFER TV DIGITAL IN OPTICAL COAXIAL SPEAKER FRONT R FRONT L SUR R HDMI OUT SUR L DMPORT DC5V 0.7A MAX EZW-RT10 ANTENNA FM AM COAXIAL 75 COMPONENT VIDEO OUT VIDEO OUT TV/VIDEO Y PB/CB PR/CR R AUDIO IN L A SPEAKER jacks (16) B EZW-RT10 slot (22) C - Sony DAV-HDX287WC | Operating Instructions - Page 93
S-AIR transceiver is inserted in the unit and the system transmits the sound. (61) G Lights up when the HDMI OUT jack is correctly connected to HDCP (Highbandwidth Digital Content Protection) compliant device with HDMI or DVI (Digital Visual Interface) input. (17) H Current surround - Sony DAV-HDX287WC | Operating Instructions - Page 94
wf (68) FUNCTION +/- 2 (27, 31) MENU wg (68) MUTING 7 (31) NIGHT wd (69) ONE-TOUCH PLAY eg (59) PICTURE NAVI qg (42) PRESET +/- wj (56) S-AIR MODE 4 SLEEP qj (71) SOUND MODE 5 (70) SUBTITLE ws (33) SYSTEM MENU wf (23, 28, 55, 61, 71) THEATER qk (58) TOOLS wh (68) TUNING +/- 0 (55) TV wl - Sony DAV-HDX287WC | Operating Instructions - Page 95
Information Guide to the Control Menu Display You can use the Control Menu display to select a function and to view related information. DISPLAY Press DISPLAY repeatedly. Each time you press DISPLAY, the Control Menu display changes: 1 t 2 t ... t 1 t ... 1 Control Menu display 1 2 Control Menu - Sony DAV-HDX287WC | Operating Instructions - Page 96
time Current setting Options Operation message To turn off the display Press DISPLAY. List of Control Menu items Item Item Name, Function, the remaining playback time. You can play from a desired point by inputting the time code (DVD VIDEO/DVD-VR only). [MULTI/2CH] (page 34) You can select - Sony DAV-HDX287WC | Operating Instructions - Page 97
both MP3 file and JPEG image file) to be played on a DATA CD/DATA DVD. Tip • The Control Menu icon indicator lights up in yellow t when you select any item except [OFF] ([PROGRAM], [SHUFFLE], [REPEAT lights up in yellow when you select the multi-channel playback area on a Super Audio CD. 97US - Sony DAV-HDX287WC | Operating Instructions - Page 98
R Rear panel 92 Region Code 9 Remote 11 Repeat Play 38 RESET 52, 75 Resume Play 35 RF CHANGE 65 RF POWER 65 S S-AIR 88 S-AIR ID 62 S-AIR MODE 62 S-AIR receiver 61 S-AIR STBY 63 SCREEN SAVER 52 SETUP 47, 74 Shuffle Play 37 SLEEP 71 Slide Show 43 SPEAKER FORMATION 51, 66 SPEAKER SETUP 52 CONNECTION 52 - Sony DAV-HDX287WC | Operating Instructions - Page 99
- Sony DAV-HDX287WC | Operating Instructions - Page 100
(1) Sony Corporation Printed in China
-
 1
1 -
 2
2 -
 3
3 -
 4
4 -
 5
5 -
 6
6 -
 7
7 -
8
-
9
-
10
-
11
-
12
-
13
-
14
-
15
-
16
-
17
-
18
-
19
-
20
-
21
-
22
-
23
-
24
-
25
-
26
-
27
-
28
-
29
-
30
-
31
-
32
-
33
-
34
-
35
-
36
-
37
-
38
-
39
-
40
-
41
-
42
-
43
-
44
-
45
-
46
-
47
-
48
-
49
-
50
-
51
-
52
-
53
-
54
-
55
-
56
-
57
-
58
-
59
-
60
-
61
-
62
-
63
-
64
-
65
-
66
-
67
-
68
-
69
-
70
-
71
-
72
-
73
-
74
-
75
-
76
-
77
-
78
-
79
-
80
-
81
-
82
-
83
-
84
-
85
-
86
-
87
-
88
-
89
-
90
-
91
-
92
-
93
-
94
-
95
-
96
-
97
-
98
-
99
-
100
 |
 |

©2009 Sony Corporation
4-142-219-
11
(1)
DVD Home Theatre
System
Operating Instructions
DAV-HDX287WC