Sony DCR-DVD308 First Step Guide - Page 22
Copying a disc, Connect your camcorder and a computer.
 |
UPC - 027242701755
View all Sony DCR-DVD308 manuals
Add to My Manuals
Save this manual to your list of manuals |
Page 22 highlights
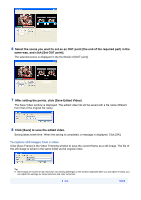
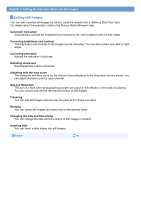
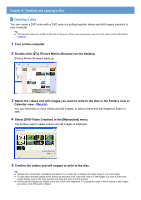
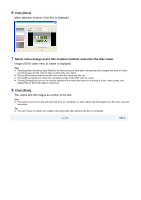
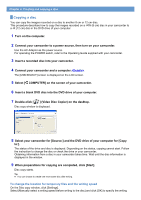
Chapter 4: Creating and copying a disc Copying a disc You can copy the images recorded on a disc to another 8 cm or 12 cm disc. This procedure describes how to copy the images recorded on a -RW (8 cm) disc in your camcorder to a -R (12 cm) disc in the DVD drive of your computer. 1 Turn on the computer. 2 Connect your camcorder to a power source, then turn on your camcorder. Use the AC Adaptor as the power source. For operating the POWER switch, refer to the Operating Guide supplied with your camcorder. 3 Insert a recorded disc into your camcorder. 4 Connect your camcorder and a computer. The [USB SELECT] screen is displayed on the LCD screen. 5 Select [ COMPUTER] on the screen of your camcorder. 6 Insert a blank DVD disc into the DVD drive of your computer. 7 Double-click [ ] (Video Disc Copier) on the desktop. Disc copy window is displayed. 8 Select your camcorder for [Source:] and the DVD drive of your computer for [Copy to:]. The status of the drive and disc is displayed. Depending on the status, copying cannot start. Follow the instruction to change the disc or check the drive or your camcorder. Obtaining information from a disc in your camcorder takes time. Wait until the disc information is displayed in the window. 9 When preparations for copying are completed, click [Start]. Disc copy starts. Tip z You can choose to create one more same disc after writing. To change the location for temporary files and the writing speed On the Disc copy window, click [Settings]. Select [Manually select a writing speed before writing to the disc] and click [OK] to specify the writing
-
 1
1 -
2
-
3
-
4
-
5
-
6
-
7
-
8
-
9
-
10
-
11
-
12
-
13
-
14
-
15
-
16
-
 17
17 -
 18
18 -
 19
19 -
 20
20 -
 21
21 -
 22
22 -
 23
23 -
 24
24 -
 25
25 -
 26
26 -
 27
27 -
28
-
29
-
30
-
31
-
32
-
33
 |
 |