Sony DCR-HC85 Computer Applications Guide - Page 26
Copying images for MEMORY MIX to a “Memory Stick” (only the models with a Memory Stick slot) - accessories
 |
View all Sony DCR-HC85 manuals
Add to My Manuals
Save this manual to your list of manuals |
Page 26 highlights
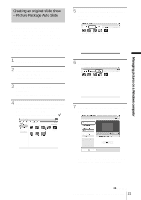
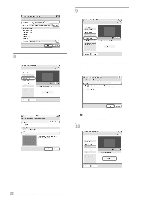
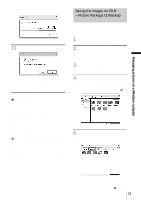
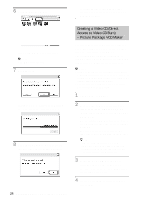
• Once you have created a Video CD, you cannot add images to the same CD-R. • There may be a few second-break about every 10 minutes on the created Video CD. This is due to the AVI format used to create the Video CD, which divides a picture every 10 minutes (about 4 GB) to write it on a CD-R. • The picture being written onto the CD-R does not appear on the computer screen. z Tip • The importing of the picture stops automatically when the tape is played to the end. To play the Video CD You can play back the Video CD in one of the following devices. Refer to the operating instructions supplied with each player for details. - a DVD player compatible with Video CDs - a computer equipped with a DVD drive and software compatible with Video CDs - a computer equipped with Windows Media Player (You may not be able to play back the Video CD depending on the computer environment, including such factors as the operating system or the hardware. The menu functions of Windows Media Player do not work.) The following procedure describes how to play back a Video CD using Windows Media Player. 1 Place a Video CD in the disc drive of your computer and start up Windows Media Player. For Windows XP Click [Start], [All Programs], [Accessories], [Entertainment], then [Windows Media Player]. For other operating systems Click [Start], [Programs], [Accessories], [Entertainment], then [Windows Media Player]. 2 Open [My Computer], [CD-R], then [MPEGAV]. Then, drag and drop the movie file [sss*.DAT] onto the Windows Media Player screen. * sss indicates the actual file name. 26 Managing pictures on a Windows computer Copying images for MEMORY MIX to a "Memory Stick" (only the models with a Memory Stick slot) You can copy images for the MEMORY MIX function to a "Memory Stick." Refer to the separate Camera Operations Guide supplied with your camcorder for details on the MEMORY MIX function. 1 Turn on the computer. 2 Insert a "Memory Stick" into your camcorder. 3 Prepare the power source for your camcorder, then slide the POWER switch repeatedly to select the PLAY/ EDIT mode. The name of the power switch on the camcorder varies depending on the model. 4 Set [STD-USB] in the menu settings of your camcorder to on. The procedure of the menu settings varies depending on the model. For details, refer to the separate Camera Operations Guide supplied with your camcorder. 5 Connect your camcorder to the computer via the USB cable (supplied) (p. 12). Click if [Picture Package Menu] starts up automatically. 6 Start up [MEMORY MIX Image Tool]. For Windows XP Click [Start], [All Programs], [Picture Package], [Handycam Tools], then [MEMORY MIX Image Tool]. For other operating systems Click [Start], [Programs], [Picture Package], [Handycam Tools], then [MEMORY MIX Image Tool].
-
 1
1 -
2
-
3
-
4
-
5
-
6
-
7
-
8
-
9
-
10
-
11
-
12
-
13
-
14
-
15
-
16
-
17
-
18
-
19
-
20
-
 21
21 -
 22
22 -
 23
23 -
 24
24 -
 25
25 -
 26
26 -
 27
27 -
 28
28 -
 29
29 -
 30
30 -
 31
31 -
32
-
33
-
34
-
35
-
36
-
37
-
38
-
39
-
40
-
41
-
42
-
43
-
44
 |
 |