Sony DCR-SX63 Operating Guide - Page 26
Shooting photos, DCR-SR68/SR88: Internal hard disk
 |
UPC - 027242788695
View all Sony DCR-SX63 manuals
Add to My Manuals
Save this manual to your list of manuals |
Page 26 highlights
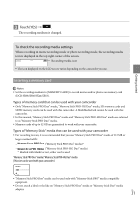
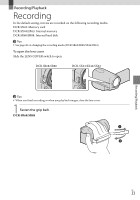
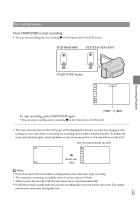
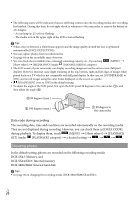
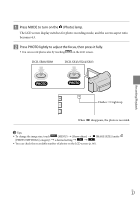
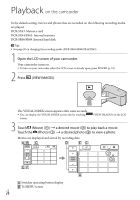
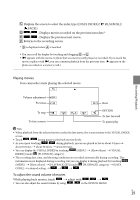
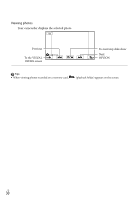
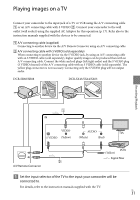
The following states will be indicated if data is still being written onto the recording media after recording has finished. During this time, do not apply shock or vibration to the camcorder, or remove the battery or AC Adaptor. Access lamp (p. 22) is lit or flashing The media icon in the upper right of the LCD screen is flashing Tips When a face is detected, a white frame appears and the image quality around the face is optimized automatically ([FACE DETECTION]). You can capture photos from recorded movies. See page 64 on the recordable time of movies. You can check the recordable time, estimated remaining capacity, etc., by touching (MENU) [Show others] [MEDIA INFO] (under [MANAGE MEDIA] category). The LCD screen of your camcorder can display recording images across the entire screen (full pixel display). However, this may cause slight trimming of the top, bottom, right and left edges of images when played back on a TV which is not compatible with full pixel display. In this case, set [GUIDEFRAME] to [ON], and record images using the outer frame displayed on the screen as a guide. [ STEADYSHOT] is set to [ON] in the default setting. To adjust the angle of the LCD panel, first open the LCD panel 90 degrees to the camcorder (), and then adjust the angle (). 90 degrees (max.) 180 degrees (max.) 90 degrees to the camcorder Data code during recording The recording date, time and condition are recorded automatically on the recording media. They are not displayed during recording. However, you can check them as [DATA CODE] during playback. To display them, touch (MENU) [Show others] [PLAYBACK SET] (under [PLAYBACK] category) a desired setting . Shooting photos In the default setting, photos are recorded on the following recording media. DCR-SX43: Memory card DCR-SX44/SX63: Internal memory DCR-SR68/SR88: Internal hard disk Tips See page 20 on changing the recording media (DCR-SR68/SR88/SX44/SX63). US 26
-
 1
1 -
2
-
3
-
4
-
5
-
6
-
7
-
8
-
9
-
10
-
11
-
12
-
13
-
14
-
15
-
16
-
17
-
18
-
19
-
20
-
 21
21 -
 22
22 -
 23
23 -
 24
24 -
 25
25 -
 26
26 -
 27
27 -
 28
28 -
 29
29 -
 30
30 -
 31
31 -
32
-
33
-
34
-
35
-
36
-
37
-
38
-
39
-
40
-
41
-
42
-
43
-
44
-
45
-
46
-
47
-
48
-
49
-
50
-
51
-
52
-
53
-
54
-
55
-
56
-
57
-
58
-
59
-
60
-
61
-
62
-
63
-
64
-
65
-
66
-
67
-
68
-
69
-
70
-
71
-
72
-
73
-
74
-
75
-
76
-
77
-
78
-
79
-
80
-
81
-
82
-
83
-
84
-
85
-
86
-
87
-
88
-
89
-
90
-
91
-
92
-
93
-
94
-
95
-
96
-
97
-
98
-
99
-
100
-
101
-
102
-
103
-
104
-
105
-
106
-
107
-
108
-
109
-
110
-
111
-
112
-
113
-
114
-
115
-
116
-
117
-
118
-
119
-
120
-
121
-
122
-
123
-
124
-
125
-
126
-
127
-
128
-
129
-
130
-
131
-
132
-
133
-
134
-
135
-
136
-
137
-
138
-
139
 |
 |