Sony DCR-TRV22 PIXELA ImageMixer v1.5 Instruction Manual - Page 234
Creating Video CD easily, When you start Easy Video CD - download
 |
View all Sony DCR-TRV22 manuals
Add to My Manuals
Save this manual to your list of manuals |
Page 234 highlights
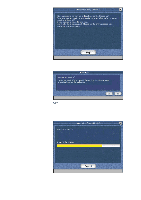
Introduction Chapter 1 Before Use Chapter 2 Capture Environment Chapter 3 Album Environment Chapter 4 Movie Editing Environment Chapter 5 Layout Environment Chapter 6 Image Editor Chapter 7 Video Disc Environment Chapter 8 ImageMixer Easy Video CD (Win) Creating Video CD easily Option Settings Creating Video CD easily ImageMixer Easy Video CD (Easy Video CD) is a wizard-based program that lets you easily create Video CD from tape in a video camera connected through a USB cable. Important Please make sure the drive you are using is functioning properly before creating a Video CD. 1. Connect the video camera to your PC and insert a blank disk in the drive. At this time, set the video camera to Video mode. 2. When you start Easy Video CD, the following screen is displayed. Select the connected drive. 3. Select the speed for writing to the disk. In cases where the drive has a slow transfer speed (e.g., if it is connected through a USB cable), writing to the disk may not work properly if the speed setting is too high. Therefore, the speed should be set to the setting recommended by the drive manufacturer. 4. Click the "Option" button to set options. 5. Click the "Start" button. The screen shown below is displayed, and the process of downloading video from the video camera's tape starts automatically.
-
 1
1 -
2
-
3
-
4
-
5
-
6
-
7
-
8
-
9
-
10
-
11
-
12
-
13
-
14
-
15
-
16
-
17
-
18
-
19
-
20
-
21
-
22
-
23
-
24
-
25
-
26
-
27
-
28
-
29
-
30
-
31
-
32
-
33
-
34
-
35
-
36
-
37
-
38
-
39
-
40
-
41
-
42
-
43
-
44
-
45
-
46
-
47
-
48
-
49
-
50
-
51
-
52
-
53
-
54
-
55
-
56
-
57
-
58
-
59
-
60
-
61
-
62
-
63
-
64
-
65
-
66
-
67
-
68
-
69
-
70
-
71
-
72
-
73
-
74
-
75
-
76
-
77
-
78
-
79
-
80
-
81
-
82
-
83
-
84
-
85
-
86
-
87
-
88
-
89
-
90
-
91
-
92
-
93
-
94
-
95
-
96
-
97
-
98
-
99
-
100
-
101
-
102
-
103
-
104
-
105
-
106
-
107
-
108
-
109
-
110
-
111
-
112
-
113
-
114
-
115
-
116
-
117
-
118
-
119
-
120
-
121
-
122
-
123
-
124
-
125
-
126
-
127
-
128
-
129
-
130
-
131
-
132
-
133
-
134
-
135
-
136
-
137
-
138
-
139
-
140
-
141
-
142
-
143
-
144
-
145
-
146
-
147
-
148
-
149
-
150
-
151
-
152
-
153
-
154
-
155
-
156
-
157
-
158
-
159
-
160
-
161
-
162
-
163
-
164
-
165
-
166
-
167
-
168
-
169
-
170
-
171
-
172
-
173
-
174
-
175
-
176
-
177
-
178
-
179
-
180
-
181
-
182
-
183
-
184
-
185
-
186
-
187
-
188
-
189
-
190
-
191
-
192
-
193
-
194
-
195
-
196
-
197
-
198
-
199
-
200
-
201
-
202
-
203
-
204
-
205
-
206
-
207
-
208
-
209
-
210
-
211
-
212
-
213
-
214
-
215
-
216
-
217
-
218
-
219
-
220
-
221
-
222
-
223
-
224
-
225
-
226
-
227
-
228
-
 229
229 -
 230
230 -
 231
231 -
 232
232 -
 233
233 -
 234
234 -
 235
235 -
 236
236 -
 237
237
 |
 |