Sony DCR-TRV38 Operating Instructions (primary manual) - Page 137
— Viewing images with a computer —, Viewing images with a computer – Introduction - software
 |
View all Sony DCR-TRV38 manuals
Add to My Manuals
Save this manual to your list of manuals |
Page 137 highlights
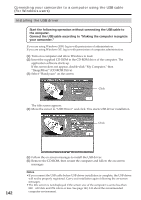
Viewing images with a computer - Viewing images with a computer - Viewing images with a computer - Introduction There are following ways of connecting your camcorder to a computer in order to view images saved on the "Memory Stick" or recorded on the tape on a computer. To view images on a computer which has a Memory Stick slot, first eject the "Memory Stick" from your camcorder, then insert it into your computer's Memory Stick slot. Camcorder connection jack Tape image/ live from your camcorder USB jack DV Interface "Memory Stick" image USB jack Connection cable USB cable (supplied) i.LINK cable (optional) USB cable (supplied) Computer environment requirements USB port, editing software DV port, editing software USB port, editing software Reference pages For For Windows Macintosh Users Users 140 - 142 144 - 145 150 - 153 138 140 - 143 146 157 - 159 160 - 162 When connecting to a computer with the USB port, complete installation of the USB driver before connecting your camcorder to the computer. If you connect your camcorder to the computer first, you will not be able to install the USB driver correctly. For details about the computer's ports and editing software, contact the computer manufacturer. Viewing pictures recorded on the tape When connecting to a computer with the USB port See page 140 for details. Push into the end (USB) USB port USB cable (supplied) 137
-
 1
1 -
2
-
3
-
4
-
5
-
6
-
7
-
8
-
9
-
10
-
11
-
12
-
13
-
14
-
15
-
16
-
17
-
18
-
19
-
20
-
21
-
22
-
23
-
24
-
25
-
26
-
27
-
28
-
29
-
30
-
31
-
32
-
33
-
34
-
35
-
36
-
37
-
38
-
39
-
40
-
41
-
42
-
43
-
44
-
45
-
46
-
47
-
48
-
49
-
50
-
51
-
52
-
53
-
54
-
55
-
56
-
57
-
58
-
59
-
60
-
61
-
62
-
63
-
64
-
65
-
66
-
67
-
68
-
69
-
70
-
71
-
72
-
73
-
74
-
75
-
76
-
77
-
78
-
79
-
80
-
81
-
82
-
83
-
84
-
85
-
86
-
87
-
88
-
89
-
90
-
91
-
92
-
93
-
94
-
95
-
96
-
97
-
98
-
99
-
100
-
101
-
102
-
103
-
104
-
105
-
106
-
107
-
108
-
109
-
110
-
111
-
112
-
113
-
114
-
115
-
116
-
117
-
118
-
119
-
120
-
121
-
122
-
123
-
124
-
125
-
126
-
127
-
128
-
129
-
130
-
131
-
 132
132 -
 133
133 -
 134
134 -
 135
135 -
 136
136 -
 137
137 -
 138
138 -
 139
139 -
 140
140 -
 141
141 -
 142
142 -
143
-
144
-
145
-
146
-
147
-
148
-
149
-
150
-
151
-
152
-
153
-
154
-
155
-
156
-
157
-
158
-
159
-
160
-
161
-
162
-
163
-
164
-
165
-
166
-
167
-
168
-
169
-
170
-
171
-
172
-
173
-
174
-
175
-
176
-
177
-
178
-
179
-
180
-
181
-
182
-
183
-
184
-
185
-
186
-
187
-
188
-
189
-
190
-
191
-
192
-
193
-
194
-
195
-
196
-
197
-
198
-
199
-
200
-
201
-
202
-
203
-
204
-
205
-
206
-
207
-
208
-
209
-
210
-
211
-
212
 |
 |
