Sony DPP FP70 Instruction Manual - Page 12
Editing an image, Displaying the Edit menu - ink ribbon
 |
UPC - 027242711105
View all Sony DPP FP70 manuals
Add to My Manuals
Save this manual to your list of manuals |
Page 12 highlights
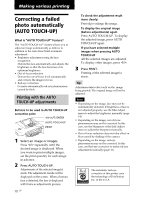
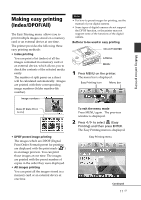
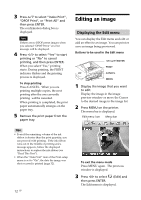
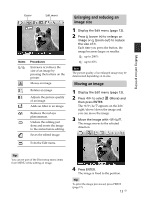
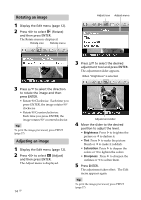
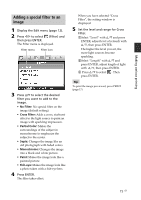
3 Press f/F to select "Index Print", "DPOF Print", or "Print All" and then press ENTER. The confirmation dialog box is displayed. Note If there are no DPOF preset images when you selected "DPOF Print," an error message will be displayed. 4 Press g/G to select "Yes" to start printing or "No" to cancel printing, and then press ENTER. When you select "Yes," printing starts. During printing, the PRINT indicator flashes and the printing process is displayed. To stop printing Press CANCEL. When you are printing multiple copies, the next printing after the one currently printing will be canceled. When printing is completed, the print paper automatically emerges on the paper tray. 5 Remove the print paper from the paper tray. Editing an image Displaying the Edit menu You can display the Edit menu and edit or add an effect to an image. You can print or save an image being previewed. Buttons to be used in the Edit menu g/G/f/F/ENTER PRINT CANCEL MENU 1 Display the image that you want to edit. Display the image in the image preview window or move the Cursor to the desired image in the image list. 2 Press MENU on the printer. The menu bar is displayed. Edit menu icon Menu bar Tips • Even if the remaining volume of the ink ribbon is shorter than the print quantity, you can proceed with printing. If the ink ribbon runs out in the middle of printing and a message appears, follow the displayed instructions to replace the ink ribbon (see "Read This First"). • When the "Date Print" item of the Print setup menu is set to "On", the date the image was shot or saved is printed (page 32). 12 GB To exit the menu mode Press MENU again. The previous window is displayed. 3 Press g/G to select (Edit) and then press ENTER. The Edit menu is displayed.
-
 1
1 -
2
-
3
-
4
-
5
-
6
-
 7
7 -
 8
8 -
 9
9 -
 10
10 -
 11
11 -
 12
12 -
 13
13 -
 14
14 -
 15
15 -
 16
16 -
 17
17 -
18
-
19
-
20
-
21
-
22
-
23
-
24
-
25
-
26
-
27
-
28
-
29
-
30
-
31
-
32
-
33
-
34
-
35
-
36
-
37
-
38
-
39
-
40
-
41
-
42
-
43
-
44
-
45
-
46
-
47
-
48
-
49
-
50
-
51
-
52
-
53
-
54
-
55
-
56
-
57
-
58
-
59
-
60
-
61
-
62
-
63
-
64
-
65
-
66
-
67
-
68
-
69
-
70
-
71
-
72
-
73
-
74
-
75
-
76
-
77
-
78
-
79
-
80
-
81
-
82
-
83
-
84
 |
 |
