Sony DRX-830U Operating Instructions - Page 9
Busy indicator, Eject button, Emergency eject hole, Disc tray, USB Connector, Power Switch, DC IN Jack - manual
 |
View all Sony DRX-830U manuals
Add to My Manuals
Save this manual to your list of manuals |
Page 9 highlights
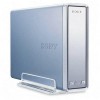
Introduction A Busy indicator Indicates the drive status. Lit: The drive is reading data, playing back an audio CD, or writing packets. Blinking: The drive is writing data (disc-at-once, track-at-once), formatting a disc, or deleting1) data from a disc. Off: The drive is in a state other than those outlined above. 1) Some drives indicate this state with the lit indicator. B Eject button Press to open and close the disc tray. C Emergency eject hole If you cannot open the disc tray with the eject button, turn off the drive, and then insert a thin, elongated object into this hole to eject the disc tray manually. D Disc tray Insert discs here, label side up. Hint When you insert a disc into the drive, make sure that it is under the four pins. When using the drive vertically, make sure that you set the disc inside the two lower pins. E USB Connector Used with a USB cable to connect the drive to a computer. F Power Switch Press to turn the drive on or off. G DC IN Jack Connect the supplied AC power cord to the AC power adapter. Connect this assembly to the DC IN jack, and then connect the whole to the AC outlet. 9
-
 1
1 -
2
-
3
-
 4
4 -
 5
5 -
 6
6 -
 7
7 -
 8
8 -
 9
9 -
 10
10 -
 11
11 -
 12
12 -
 13
13 -
 14
14 -
15
-
16
-
17
-
18
-
19
-
20
-
21
-
22
-
23
-
24
-
25
-
26
-
27
-
28
-
29
-
30
-
31
-
32
 |
 |
