Sony DSC-H90 Quick Start Guide - Page 2
Windows
 |
View all Sony DSC-H90 manuals
Add to My Manuals
Save this manual to your list of manuals |
Page 2 highlights
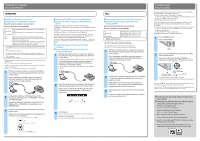
Using with your computer Uso con el ordenador WINDOWS Installing "PlayMemories Home" Instalación de "PlayMemories Home" Recommended computer environment Entorno operativo recomendado OS (preinstalled) SO (preinstalado) Microsoft Windows XP*1 SP3/Windows Vista*2 SP2/Windows 7 SP1 Microsoft Windows XP*1 SP3/Windows Vista*2 SP2/Windows 7 SP1 CPU Intel Pentium III 800 MHz or faster (For playing/editing the CPU High Definition movies: Intel Core Duo 1.66 GHz or faster/ Intel Core 2 Duo 1.66 GHz or faster) Intel Pentium III 800 MHz o más rápido (Para reproducir/edital películas de alta definición: Intel Core Duo 1,66 GHz o más rápido/Intel Core 2 Duo 1,66 GHz o más rápido) *1 64-bit editions and Starter (Edition) are not supported. Windows Image Mastering API (IMAPI) Ver.2.0 or later is required to install the advanced function for creating discs. *2 Starter (Edition) is not supported. *1 Las ediciones de 64 bits y Starter (Edition) no son compatibles. Para utilizar la función de creación de discos, se requiere Windows Image Mastering API (IMAPI) Ver.2.0 o posterior. *2 Starter (Edition) no se admite. Windows is registered trademark of Microsoft Corporation in the United States and/or other countries. The or marks are not used in all cases in this manual. Windows es una marca comercial registrada de Microsoft Corporation en los Estados Unidos y/o en otros países. Las marcas o no se utilizan en todos los casos en este manual. 1 With the computer turned on, connect the camera to the computer using the supplied USB cable, then turn on the camera. Con el ordenador encendido, conecte la cámara al ordenador mediante el cable USB suministrado y, a continuación, encienda la cámara. 2 [Computer] (in Windows 7/Windows Vista) or [My Computer] (in Windows XP) [PMHOME] doubleclick [PMHOME.EXE]. [Equipo] (en Windows 7/Windows Vista) o [Mi PC] (en Windows XP) [PMHOME] haga doble clic en [PMHOME.EXE]. 3 Proceed with installation by following the instructions on the screen. Siga las instrucciones que aparecen en la pantalla para continuar con la instalación. Accessing "PlayMemories Home Help Guide" Acceso a la "Guía de ayuda de PlayMemories Home" "PlayMemories Home" allows you to easily import images/movies. For details on "PlayMemories Home" functions, see the "PlayMemories Home Help Guide" Accessing to "PlayMemories Home Help Guide": [Start] [All Programs] [PlayMemories Home] [PlayMemories Home Help Guide]. "PlayMemories Home" le permite importar imágenes/películas fácilmente. Para obtener más información acerca de las funciones de "PlayMemories Home", consulte la "Guía de ayuda de PlayMemories Home" Acceso a la "Guía de ayuda de PlayMemories Home": [Inicio] [Todos los programas] [PlayMemories Home] [Guía de ayuda de PlayMemories Home]. Importing images/movies to a Windows computer Importación de imágenes/películas a un ordenador Windows 1 With the computer turned on, connect the camera to the computer using the supplied USB cable, then turn on the camera. The image/movie import window is displayed on the screen of the computer. Con el ordenador encendido, conecte la cámara al ordenador mediante el cable USB suministrado y, a continuación, encienda la cámara. La ventana de importación de imágenes/películas aparece en la pantalla del ordenador. 2 Select the destination drive and folder, and the import method, by following the instructions on the screen. Siga las instrucciones de la pantalla para seleccionar la unidad y la carpeta de destino y el método de importación. Mac Importing images/movies to a Mac computer Importación de imágenes/películas a un ordenador Mac Recommended computer environment Entorno operativo recomendado OS (preinstalled) SO (preinstalado) USB Connection: Mac OS X v10.3 a v10.7 Music Transfer: Mac OS X v10.4 to v10.7* Conexión USB: Mac OS X v10,3 a v10,7 Music Transfer: Mac OS X v10,4 a v10,7* * Equipped with Intel Processor * Equipado con Procesador Intel Mac and Mac OS are registered trademark of Apple Inc. The or marks are not used in all cases in this manual. Mac y Mac OS son marcas comerciales registradas de Apple Inc. Las marcas o no se utilizan en todos los casos en este manual. 1 With the computer turned on, connect the camera to the computer using the supplied USB cable, then turn on the camera. Con el ordenador encendido, conecte la cámara al ordenador mediante el cable USB suministrado y, a continuación, encienda la cámara. 2 Double-click the newly recognized icon on the desktop the folder where the images/movies you want to import are stored. Haga doble clic en el nuevo icono que aparece en el escritorio la carpeta donde se almacenarán las imágenes/películas que desea importar. 3 Drag and drop the image/movie files to the hard disk icon. Arrastre los archivos de imágenes/películas y suéltelos en el icono del disco duro. 3 Click [Import]. When the import of the data is completed, the main window is displayed. Haga clic en [Importar]. Una vez finalizada la importación de los datos, aparece la ventana principal. In-Camera Guide Guía en la cámara [In-Camera Guide] allows you to search for details on camera operation, troubleshooting, etc., according to your needs. To use [In-Camera Guide], use method A or B below. A: Select [In-Camera Guide] from MENU in shooting or playback mode. B: Press the / (In-Camera Guide) button. The following procedure is for method A. [Guía en la cámara] le permite buscar información detallada acerca del funcionamiento de la cámara, solución de problemas, etc., según sus necesidades. Para utilizar la [Guía en la cámara], emplee el método A o B a continuación. A: Seleccione [Guía en la cámara] del MENU en el modo de toma de imágenes o reproducción. B: Pulse el botón / (Guía en la cámara). El siguiente procedimiento corresponde al método A. 1 Press the MENU button. Pulse el botón MENU. MENU 2 Select the desired MENU item, then press the / (InCamera Guide) button. Seleccione el elemento deseado del MENU y, a continuación, pulse el botón / (Guía en la cámara). / (In-Camera Guide) (Guía en la cámara) Select items Set: Seleccione imágenes Ajuste: The operation guide for the selected item is displayed. La guía de funcionamiento del elemento seleccionado aparecerá en pantalla. If you press the / (In-Camera Guide) button (method B) when the MENU screen is not displayed, you can search the guide using keywords or icons. Si pulsa el botón / (Guía en la cámara) (método B) cuando la pantalla MENU no se visualiza, puede buscar en la guía utilizando palabras clave o iconos. Learning more about the camera ("Cyber-shot User Guide") Obtenga más información acerca de la cámara ("Guía del usuario de Cyber-shot") 1 Access the Sony support page. http://www.sony.net/SonyInfo/Support/ Acceda a la página de soporte de Sony. http://www.sony.net/SonyInfo/Support/ 2 Select [United States] from the drop-down list. Seleccione [United States] de la lista desplegable. 3 Search for the model name "DSC-H90" within the site, then find "Cyber-shot User Guide". Busque el nombre del modelo "DSC-H90" en el sitio y, a continuación, busque "Guía del usuario de Cyber-shot".
-
 1
1 -
 2
2
 |
 |
