Sony DSC-TX1/P Cyber-shot® Handbook - Page 45
Burst
 |
UPC - 027242766686
View all Sony DSC-TX1/P manuals
Add to My Manuals
Save this manual to your list of manuals |
Page 45 highlights
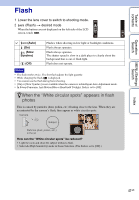
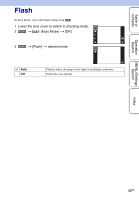
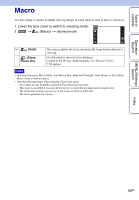
Table of contents Operation Search MENU/Settings Search Burst The camera shoots up to 10 continuous frames in one burst when you hold down the shutter button. 1 Lower the lens cover to switch to shooting mode. 2 (Burst) t desired mode When the buttons are not displayed on the left side of the LCD screen, touch . (Off) (High) (Mid) (Low) Records a single image. Shoots up to 10 images in succession. Shoots up to 5 images in succession. Shoots up to 2 images in succession. Notes • Burst mode is not available for Sweep Panorama, Movie Mode, Anti Motion Blur, Hand-held Twilight, Smile Shutter or Easy Mode. • The flash is set to [Off]. • When recording with the self-timer, a series of a maximum of five images is recorded. • In slow shutter speed conditions, the burst of shots per second may be decreased. • The recording interval becomes longer, depending on the setting for the image size. • [VGA] image size will be set while recording on internal memory. • When the battery level is low, or when the internal memory or a "Memory Stick Duo" media is full, the burst stops. • The focus, white balance, and exposure are adjusted for the first image, and these settings are also used for the other images. zAbout the recording of burst shooting images After shooting burst images, the shot images are displayed in frames on the LCD screen. When all the images are fitted in the frames, recording is completed. You can stop the recording by touching [Cancel recording] t [OK]. When stopped, the image displayed in index and images in the image processing are recorded. Index 45GB
-
 1
1 -
2
-
3
-
4
-
5
-
6
-
7
-
8
-
9
-
10
-
11
-
12
-
13
-
14
-
15
-
16
-
17
-
18
-
19
-
20
-
21
-
22
-
23
-
24
-
25
-
26
-
27
-
28
-
29
-
30
-
31
-
32
-
33
-
34
-
35
-
36
-
37
-
38
-
39
-
 40
40 -
 41
41 -
 42
42 -
 43
43 -
 44
44 -
 45
45 -
 46
46 -
 47
47 -
 48
48 -
 49
49 -
 50
50 -
51
-
52
-
53
-
54
-
55
-
56
-
57
-
58
-
59
-
60
-
61
-
62
-
63
-
64
-
65
-
66
-
67
-
68
-
69
-
70
-
71
-
72
-
73
-
74
-
75
-
76
-
77
-
78
-
79
-
80
-
81
-
82
-
83
-
84
-
85
-
86
-
87
-
88
-
89
-
90
-
91
-
92
-
93
-
94
-
95
-
96
-
97
-
98
-
99
-
100
-
101
-
102
-
103
-
104
-
105
-
106
-
107
-
108
-
109
-
110
-
111
-
112
-
113
-
114
-
115
-
116
-
117
-
118
-
119
-
120
-
121
-
122
-
123
-
124
-
125
-
126
-
127
-
128
-
129
-
130
-
131
-
132
-
133
-
134
-
135
-
136
-
137
-
138
-
139
-
140
-
141
-
142
-
143
-
144
-
145
-
146
-
147
-
148
-
149
-
150
 |
 |