Sony DSC-TX7/R Cyber-shot® Handbook - Page 29
Changing the shooting direction or image size of a, panoramic image
 |
UPC - 027242779167
View all Sony DSC-TX7/R manuals
Add to My Manuals
Save this manual to your list of manuals |
Page 29 highlights
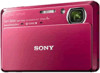
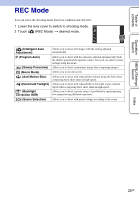
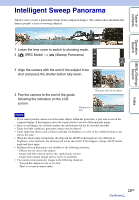
Table of contents zChanging the shooting direction or image size of a panoramic image Shooting Direction: Image Size: (Shooting Direction) t [Right], [Left], [Up] or [Down] (Image Size) t [Standard] or [Wide] zTips for shooting a panoramic image Pan the camera in an arc at a constant velocity in the direction indicated on the LCD screen. Subjects at rest are more suited for panorama shots than moving subjects. Vertical direction Horizontal direction Operation Search MENU/Settings Search Index Radius as short as possible • Determine the scene and press the shutter button halfway, so that you can lock the exposure and white balance. • Adjust the frame composition so that a portion with greatly varied scenery is in the center of the image. zScrolling the panoramic images for display Scroll panoramic images by touching while panoramic images are being displayed. Touch the LCD screen during playback to display the operation buttons. Shows the displayed area of the whole panoramic image Operation button/ Operation method Touch screen or the LCD Touch / / / or drag up/down/right/ left Action Playbacks scrolling images/pauses Scrolls images • Panoramic images can also be played back using the supplied software "PMB" (page 131). • Panoramic images recorded using another camera may not scroll correctly when played. 29GB
-
 1
1 -
2
-
3
-
4
-
5
-
6
-
7
-
8
-
9
-
10
-
11
-
12
-
13
-
14
-
15
-
16
-
17
-
18
-
19
-
20
-
21
-
22
-
23
-
 24
24 -
 25
25 -
 26
26 -
 27
27 -
 28
28 -
 29
29 -
 30
30 -
 31
31 -
 32
32 -
 33
33 -
 34
34 -
35
-
36
-
37
-
38
-
39
-
40
-
41
-
42
-
43
-
44
-
45
-
46
-
47
-
48
-
49
-
50
-
51
-
52
-
53
-
54
-
55
-
56
-
57
-
58
-
59
-
60
-
61
-
62
-
63
-
64
-
65
-
66
-
67
-
68
-
69
-
70
-
71
-
72
-
73
-
74
-
75
-
76
-
77
-
78
-
79
-
80
-
81
-
82
-
83
-
84
-
85
-
86
-
87
-
88
-
89
-
90
-
91
-
92
-
93
-
94
-
95
-
96
-
97
-
98
-
99
-
100
-
101
-
102
-
103
-
104
-
105
-
106
-
107
-
108
-
109
-
110
-
111
-
112
-
113
-
114
-
115
-
116
-
117
-
118
-
119
-
120
-
121
-
122
-
123
-
124
-
125
-
126
-
127
-
128
-
129
-
130
-
131
-
132
-
133
-
134
-
135
-
136
-
137
-
138
-
139
-
140
-
141
-
142
-
143
-
144
-
145
-
146
-
147
-
148
-
149
-
150
-
151
-
152
-
153
-
154
-
155
-
156
-
157
-
158
-
159
-
160
-
161
-
162
-
163
-
164
-
165
-
166
-
167
-
168
 |
 |