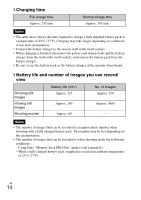
Sony DSC-TX9 Instruction Manual - Page 19
Setting the date and time/display color, and touch [OK].
 |
UPC - 027242793088
View all Sony DSC-TX9 manuals
Add to My Manuals
Save this manual to your list of manuals |
Page 19 highlights
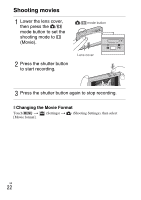
Setting the date and time/display color 1 Lower the lens cover. The camera is turned on. The power lamp lights up only when the camera starts up. • You can also turn on the camera by pressing the ON/OFF (Power) button. • It may take time for the power to turn on and allow operation. Lens cover ON/OFF (Power) button GB 2 Select the desired date display format, then touch [OK]. 3 Select Daylight Savings [On]/[Off], then touch [OK]. 4 Select the item to be set, then set the value with v/V and touch [OK]. • Midnight is indicated as 12:00 AM, and noon as 12:00 PM. 5 Select your desired area with b/B, then touch [OK] t [OK]. 6 Select a desired display color, then touch [OK]. GB 19
-
 1
1 -
2
-
3
-
4
-
5
-
6
-
7
-
8
-
9
-
10
-
11
-
12
-
13
-
 14
14 -
 15
15 -
 16
16 -
 17
17 -
 18
18 -
 19
19 -
 20
20 -
 21
21 -
 22
22 -
 23
23 -
 24
24 -
25
-
26
-
27
-
28
-
29
-
30
-
31
-
32
-
33
-
34
-
35
-
36
-
37
-
38
-
39
-
40
-
41
-
42
-
43
-
44
-
45
-
46
-
47
-
48
-
49
-
50
-
51
-
52
-
53
-
54
-
55
-
56
-
57
-
58
-
59
-
60
-
61
-
62
-
63
-
64
-
65
-
66
-
67
-
68
 |
 |

GB
19
GB
Setting the date and time/display color
1
Lower the lens cover.
The camera is turned on. The power
lamp lights up only when the camera
starts up.
• You can also turn on the camera
by pressing the ON/OFF (Power)
button.
• It may take time for the power to
turn on and allow operation.
2
Select the desired date display format, then touch
[OK].
3
Select Daylight Savings [On]/[Off], then touch [OK].
4
Select the item to be set, then set the value with
v
/
V
and touch [OK].
• Midnight is indicated as 12:00 AM, and noon as 12:00 PM.
5
Select your desired area with
b
/
B
, then touch [OK]
t
[OK].
6
Select a desired display color, then touch [OK].
ON/OFF (Power) button
Lens cover