Sony DSCW1 Service Manual - Page 74
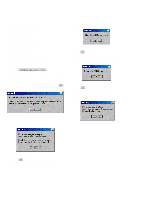
CAMERA°Adjustment°3°Start], The Automatic Adjustment Program executes the 1. Data Set
 |
UPC - 027242649064
View all Sony DSCW1 manuals
Add to My Manuals
Save this manual to your list of manuals |
Page 74 highlights
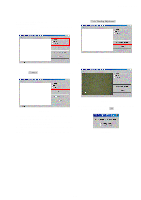
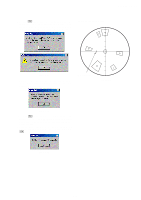
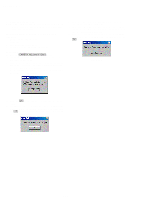
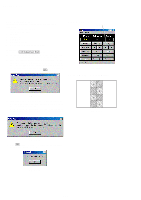
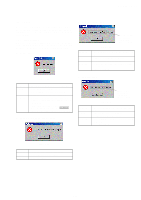
DSC-W1/W12 5. CAMERA Adjustment 3 [Automatic Adjustment Program execution items and sequence] 1. Data Setting during Camera Adj. 2. Picture Frame Setting 3. F No. Compensation 4. Mechanical Shutter Adj. 5. Light Value Adj. 6. AWB 3200K Standard Data Input 7. AWB 5800K Standard Data Input 8. AWB 5800K Check 9. AWB 3200K Check 10. CCD Linearity Check 11. Color Reproduction Adj. 12. CCD White Defect Compensation Check 13. CCD Black Defect Compensation Check 14. Release of Data Setting during Camera Adj. [Adjusting method] 1) Click the [CAMERA Adjustment 3 Start] button. 2) The Automatic Adjustment Program executes the "1. Data Set- ting during Camera Adj.". 3) Upon successful completion of "1. Data Setting during Cam- era Adj.", "2. Picture Frame Setting" is executed. The following message is displayed, and then referring to Fig. 6-1-22 to Fig. 6-1-24 (See page 6-16), set the subject and click the [OK] button. 5) Upon successful completion of the "AWB 3200K Check", the following message is displayed. Set the filter in accordance with the message. Fig. 6-1-32 6) Click the [OK] button, and the "7. AWB 5800K Standard Data Input" and "8. AWB 5800K Check" will be executed. 7) Upon successful completion of the "AWB 5800K Check", the following message is displayed. Set the filter in accordance with the message. Fig. 6-1-33 8) Click the [OK] button, and the "9. AWB 3200K Check" and "10. CCD Linearity Check" will be executed. 9) Upon successful completion of "10. CCD Linearity Check", the following message is displayed. Change the chart in accordance with the message. Fig. 6-1-30 After that, the next message is displayed. Then, change the chart in accordance with the message. Fig. 6-1-34 Fig. 6-1-31 4) Click the [OK] button, and the items from "3. F No. Compen- sation" to "6. AWB 3200K Standard Data Input" will be executed. 6-18
-
 1
1 -
2
-
3
-
4
-
5
-
6
-
7
-
8
-
9
-
10
-
11
-
12
-
13
-
14
-
15
-
16
-
17
-
18
-
19
-
20
-
21
-
22
-
23
-
24
-
25
-
26
-
27
-
28
-
29
-
30
-
31
-
32
-
33
-
34
-
35
-
36
-
37
-
38
-
39
-
40
-
41
-
42
-
43
-
44
-
45
-
46
-
47
-
48
-
49
-
50
-
51
-
52
-
53
-
54
-
55
-
56
-
57
-
58
-
59
-
60
-
61
-
62
-
63
-
64
-
65
-
66
-
67
-
68
-
 69
69 -
 70
70 -
 71
71 -
 72
72 -
 73
73 -
 74
74 -
 75
75 -
 76
76 -
 77
77 -
 78
78 -
 79
79 -
80
-
81
-
82
-
83
-
84
-
85
 |
 |