Sony DSLR-A100K Read This First - Page 4
Prepare the battery pack, CHARGE lamp - battery charger
 |
View all Sony DSLR-A100K manuals
Add to My Manuals
Save this manual to your list of manuals |
Page 4 highlights
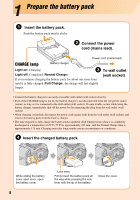
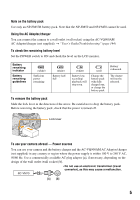
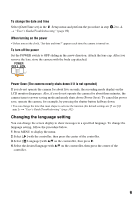
Prepare the battery pack 1 Insert the battery pack. Push the battery pack until it clicks. 2 Connect the power cord (mains lead). Power cord (mains lead) CHARGE lamp Battery charger Light on: Charging 3 To wall outlet Light off: Completed (Normal Charge) (wall socket) If you continue charging the battery pack for about one more hour until it is fully charged (Full Charge), the charge will last slightly longer. • Connect the battery charger to an easily accessible wall outlet (wall socket) close by. • Even if the CHARGE lamp is not lit, the battery charger is not disconnected from the AC power source (mains) as long as it is connected to the wall outlet (wall socket). If some trouble occurs while using the battery charger, immediately shut off the power by disconnecting the plug from the wall outlet (wall socket). • When charging is finished, disconnect the power cord (mains lead) from the wall outlet (wall socket), and remove the battery pack from the battery charger. • The time required to fully charge the battery pack (supplied) (Full Charge) from when it is completely discharged at a temperature of 25°C (77°F) is approximately 235 min., and the Normal Charge time is approximately 175 min. Charging may take longer under certain circumstances or conditions. 4 Insert the charged battery pack. While sliding the battery cover open lever, open the battery cover. 4 Lock lever Firmly insert the battery pack all the way while pressing the lock lever with the tip of the battery. Close the cover.
-
 1
1 -
 2
2 -
 3
3 -
 4
4 -
 5
5 -
 6
6 -
 7
7 -
 8
8 -
 9
9 -
 10
10 -
11
-
12
-
13
-
14
-
15
-
16
-
17
-
18
-
19
 |
 |
