Sony F23 Product Manual (CAF101 Operations Manual 1st ED) - Page 27
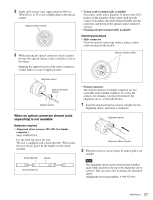
When an optical connector cleaner sold, separately is not available
 |
View all Sony F23 manuals
Add to My Manuals
Save this manual to your list of manuals |
Page 27 highlights
2 Apply sufficient pressure (approximately 600 g to 700 g [20 oz. to 25 oz.]) to slightly depress the optical contact. Optical contacts (white) 3 While pressing the optical connector cleaner against the tip of the optical contact, rotate it clockwise four or five times. Gripping the support section of the optical connector cleaner makes it easier to apply pressure. • Cotton swab (commercially available) Use cotton swabs with a diameter of about 4 mm (5/32 inches). If the diameter of the cotton swab exceeds 5 mm (7/32 inches), the swab will not fit fully into the connector, and the tip of the optical contact cannot be cleaned. • Cleaning alcohol (commercially available) Cleaning procedure • Male connector Clean the optical contact tips (white), using a cotton swab moistened with alcohol. Optical contacts (white) Alignment sleeve Optical connector cleaner Support section When an optical connector cleaner (sold separately) is not available Materials required • Alignment sleeve remover HC-001 (for female connector) Sony J-6480-010-A Use the short-tip end of the tool. The tool is equipped with a shock absorber. When using the tool, always grip it by the handle, not the shock absorber. Shock absorber Handle Use short-tip end • Female connector The optical contacts of a female connector are not accessible in the normal condition. To access the contacts for cleaning, you must first remove the alignment sleeve, as described below. 1 Insert the alignment sleeve remover straight into the alignment sleeve, and rotate it clockwise. Alignment sleeve Alignment sleeve remover 2 When the remover can no longer be turned, pull it out straight. NNoottee The alignment sleeve can be removed and installed again while attached to the tip of the alignment sleeve remover. Take care not to lose or damage the alignment sleeve. (Alignment sleeve part number: 9-980-074-01) 27 Maintenance
-
 1
1 -
2
-
3
-
4
-
5
-
6
-
7
-
8
-
9
-
10
-
11
-
12
-
13
-
14
-
15
-
16
-
17
-
18
-
19
-
20
-
21
-
 22
22 -
 23
23 -
 24
24 -
 25
25 -
 26
26 -
 27
27 -
 28
28 -
 29
29 -
 30
30 -
 31
31 -
 32
32
 |
 |
