Sony GPS-CS3KA Operating Instructions - Page 6
Displaying images where they were taken and the route you traveled on a map - gps image tracker
 |
UPC - 027242760660
View all Sony GPS-CS3KA manuals
Add to My Manuals
Save this manual to your list of manuals |
Page 6 highlights
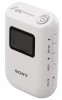
Displaying images where they were taken and the route you traveled on a map 1 Step Recording the traveled route , See page 14. 1 Insert an LR6/HR6 (size AA) battery (sold separately) into the GPS unit, and turn it on. Make sure that the triangulating symbol ( to ) appears on the LCD screen. 2 When you use the GPS unit for the first time, the [Time Zone] screen appears. Select the time difference using V/v based on GMT, then press ENTER. See page 17 on the GMT time difference for each country/region. 3 Set the correct time on your camera. Refer to the operating instructions of the camera. 4 Carry the GPS unit and the camera together. 2 Step Applying the recording positioning information to images , See page 20. 1 Insert the "Memory Stick Duo" media or the SD memory card that contains the recorded images into the GPS unit. 2 Press MENU, then select [Matching] t [Start]. When the GPS unit has applied the positioning information to the images, [Complete] appears. 3 Install the supplied software (GPS Image Tracker, PMB, and PMB Launcher) on your computer. • You may apply positioning information to images using the supplied GPS Image Tracker (p. 26). • If you are using media other than "Memory Stick Duo" media or SD memory cards, see page 26. • When you want to adjust or change the location of the images on a map, refer to the GPS Image Tracker Help. 6
-
 1
1 -
 2
2 -
 3
3 -
 4
4 -
 5
5 -
 6
6 -
 7
7 -
 8
8 -
 9
9 -
 10
10 -
 11
11 -
 12
12 -
13
-
14
-
15
-
16
-
17
-
18
-
19
-
20
-
21
-
22
-
23
-
24
-
25
-
26
-
27
-
28
-
29
-
30
-
31
-
32
-
33
-
34
-
35
-
36
-
37
-
38
-
39
-
40
-
41
-
42
-
43
-
44
-
45
-
46
-
47
-
48
-
49
-
50
-
51
-
52
-
53
-
54
-
55
-
56
-
57
-
58
-
59
-
60
-
61
-
62
-
63
-
64
-
65
-
66
-
67
-
68
-
69
-
70
-
71
-
72
-
73
-
74
-
75
-
76
-
77
-
78
-
79
-
80
-
81
-
82
-
83
-
84
-
85
-
86
-
87
-
88
 |
 |
