Sony HCD-FX900W Operating Instructions - Page 76
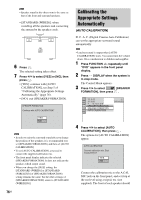
Calibrating the Appropriate Settings Automatically, AUTO CALIBRATION
 |
View all Sony HCD-FX900W manuals
Add to My Manuals
Save this manual to your list of manuals |
Page 76 highlights
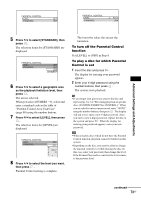
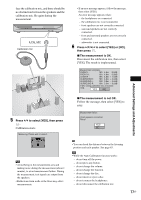
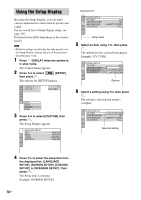
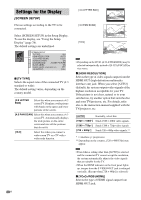
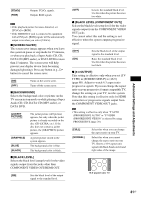
Note • Speaker sound in the other room is the same as that of the front and surround speakers. • [STANDARD (WIRED)]: when installing all the speakers and connecting the system by the speaker cords. 6 Press . The selected setting takes effect. 7 Press X/x to select [YES] or [NO], then press . • [YES]: continue with [AUTO CALIBRATION], see Step 5 of "Calibrating the Appropriate Settings Automatically" (page 76). • [NO]: exit [SPEAKER FORMATION]. SPEAKER FORMATION Continue with AUTO CALIBRATION? YES NO Note • In order to enjoy the surround sound after you change the position of the speakers, it is recommended you set [SPEAKER FORMATION], and then set [AUTO CALIBRATION]. • To set [AUTO CALIBRATION], you need to connect the supplied calibration mic. • The front panel display indicates the selected [SPEAKER FORMATION]. It does not indicate the speakers which output sound. • When you change the [SIZE] setting, the [STANDARD (WIRED)] or [STANDARD (WIRELESS)] of [SPEAKER FORMATION] setting remains the same, but the other settings of [SPEAKER FORMATION] return to [STANDARD (WIRELESS)]. 76US Calibrating the Appropriate Settings Automatically (AUTO CALIBRATION) D. C. A. C. (Digital Cinema Auto Calibration) can set the appropriate surround sound automatically. Note • Loud test sound is output when [AUTO CALIBRATION] starts. You cannot turn the volume down. Give consideration to children and neighbor. 1 Press FUNCTION +/- repeatedly until "DVD" appears in the front panel display. 2 Press DISPLAY when the system is in stop mode. The Control Menu appears. 3 Press X/x to select [SPEAKER FORMATION], then press . 1 ( 4 4 ) 3 ( 2 8 ) T 0:03:04 SPEAKER FORMATION SPEAKER FORMATION AUTO CALIBRATION DVD VIDEO 4 Press X/x to select [AUTO CALIBRATION], then press . The options for [AUTO CALIBRATION] appear. AUTO CALIBRATION Connect calibration mic. Start measurement? YES NO Connect the calibration mic to the A.CAL MIC jack on the front panel, and set it up at the ear level using a tripod, etc. (not supplied). The front of each speaker should
-
 1
1 -
2
-
3
-
4
-
5
-
6
-
7
-
8
-
9
-
10
-
11
-
12
-
13
-
14
-
15
-
16
-
17
-
18
-
19
-
20
-
21
-
22
-
23
-
24
-
25
-
26
-
27
-
28
-
29
-
30
-
31
-
32
-
33
-
34
-
35
-
36
-
37
-
38
-
39
-
40
-
41
-
42
-
43
-
44
-
45
-
46
-
47
-
48
-
49
-
50
-
51
-
52
-
53
-
54
-
55
-
56
-
57
-
58
-
59
-
60
-
61
-
62
-
63
-
64
-
65
-
66
-
67
-
68
-
69
-
70
-
 71
71 -
 72
72 -
 73
73 -
 74
74 -
 75
75 -
 76
76 -
 77
77 -
 78
78 -
 79
79 -
 80
80 -
 81
81 -
82
-
83
-
84
-
85
-
86
-
87
-
88
-
89
-
90
-
91
-
92
-
93
-
94
-
95
-
96
-
97
-
98
-
99
-
100
-
101
-
102
-
103
-
104
-
105
-
106
-
107
-
108
-
109
-
110
-
111
-
112
 |
 |
