Sony HDR CX100 Handycam® Handbook - Page 57
recording device a disc recorder, Connect your camcorder to
 |
UPC - 027242765023
View all Sony HDR CX100 manuals
Add to My Manuals
Save this manual to your list of manuals |
Page 57 highlights
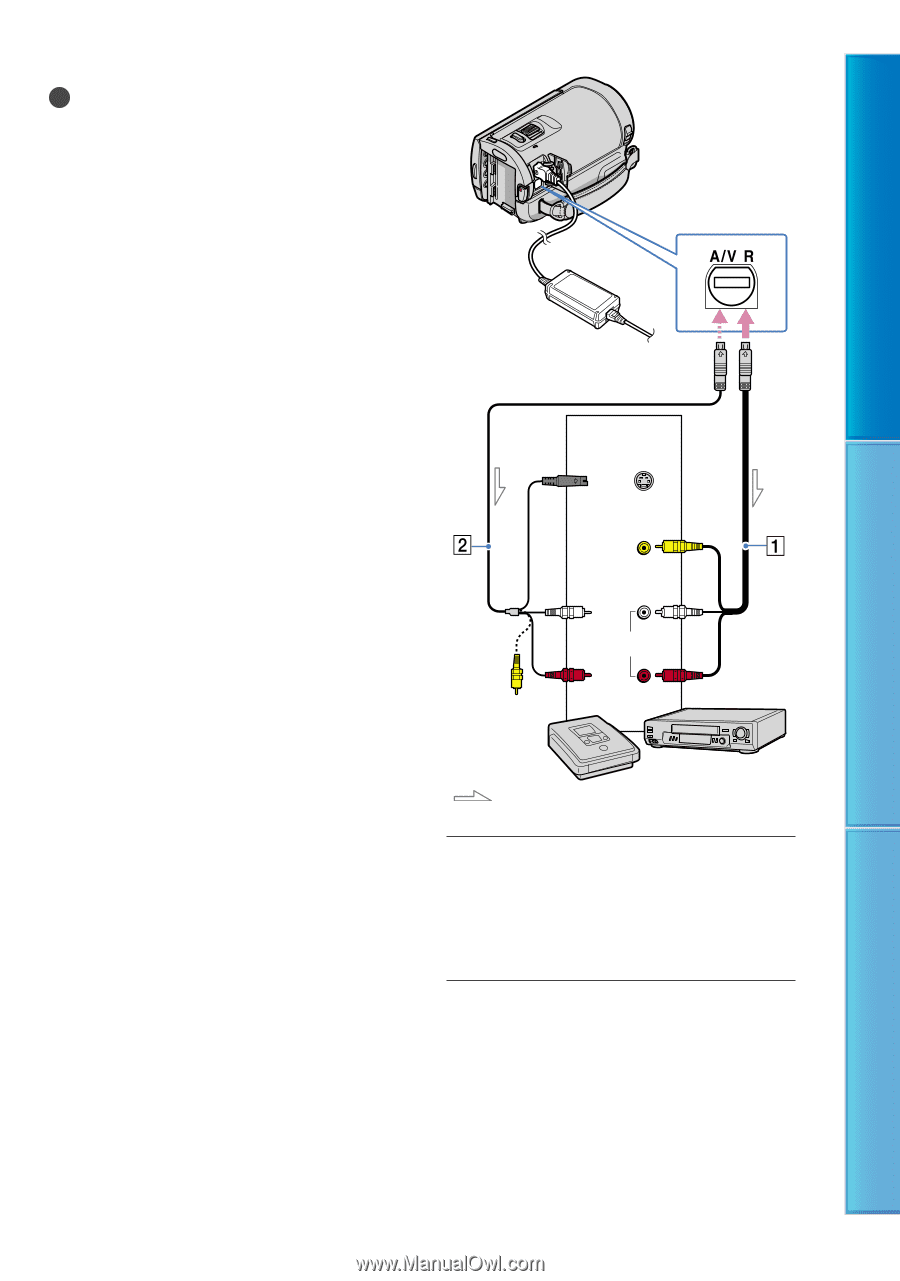
Table of Contents countries/regions. Notes Connect your camcorder to the wall outlet (wall socket) using the supplied AC Adaptor for this operation (p. 18). High definition image quality (HD) movies will be dubbed with standard definition image quality (SD). A/V connecting cable (supplied) Connect the A/V connecting cable to the input jack of another device. A/V connecting cable with S VIDEO (sold separately) When connecting to another device via the S VIDEO jack, by using an A/V connecting cable with an S VIDEO cable (sold separately), higher quality images can be produced than with an A/V connecting cable. Connect the white and red plug (left/right audio) and the S VIDEO plug (S VIDEO channel) of the A/V connecting cable with an S VIDEO cable. If you connect the S VIDEO plug only, you will hear no sound. The yellow plug (video) connection is not necessary. AV Remote Connector Input S VIDEO (Yellow) VIDEO (Yellow) (White) AUDIO (Red) Useful Recording Techniques Index Signal flow Insert the recording media in the recording device. If your recording device has an input selector, set it to the input mode. Connect your camcorder to the recording device (a disc recorder, etc.) with the A/V connecting cable (supplied) or an A/V connecting cable with S VIDEO (sold separately). Connect your camcorder to the input jacks 57
-
 1
1 -
2
-
3
-
4
-
5
-
6
-
7
-
8
-
9
-
10
-
11
-
12
-
13
-
14
-
15
-
16
-
17
-
18
-
19
-
20
-
21
-
22
-
23
-
24
-
25
-
26
-
27
-
28
-
29
-
30
-
31
-
32
-
33
-
34
-
35
-
36
-
37
-
38
-
39
-
40
-
41
-
42
-
43
-
44
-
45
-
46
-
47
-
48
-
49
-
50
-
51
-
 52
52 -
 53
53 -
 54
54 -
 55
55 -
 56
56 -
 57
57 -
 58
58 -
 59
59 -
 60
60 -
 61
61 -
 62
62 -
63
-
64
-
65
-
66
-
67
-
68
-
69
-
70
-
71
-
72
-
73
-
74
-
75
-
76
-
77
-
78
-
79
-
80
-
81
-
82
-
83
-
84
-
85
-
86
-
87
-
88
-
89
-
90
-
91
-
92
-
93
-
94
-
95
-
96
-
97
-
98
-
99
-
100
-
101
-
102
-
103
-
104
-
105
-
106
-
107
-
108
-
109
-
110
-
111
-
112
-
113
 |
 |