Sony HDR-TG5 Operating Guide - Page 29
Handycam Station Cradle or the, Dedicated USB Terminal Adaptor
 |
UPC - 027242763005
View all Sony HDR-TG5 manuals
Add to My Manuals
Save this manual to your list of manuals |
Page 29 highlights
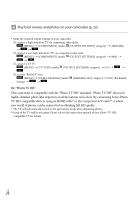
Set the camcorder onto the "Handycam" Station Cradle. Turn on the camcorder by opening the LCD screen. Connect the (USB) jack of the "Handycam" Station Cradle or the Dedicated USB Terminal Adaptor and the computer with the USB cable (supplied). The [USB SELECT] screen appears on the camcorder screen automatically. Touch [ USB CONNECT] on the camcorder screen. If the [USB SELECT] screen does not appear, touch (MENU) [USB CONNECT] (under [OTHERS] category). Read the terms of the license agreement carefully. If you agree to the terms, change to , and then click [Next] [Install]. Follow the on-screen instructions to install the software. Depending on the computer, you may need to install third party software. If the installation screen appears, follow the instructions to install the required software. Restart the computer if required to complete the installation. When the installation is completed, following icons will appear. Remove the CD-ROM from your computer. Other icons may appear. No icon may appear depending on the installation procedure. The "Handycam" Handbook is not installed in this procedure (p. 54). Saving movies and photos with a computer Click [Continue] on the computer screen. US 29
-
 1
1 -
2
-
3
-
4
-
5
-
6
-
7
-
8
-
9
-
10
-
11
-
12
-
13
-
14
-
15
-
16
-
17
-
18
-
19
-
20
-
21
-
22
-
23
-
 24
24 -
 25
25 -
 26
26 -
 27
27 -
 28
28 -
 29
29 -
 30
30 -
 31
31 -
 32
32 -
 33
33 -
 34
34 -
35
-
36
-
37
-
38
-
39
-
40
-
41
-
42
-
43
-
44
-
45
-
46
-
47
-
48
-
49
-
50
-
51
-
52
-
53
-
54
-
55
-
56
-
57
-
58
-
59
-
60
-
61
-
62
-
63
-
64
-
65
-
66
-
67
-
68
-
69
-
70
-
71
-
72
-
73
-
74
-
75
-
76
-
77
-
78
-
79
-
80
-
81
-
82
-
83
-
84
-
85
-
86
-
87
-
88
-
89
-
90
-
91
-
92
-
93
-
94
-
95
-
96
-
97
-
98
-
99
-
100
-
101
-
102
-
103
-
104
-
105
-
106
-
107
-
108
-
109
-
110
-
111
-
112
-
113
-
114
-
115
-
116
-
117
-
118
-
119
-
120
-
121
-
122
-
123
-
124
-
125
-
126
-
127
-
128
-
129
-
130
-
131
-
132
-
133
-
134
-
135
 |
 |
