Sony HDR-XR350V Operating Guide - Page 43
Importing movies and photos to a computer, Click [Import].
 |
UPC - 027242788794
View all Sony HDR-XR350V manuals
Add to My Manuals
Save this manual to your list of manuals |
Page 43 highlights
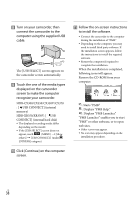
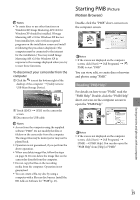
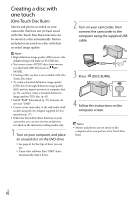
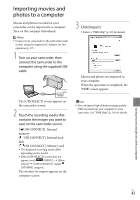
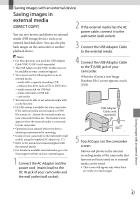
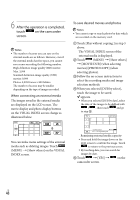
Importing movies and photos to a computer Movies and photos recorded on your camcorder can be imported to a computer. Turn on the computer beforehand. Notes Connect your camcorder to the wall outlet (wall socket) using the supplied AC Adaptor for this operation (p. 17). 1 Turn on your camcorder, then connect the camcorder to the computer using the supplied USB cable. 3 Click [Import]. Refer to "PMB Help" (p. 39) for details. Movies and photos are imported to your computer. When the operation is completed, the "PMB" screen appears. The [USB SELECT] screen appears on the camcorder screen. 2 Touch the recording media that contains the images you want to save on the camcorder screen. [ USB CONNECT]: Internal memory [ USB CONNECT]: Internal hard disk [ USB CONNECT]: Memory card The displayed recording media differ depending on the model. If the [USB SELECT] screen does not appear, touch (MENU) [Show others] [USB CONNECT] (under [OTHERS] category). The window for import appears on the computer screen. Tips You can export high definition image quality (HD) movies from your computer to your camcorder. See "PMB Help" (p. 39) for details. Saving movies and photos with a computer US 43
-
 1
1 -
2
-
3
-
4
-
5
-
6
-
7
-
8
-
9
-
10
-
11
-
12
-
13
-
14
-
15
-
16
-
17
-
18
-
19
-
20
-
21
-
22
-
23
-
24
-
25
-
26
-
27
-
28
-
29
-
30
-
31
-
32
-
33
-
34
-
35
-
36
-
37
-
 38
38 -
 39
39 -
 40
40 -
 41
41 -
 42
42 -
 43
43 -
 44
44 -
 45
45 -
 46
46 -
 47
47 -
 48
48 -
49
-
50
-
51
-
52
-
53
-
54
-
55
-
56
-
57
-
58
-
59
-
60
-
61
-
62
-
63
-
64
-
65
-
66
-
67
-
68
-
69
-
70
-
71
-
72
-
73
-
74
-
75
-
76
-
77
-
78
-
79
-
80
-
81
-
82
-
83
-
84
-
85
-
86
-
87
-
88
-
89
-
90
-
91
-
92
-
93
-
94
-
95
-
96
-
97
-
98
-
99
-
100
-
101
-
102
-
103
-
104
-
105
-
106
-
107
-
108
-
109
-
110
-
111
-
112
-
113
-
114
-
115
-
116
-
117
-
118
-
119
-
120
-
121
-
122
-
123
-
124
-
125
-
126
-
127
-
128
-
129
-
130
-
131
-
132
-
133
-
134
-
135
-
136
-
137
-
138
-
139
-
140
-
141
-
142
-
143
-
144
-
145
-
146
-
147
-
148
-
149
-
150
-
151
-
152
-
153
-
154
-
155
 |
 |
