Sony ICF-C1IP Operating Instructions - Page 2
DST/Summer Time adjustment - ipod dock clock radio
 |
UPC - 027242721722
View all Sony ICF-C1IP manuals
Add to My Manuals
Save this manual to your list of manuals |
Page 2 highlights
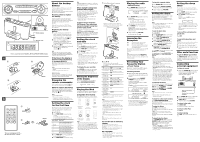
FM wire antenna AC power cord There is a tactile dot on the VOLUME +, N/X and PRESET TUNING 3 button. A 1 2 RESET 3 RESET CR2032 B RESET 1 CR2025 2 g There is a tactile dot on the VOL +, N/X, M and PRESET + button. About the backup battery To keep good time, as a backup power source, this unit has one CR2032 battery inside of the unit in addition to the house current. The battery keeps the clock and the alarm operating in the event of a power interruption. Knowing when to replace the battery If a power interruption occurs when the battery is weak, the brightness of characters in the display darkens. If the battery runs out during the interruption, the current time and alarm functions will be initialized. Replace the battery with a Sony CR2032 lithium battery. Use of another battery may present a risk of fire or explosion. Replacing the backup battery 1 Keep the AC plug connected to the AC outlet, remove the screw that secures the battery compartment at the bottom of the unit using a screwdriver, and remove the battery compartment. (See Fig. A-1) 2 Insert a new battery in the battery compartment with the e side facing up. To remove the battery from the battery compartment, push it out from the side marked PUSH. (See Fig. A-2) 3 Insert the battery compartment back into the unit and secure it with the screw. (See Fig. A-3) Note When you replace the battery, keep the AC plug connected to a wall outlet. Otherwise, current time and alarms will be initialized if the replacement is not completed within around one minute. If the time in the display is incorrect after the battery is changed (RESET) Push the Reset switch with the pointed device. The Reset switch is in the small hole located in the battery compartment. Notes • You cannot reset unless the lithium battery is installed. • Set the clock again after the unit is reset. Battery Warning When the unit will be left unplugged for a long time, remove the battery to avoid undue battery discharge and damage to the unit from battery leakage. Preparing the remote commander Before using the card remote commander for the first time, remove the insulation film. (See Fig. B-1) When to replace the battery With normal use, the battery (CR2025) should last for about six months. When the remote commander no longer operates the unit, replace the battery with new ones. (See Fig. B-2) Notes • Do not charge the battery. • When you are not going to use the remote commander for a long time, remove the battery to avoid any damage caused by leakage and corrosion. Setting the clock for the first time This unit is preset to the current date and time at the factory, and is powered by the back up battery. All you need to do the first time is just plug it in and select your time zone. 1 Plug in the unit. 2 Press TIME ZONE for more then two seconds. Area number "2" appears in the display. If you live in the Eastern Time zone, you do not need to adjust the area setting. Area number Time zone 1 Atlantic Standard/Daylight Time 2 (default) Eastern Standard/Daylight Time 3 Central Standard/Daylight Time 4 Mountain Standard/Daylight Time 5 Pacific Standard/Daylight Time 6 Yukon Standard/Daylight Time 7 Hawaiian Standard/Daylight Time 3 Press TIME SET + or - repeatedly until the desired number appears. 4 Press TIME ZONE to complete the setting. Note During the shipment and your first use, a clock error may occur. In this case, refer to "Setting the clock and date" to set the correct time. When daylight saving time (summer time) begins This model employs the Automatic Daylight Saving Time/Summer Time adjustment. The DST indicator in the display appears in the display at the beginning of the daylight saving time (summer time), and disappears at the end of it. • Daylight saving time begins at: 2:00 AM on the second Sunday of March. • Standard time begins at: 2:00 AM on the first Sunday of November. To deactivate the Automatic DST/Summer Time adjustment during the daylight saving time (summer time) period. The Automatic DST/Summer Time adjustment can be cancelled. Press CLOCK and TIME ZONE/ALARM DISPLAY for more than two seconds. The Automatic DST/ Summer Time adjustment will be cancelled. To active the Automatic DST/Summer Time adjustment again, repeat the same operation. Setting the clock and date To change the setting manually, follow the procedure from step 1. 1 Press CLOCK for more than 2 seconds. The year will start to flash in the display. 2 Press TIME SET + or - until the correct year appears in the display. 3 Press CLOCK. 4 Repeat steps 2 and 3 to set the month, day and time. After setting the minute the clock starts from 0 seconds. But if you do not set "Minute", the clock does not start from 0 second flat. • Pressing and holding + or - changes the year, month, day or time rapidly. • While setting the clock, you must perform each step within about 65 seconds, or the clock setting mode will be cancelled. To display the year and date Press CLOCK once for the date, and within about 5 seconds press it again for the year. The display shows the date or year for about 5 seconds and then changes back to the current time. Setting the brightness of the display Three levels of brightness are available by pressing SNOOZE/BRIGHTNESS. High (default) t Middle t Low Playing the iPod You can enjoy iPod audio by connecting this unit. To use an iPod, refer to the user's guide of your iPod. Compatible iPod models The compatible iPod models are as follows. Update your iPod to use the latest software before you use it. iPod nano 2nd generation (aluminium) iPod 5th generation (video) iPod nano 1st generation iPod 4th generation (color display) iPod 4th generation iPod mini Notes • The connector of the unit is for sole use for iPod. When you use the devices do not match with the connector, connect it to the AUDIO IN terminal of this unit with the supplied audio connecting cable. • Sony cannot accept responsibility in the event that data recorded to iPod is lost or damaged when using an iPod connected to this unit. 1 Put the iPod into the unit's connector. Adjust the rear support forward or backward checking the back of the iPod fits snugly against the rear support to protect the connector. 2 Press N/X. The iPod begins to play automatically. You can operate the connected iPod by the unit or iPod buttons. To Press Turn off the iPod OFF, or press and hold u Pause playback N/X To resume play, press it again. Go to the next > track Go back to the . previous track Locate a point > (forward) or . while listening to (backward) while playing and the sound hold it until you find the point. Locate a point > (forward) or . while observing (backward) in pause and hold it the display until you find the point. Go back to the MENU* previous menu Select a menu item or a track for playback Execute the selected menu or the playback R/r* ENTER* * These operations are available only when using the supplied remote commander. Notes • When placing or removing the iPod, keep it straight and parallel with the rear support. • Do not carry the unit with an iPod set on the connector. Doing so may cause a malfunction. • When placing or removing the iPod, brace the unit with one hand and take care not to press the controls of the iPod by mistake. • Do not pull on the rear support strongly as it cannot be detached from the unit and may cause a malfunction. • To use an iPod, refer to the user's guide of your iPod. • Before disconnecting the iPod, pause playback. Tip Apple's iPod Universal Dock Adapter can be used with this unit. To use the unit as a battery charger You can use the unit as a battery charger. The charging begins when the iPod is placed on the connector. The charging status appears in the iPod display. For details, see the user's guide of your iPod. On copyrights • iPod is a trademark of Apple Inc., registered in the U.S. and other countries. • All other trademarks and registered trademarks are of their respective holders. In this manual, ™ and ® marks are not specified. Playing the radio -Manual Tuning 1 Press RADIO ON to turn on the radio. The display shows the band and frequency. 2 Press RADIO ON repeatedly to select the desired band. Each press changes the band as follows: FM1 FM2 AM FM1 and FM2 are the same frequency bands. 3 Use TUNING + or - to tune into the desired station. The FM frequency advances or reverses in 0.1 MHz channel steps and the AM frequency in 10 kHz channel steps. 4 Adjust volume using VOLUME. To turn off the radio, press OFF. Improving the Reception FM: Extend the FM wire antenna fully to increase reception sensitivity. AM: Connect the supplied AM loop antenna to the unit. Rotate the antenna horizontally for optimum reception. Keep away iPod from the AM loop antenna or the FM wire antenna, as this may lead to interference of reception. Tip If the FM broadcast is noisy, press FM MODE on the remote commander to turn off "STEREO" in the display. The radio becomes clearer although the sound becomes monaural. Presetting Your Favourite Station -Preset Tuning You can preset up to 10 stations in FM (5 stations in FM1, 5 stations in FM2), and 5 stations in AM. Presetting a Station 1 Follow steps 1 to 4 in "Playing the Radio" and manually tune into the station you wish to preset. 2 Press and hold the desired PRESET TUNING button for more than two seconds for registration. After the preset has finished, the preset number appears on the display. Example: To preset AM 1 260 kHz onto preset 2 button. v a few seconds after To preset another station, repeat these steps. To change the preset station, tune into the desired station and hold down the PRESET TUNING 1 to 5 button. The new station will replace the previous station on the preset button. Tuning into a preset station 1 Press RADIO ON to turn on the radio. 2 Press one of the PRESET TUNING buttons where the desired station is stored. 3 Adjust volume using VOLUME. Setting the alarm The dual alarm function allows you to set two alarm programs (ALARM A and ALARM B). The alarm time can be set for each program and the alarm sound is selectable from RADIO, BUZZER or iPod. Notes • Before setting the alarm, make sure to set the clock (see "Setting the clock and date"). • The factory setting alarm time is "AM 12:00". • To set the radio alarm, first tune in to a station (see "Playing the radio"). To set the alarm time To set ALARM A 1 Press ALARM SET A for a few seconds. 2 Press TIME SET +/- to set the desired hour, and press ALARM SET A. 3 Press TIME SET +/- to set the desired minute, and press ALARM SET A. 4 Press TIME SET +/- to set the desired alarm mode (RADIO, BUZZER or iPod) and press ALARM SET A. 5 If you select the RADIO or iPod, press TIME SET +/- to set the wake up volume and press ALARM SET A. To set ALARM B, follow the same steps above using ALARM B instead of ALARM A. To change the display between ALARM TIME A and ALARM TIME B, press TIME ZONE/ALARM DISPLAY. Notes • When you use the radio alarm, the timed alarm sounds with the last broadcasting station tuned to before the power went off. When you set the radio alarm, select the desired broadcasting station before turning the power off. • The ALARM A (or B) indicator flashes in the display when the alarm sounds. • If a second alarm sounds during a first (or the SNOOZE function is active), the second alarm takes priority. • The alarm function works as usual at the beginning and end day of the daylight saving time (summer time). While the Automatic DST/Summer Time adjustment is set, as a result, if the alarm is set at a time skipped when the daylight saving time (summer time) begins, the alarm is skipped, or if the alarm is set at a time overlapped when the daylight saving time (summer time) ends, the alarm sounds twice. • If the same alarm time is set for both alarm (ALARM A and B), the ALARM A takes priority. To activate the alarm After setting the alarm time, follow these steps: To activate the ALARM A, press ALARM SET A to display ALARM A. To activate the ALARM B, press ALARM SET B to display ALARM B. Notes • The alarm sounds at the set time even if the unit is on. • Make sure the iPod is installed correctly after setting the iPod alarm. To doze for a few more minutes Press SNOOZE/BRIGHTNESS. The sound turns off but will automatically come on again after about 5 minutes. The maximum length of the snooze time is 40 minutes. To stop the Alarm Press OFF to turn off the alarm. The alarm will come on sound again at the same time the next day. If OFF is not pressed, the buzzer alarm sounds continuously for about 3 minutes, and then it stops automatically. The RADIO and iPod sound continuously until OFF is pressed. To deactivate the Alarm Press ALARM SET A (or B) to turn off the ALARM A (or B) indicator from the display. Note on alarm in the event of a power interruption • When the alarm sound is set to RADIO or iPod, it will change to BUZZER automatically. • If the backup battery is exhausted, the alarm will not work in the event of power interruption. Replace the battery periodically. Setting the sleep timer You can fall asleep to the sound using the built-in sleep timer that turns off the unit automatically after a preset duration. 1 Press SLEEP while the unit is turned on. SLEEP appears in the display. 2 Press SLEEP to set the sleep timer duration. Each time you press SLEEP, the duration changes as follows: 90 60 30 15 OFF The display returns to clock mode five seconds after you have finished setting the duration setting and released SLEEP, and then the sleep timer starts. The unit will play for the duration you set, and then shut off. To turn off the unit before the preset time Press OFF. To use both sleep timer and alarm You can fall asleep to the radio and also be awakened by the radio or buzzer alarm at the preset time. 1 Set the alarm. (See "Setting the alarm".) 2 Set the sleep timer. (See "Setting the sleep timer".) Other useful functions To get the MEGA Xpand effect Press MEGA Xpand. "MEGA Xpand" appears in the display. You can get the effect of expansion of the sound field. To return to normal sound, press the button again. Connecting external equipment To listen to sound 1 Connect the AUDIO IN jack of the unit to the line out jack or headphone jack of the external equipment using the audio connecting cable (supplied). Audio connecting cable (supplied) To external equipment 2 Press AUDIO IN to display "AUDIO IN". 3 Play the equipment connected to the AUDIO IN jack. 4 Adjust the volume using VOLUME. To return to the radio Press RADIO ON. The frequency is shown in the display. To return to the iPod Press N/X. To stop listening Press OFF, and stop playback on the connected unit.
-
 1
1 -
 2
2
 |
 |
