Sony ICF-C273 Operating Instructions - Page 2
Using the NAP Timer - alarm
 |
View all Sony ICF-C273 manuals
Add to My Manuals
Save this manual to your list of manuals |
Page 2 highlights
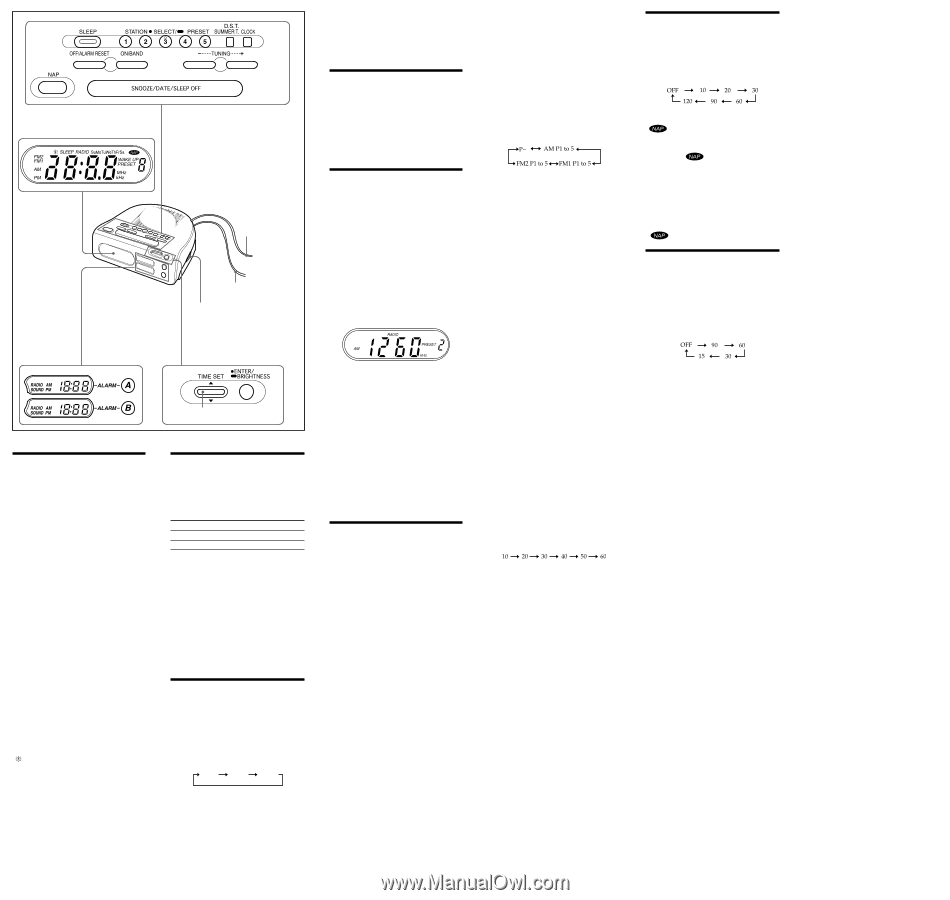
The PRESET TUNING 3 button has a tactile dot. FM wire antenna AC power cord VOLUME There is a tactile dot beside volume to show the direction to turn up the volume. 4 Adjust volume using VOLUME. • To turn off the radio, press OFF/ALARM RESET. • To check the station being received, press TUNING + or - or ON/BAND lightly. The display shows the band and frequency for a few seconds and then changes back to the current time. Improving the Reception FM: Extend the FM wire antenna fully to increase reception sensitivity. AM: Rotate the unit horizontally for optimum reception. A ferrite bar is built in to the unit. Do not operate the unit over a steel desk or metal surface, as this may lead to interference of reception. Presetting Your Favourite Station -Preset Tuning You can preset up to 10 stations in FM (5 stations in FM1, 5 stations in FM2), and 5 stations in AM. Presetting a Station 1 Follow steps 1 to 4 in "Playing the Radio" and manually tune into the station you wish to preset. 2 Hold down the desired STATION•SELECT/PRESET button until you hear two short beeps. Example: To preset AM 1 260 kHz onto preset 2 button. Setting the Clock and Date 1 Plug in the clock radio. The display will flash "AM 12:00". 2 Press CLOCK for a few seconds. You will hear a beep and the year will start to flash in the display. 3 Press Jog lever v (up) or V (down) until the correct year appears in the display. 4 Press ENTER/BRIGHTNESS. 5 Repeat steps 3 and 4 to set the month, day, hour, and minute. After setting the minute, press ENTER/ BRIGHTNESS to start the counting of the seconds, and you will hear two short beeps. • To set the current time rapidly, hold down Jog lever v (up) or V (down). • In step 5, when you press ENTER/BRIGHTNESS after the minute setting to activate the clock, the seconds start counting from zero. • When the alarm setting mode is entered, the clock cannot be set. To display the year and date Press SNOOZE/DATE/SLEEP OFF once for the date, and within 2 seconds press it again for the year. The display shows the date or year for a few seconds and then changes back to the current time. To change the display to the daylight saving time (summer time) indication Press D.S.T./SUMMER T. " " is displayed and the time indication changes to summer time. To deactivate the summer time function, press D.S.T./SUMMER T. again. To set the brightness of the backlight If you cannot see the display clearly, press and hold ENTER/BRIGHTNESS to set the desired brightness (high, middle or low). Jog lever Changing AM Channel Step The AM channel step differs depending on area. The channel step of this unit is factory-set to 10 kHz to change the setting as shown below to be able to listen to the radio. Area Channel step North and South America 10 kHz Other countries/regions 9 kHz 1 Plug in the clock radio. Press OFF/ALARM RESET to turn off the power. 2 While holding down OFF/ALARM RESET, keep pressing ON/BAND for more than 5 seconds. The AM channel step will be changed. If you proceed to step 2 again, the channel step changes again. Notes • When the AM channel step is changed, the preset stations for AM will be initialized. • When the AM channel step is changed, the FM channel step also will be changed. Playing the Radio -Manual Tuning 1 Press ON/BAND to turn on the radio. The display shows the band and frequency for a few seconds and then changes back to the current time. 2 Press ON/BAND repeatedly to select the desired band. Each press changes the band as follows: AM FM1 FM2 When using FM1 or FM2 preset mode, you may listen to the radio on either mode. (See "Presetting Your Favourite Station".) 3 Use TUNING + or - to tune into the desired station. The FM frequency advances or reverses in 0.1 MHz channel steps and the AM frequency in 10 kHz channel steps. Two short beeps sound when the minimum frequency of each band is received during tuning. The display shows the frequency for a few seconds and then changes back to the current time. To preset another station, repeat these steps. To change the preset station, tune into the desired station and hold down the PRESET TUNING 1 to 5 button. The new station will replace the previous station on the preset button. Tuning into a preset station 1 Press ON/BAND to turn on the radio. 2 Press STATION•SELECT/PRESET where the desired station is stored. 3 Adjust volume using VOLUME. After a few seconds, the display will return to the current time but the preset button number will remain. Setting the Alarm You can choose from two types of alarm, Radio or Buzzer. The alarm will come on at the same time everyday. The factory setting alarm time for the radio and buzzer is 12:00am. Notes • Set the current time before setting the alarm. • Radio reception is interrupted while the alarm time is being set. To set the Alarm Time 1 Press and hold ALARM A or ALARM B for a few seconds. After one beep, the hour flashes in the alarm display. 2 Press Jog lever v (up) or V (down) to select the hour. To set the hour rapidly, hold down Jog lever v (up) or V (down). 3 Press ENTER/BRIGHTNESS. After one beep, the minutes flash on the alarm display. 4 Repeat steps 2 and 3 to set the minute. A beep sounds to confirm the time setting. "RADIO•SOUND" appears. You can choose between "RADIO" and "SOUND" modes. Set the alarm mode as follows: • RADIO: see "A Setting the Radio Alarm" • SOUND: see "B Setting the Sound Alarm" A Setting the Radio Alarm For the radio alarm, the station you specified as the wake-up station is played. 1 Perform steps 1 to 4 in "To set the Alarm Time." 2 Press Jog lever v (up) or V (down) to select "RADIO" alarm mode. "WAKE UP STATION" appears in the display. 3 Press ENTER/BRIGHTNESS. After one beep, the preset number flashes in the display. 4 Press Jog lever v (up) or V (down) to select the desired wake-up station. Preset number changes in the order as follows: "P-" is the last received station. You can directly select the desired wake-up station by pressing ON/BAND or the STATION•SELCET/PRESET button while the indication "P-" is not displayed. 5 Press ENTER/BRIGHTNESS. Two short beeps will confirm the setting, and the ALARM A or B display will disappear. B Setting the Sound Alarm For the sound alarm, the sound you specified as the wake-up sound is played. 1 Perform steps 1 to 4 in "To set the Alarm Time." 2 Press Jog lever v (up) or V (down) to select "SOUND" alarm mode. "WAKE UP SOUND" appears in the display. 3 Press ENTER/BRIGHTNESS. The displayed wake-up sound number will sound. 4 Press Jog lever v (up) or V (down) to select the desired wake-up sound. 1: Buzzer 2: "Four seasons: Spring" Antonio Lucio Vivaldi 3: "For Eliza" Ludwig van Beethoven 5 Press ENTER/BRIGHTNESS. Two short beeps will confirm the setting, and the ALARM A or B display will disappear. To Use the Radio and Buzzer Alarm 1 Set both alarm times for ALARM A or ALARM B. (see above). 2 Press ALARM A or B. The ALARM A or B display will be turned on. If the same alarm time is set for both Alarm A and B, Alarm A takes priority. To Doze for a Few More Minutes Press SNOOZE/DATE/SLEEP OFF. The radio or buzzer turns off but will automatically come on again after about 10 minutes. Every time you press SNOOZE/DATE/SLEEP OFF, the snooze time changes as follows: The display shows the snooze time for a few seconds and returns to show the current time. When you press SNOOZE/DATE/SLEEP OFF after the current time appeared, the snooze time starts from 10 minutes again. The maximum length of the snooze time is 60 minutes. To Stop the Alarm Press OFF/ALARM RESET to turn off the alarm. The alarm will come on again at the same time the next day. To Deactivate the Alarm Press ALARM A or ALARM B. The ALARM A or B display turns off. Using the NAP Timer (Count Down Timer) The NAP timer sounds the buzzer after a preset time duration. Press NAP repeatedly until the desired minutes are displayed. Every press changes the display as follows: You will hear two beeps when the display turns from "OFF" to "10". " " appears and the NAP time is displayed for a few seconds. NAP timer starts counting down the NAP time. When selected NAP time has passed, the beep sound comes on, and " " on the display flash. The buzzer is turned off automatically after about 60 minutes. To Stop the NAP Timer Press NAP or OFF/ALARM RESET to turn off the buzzer. To Deactive the NAP Timer Press NAP. " " goes off in the display. Setting the Sleep Timer You can fall asleep to the radio using the built-in sleep timer that turns off the radio automatically after a preset duration. Press SLEEP. The radio turns on. You can set the sleep timer to durations of 90, 60, 30, or 15 minutes. Every push changes the display as follows: You will hear two beeps when the display turns from "OFF" to "90". "SLEEP" will appear in the display when the duration time is set. The radio will play for the duration you set, then shut off. • To turn off the radio before the preset time, press SNOOZE/DATE/SLEEP OFF. To Use Both Sleep Timer and Alarm You can fall asleep to the radio and also be awakened by the radio or buzzer alarm at a preset time. 1 Set the alarm. (See "Setting the Alarm".) 2 Set the sleep timer. (See "Setting the Sleep Timer".)
-
 1
1 -
 2
2
 |
 |