Sony ICF-CD513 Operating Instructions - Page 2
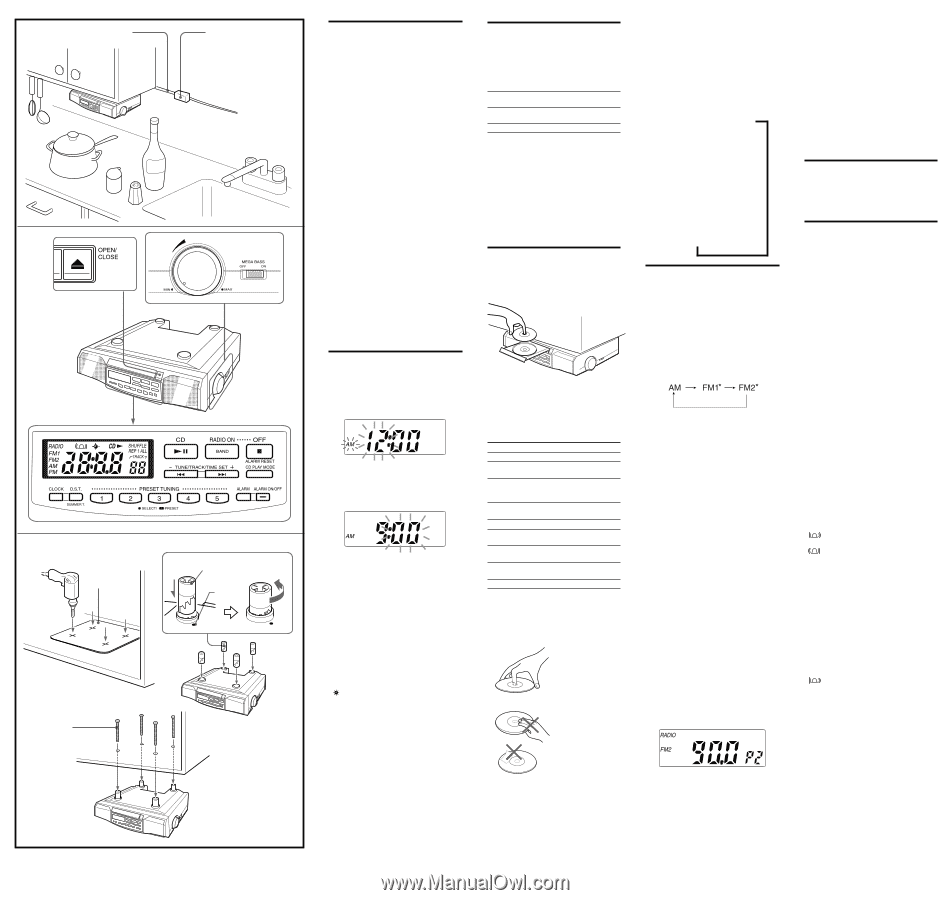
Installing the Unit, Under a Cabinet, Setting the Clock, Changing, AM Channel Step, Playing a CD, - mounting screws
 |
UPC - 027242567955
View all Sony ICF-CD513 manuals
Add to My Manuals
Save this manual to your list of manuals |
Page 2 highlights
AC power cord Cord clamp VOLUME A a b Spacer Template L (Low) Dot H L c Mounting screw Installing the Unit Under a Cabinet (See Fig. A) The unit can be installed without the spacer. 1 Mark the position of the 4 holes by using the supplied template. Use a drill to make the holes (size 6.5 mm dia., 9/32 inch). (See Fig. A-a) 2 When the cabinet door overhangs the shelf and obstructs the unit, you can adjust the unit/shelf height. First set the L mark to the dot which becomes the lowest position, then you can adjust the height in 4 steps (H••L) by turning the spacer counterclockwise. (See Fig. A-b) 3 Install the unit with the supplied mounting screws. (See Fig. A-c) Caution • Since the unit is very heavy, be careful when installing the unit. • To reduce the risk of fire, do not place any heating or cooking appliance beneath this unit. • Install the unit so that its AC power cord can be connected directly to a wall outlet. Do not use a converter or extension cord. • Be sure that the AC power cord has no slack when using the unit, since the cord acts as an FM wire antenna. If the AC power cord has some slack, wind it up to the cord hook until the cord has no slack. • The unit has a built-in ferrite bar antenna for AM radio reception. Check the condition of AM reception before fixing in position. • Install the unit as far as possible from a source of noise. (for example, refrigerator, microwave oven, fluorescent lamp, etc.) Setting the Clock 1 Plug in the clock radio. The display will flash "AM 12:00". 2 Press CLOCK for a few seconds. You will hear a beep and the hour will start to flash in the display. 3 Press TUNE/TRACK/TIME SET + or - until the correct hour appears in the display. 4 Press CLOCK once. The minute will flash. 5 Repeat steps 3 and 4 to set the minute. After setting the minute, press CLOCK to start the counting of the seconds, and you will hear two short beeps. • To set the current time rapidly, hold down TUNE/TRACK/TIME SET + or -. • The clock system varies depending on the model you own. 12-hour system: "AM 12:00" = midnight • In step 5, when you press CLOCK after the minute setting to activate the clock, the seconds start counting from zero. To change the display to the daylight saving time (summer time) indication Press D.S.T./SUMMER T.. " " is displayed and the time indication changes to summer time. To deactivate the summer time function, press D.S.T./SUMMER T. again. Changing AM Channel Step The AM channel step differs depending on areas. The channel step of this unit is factory-set to 9 kHz or 10 kHz to match the frequency allocation system of the country as listed. You can change the channel step. Area North and South American countries Other countries Channel step AM FM 10 kHz 0.1 MHz 9 kHz 0.05 MHz 1 Press OFF to turn off the power. 2 While holding down OFF, keep pressing PRESET 1 for more than 5 second. Two short beeps will sound, and the AM channel step will be changed. If you proceed step 2 again, the channel step changes again. • When the AM channel step is changed, the preset stations will be erased. • When the AM channel step is changed, the FM channel step is also changed. Playing a CD An 8 cm (3-inch) CD can be played without an adaptor. 1 Press Z OPEN/CLOSE and place a CD on the disc tray. 2 Press Z OPEN/CLOSE to close the disc tray. 3 Press CD ^. The player plays all the tracks once. 4 Adjust volume using VOLUME. To Pause Resume play after pause Locate the beginning of the current track (AMS*) Locate the next track (AMS) Go back at high speed Go forward at high speed Locate the previous track (AMS) Locate the succeeding track (AMS) Stop play Press CD u CD u again .** >** Hold down .** Hold down +** . repeatedly** > repeatedly** x * AMS = Automatic Music Sensor **These operations are possible during both play and pause. •To handle compact discs Correct Handle the disc by its edge. Incorrect Do not touch the surface. Do not stick paper or tape nor write anything on the surface. Note If you press CD u when there is no disc in the CD compartment, "00" flashes for about 5 seconds on the display and the unit turns off automatically. Various Modes of CD Playback You can play tracks repeatedly or in random order. Press CD PLAY MODE. Each press changes the play mode as follows: Display indication Play mode none (normal play) < All the tracks are played once. m "REP 1" (single repeat) A single track is played repeatedly. m "REP ALL" (all repeat) All the tracks are played repeatedly. m "SHUFFLE" (shuffle play) All the tracks are played once in random order. m "SHUFFLE REP" (shuffle repeat) All the tracks are played repeatedly in random order. Playing the Radio Manual Tuning 1 Press RADIO ON•BAND to turn on the radio. "RADIO" appears in the display. The display shows the band and frequency for a few seconds and then changes back to the current time. 2 Press RADIO ON•BAND repeatedly to select the desired band. Each press changes the band as follows: * When using FM1 or FM2 preset mode, you may listen to the radio on either mode (See "Preset Tuning"). 3 Use TUNE/TRACK/TIME SET + or - to tune in to the desired station. The FM channel step is set to 0.1 MHz and the AM channel step is set to 10 kHz. Two short beeps sound when the minimum frequency of each band is received during tuning. 4 Adjust volume using VOLUME. • To turn off the radio, press OFF. • To improve radio reception FM: Extend the AC power cord fully to improve FM reception. AM: When installing the unit, rotate the unit horizontally for optimum reception and then install the unit. A ferrite bar antenna is built into the unit. • To check the station being received, press RADIO ON • BAND lightly. The display shows the band and frequency for a few seconds and then changes back to the current time. Preset Tuning You can preset 10 stations in FM (5 stations in FM1, 5 stations in FM2) and 5 stations in AM. Presetting a Station Example: To preset FM90 MHz onto preset button 2 for FM2. 1 Press RADIO ON•BAND to turn on the radio. 2 Press RADIO ON•BAND to select FM2. 3 Tune in to the station on FM90 MHz (See "Manual Tuning"). 4 Hold down the PRESET TUNING button 2 until you hear two short beeps. The display shows the frequency for a few seconds and then changes back to the current time. To change a preset station Tune in manually to the station you want to store and hold down the PRESET TUNING buttons(1-5) until you hear two short beeps. The previously stored station will be replaced by the new one. Tuning in to a preset station 1 Press RADIO ON•BAND to turn on the radio. 2 Press RADIO ON•BAND to select the band. 3 Press the PRESET TUNING button lightly where the desired station is stored. 4 Adjust the volume using VOLUME. After a few seconds, the display returns to the current time but the preset button number remains. Note When the PRESET TUNING buttons(1-5) are pressed lightly, the radio station that is preset will be selected. When they are pressed for a while, the station that is on will be newly preset. Useful Functions To Obtain Powerful Bass Switch MEGA BASS to ON. The "MEGA BASS" system produces a powerful bass sound. Setting the Alarm Before setting the alarm, make sure to set the clock (see "Setting the Clock"). To Set the Alarm Time 1 Turn off the radio. 2 Press ALARM for a few seconds. You will hear a beep and the hour will start to flash in the display. 3 Press TUNE/TRACK/TIME SET + or - until the desired time appears in the display. 4 Press ALARM once. The minutes starts to flash. 5 Repeat steps 3 and 4 to set the minute. Two short beeps will confirm the setting, and the display will show the current time. When TUNE/TRACK/TIME SET + or - is held down, the displayed time initially changes in one-minute steps, and after about a second, switches to ten-minute steps. To Check the Alarm Time Press ALARM. The display shows the alarm time for a few seconds and then returns to show the current time. ALARM ON - To Set the Alarm Mode Press ALARM ON/OFF to set the alarm. " " will appear in the display. When the alarm comes on at the preset time, " " flashes in the display. ALARM OFF - The alarm is turned off automatically after 59 minutes. To Stop the Alarm Press OFF•ALARM RESET to turn off the alarm. The alarm will come on again at the same time the next day. To Cancel the Alarm Press ALARM ON/OFF. " " will disappear from the display.
-
 1
1 -
 2
2
 |
 |