Sony ICF-CDK50 Operating Instructions - Page 2
Playing a CD - time set
 |
UPC - 027242726512
View all Sony ICF-CDK50 manuals
Add to My Manuals
Save this manual to your list of manuals |
Page 2 highlights
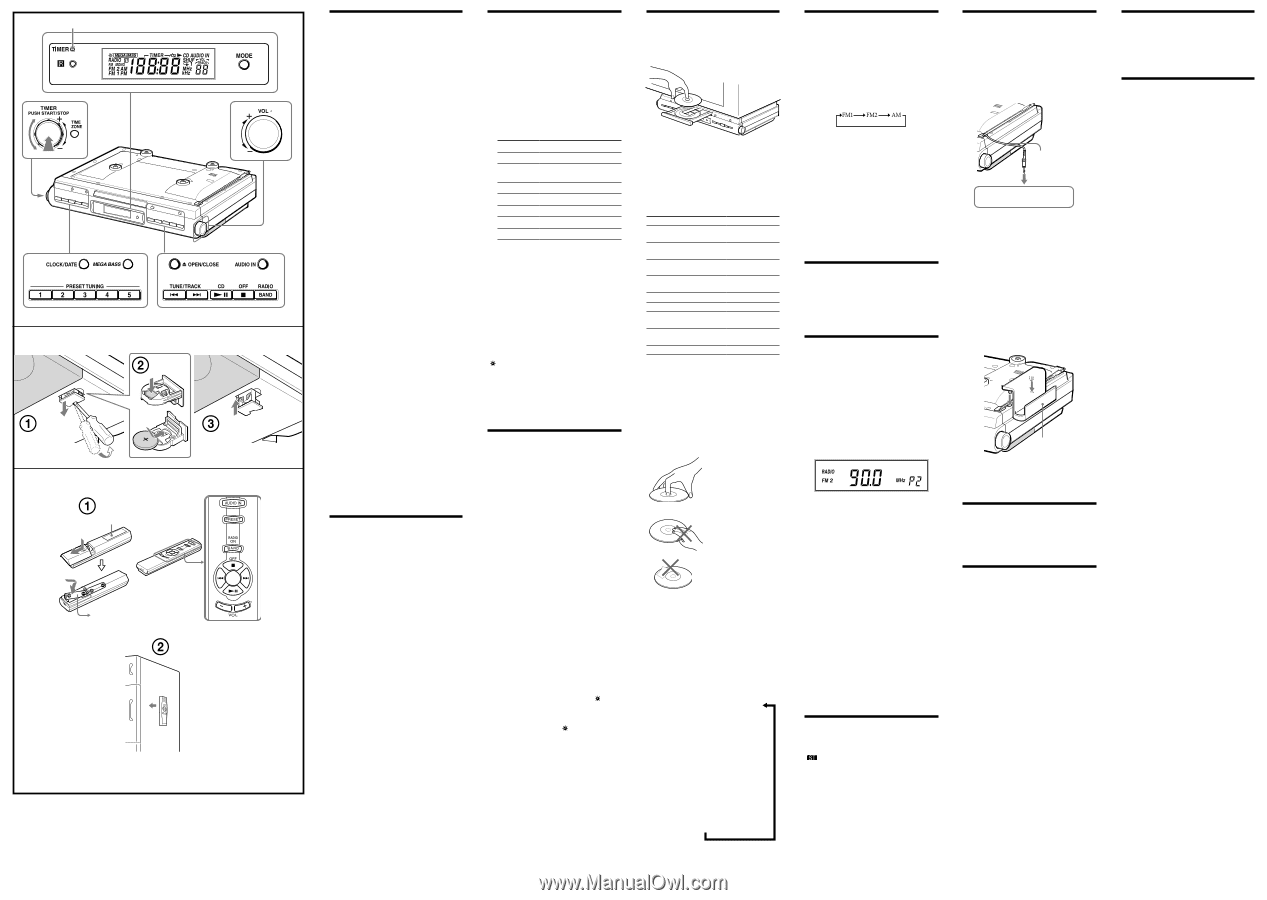
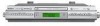
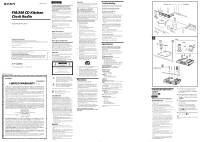
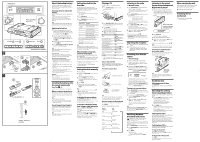
TIMER indicator Turn Push There is a tactile dot next to VOL +. CD button has a tactile dot. Push Magnet Size AAA (R03) 2 The VOL + button has a tactile dot. About the backup battery To keep good time, this unit contains one CR2032 battery inside of the unit as a backup power source. The battery keeps the clock operating in the event of a power interruption. Knowing when to replace the battery When the battery becomes weak, "" appears in the display. If a power interruption occurs while the battery is weak, the current time will be initialized. Replace the battery with a Sony CR2032 lithium battery. Use of another battery may cause a fire or explosion. Note If "AM 12:00" flashes in the display when the unit is connected to AC outlet for the first time, the battery may be weak. In this case, consult your Sony dealer. Replacing the battery 1 Keep the AC plug connected to the AC outlet and pry out the battery holder at the bottom of the unit using a slender rod, such as a screwdriver. (See Fig. -) 2 Push the exhausted battery out from the bottom of the battery holder and insert a new battery with the side facing up. (See Fig. -) 3 Insert the battery holder back into the unit. (See Fig. -) 4 Press RADIO/BAND, CD , or AUDIO IN to turn "" off in the display. Note When replacing the battery, do not disconnect AC plug from AC outlet. If you do, the current time will be initialized. Battery Warning If the unit is to be left unplugged for a long time, remove the battery to avoid undue battery discharge and damage to the unit from battery leakage. NOTES ON THE LITHIUM BATTERY Dispose of the used battery promptly. Keep the lithium battery out of the reach of children. Should the battery be swallowed, consult a doctor immediately. Wipe the battery with a dry cloth to assure a good contact. Be sure to observe correct polarity when installing the battery. Do not hold the battery with metallic tweezers, otherwise a short-circuit may occur. Do not expose the battery to excessive heat such as direct sunlight, fire or the like. WARNING There is a danger of explosion if the battery is incorrectly replaced. Replace only with the same or equivalent type recommended by the equipment manufacturer. Installing the batteries into the remote commander (See Fig. -) Insert two size AAA (R03) batteries (not supplied). When to replace the batteries With normal use, the batteries should last for about six months. When the remote no longer operates the CD kitchen clock radio, replace all the batteries with new ones. Notes Do not charge the dry batteries. If you do not intend to use the remote for a long time, remove the batteries to prevent damage by leakage and corrosion. Use of magnet (See Fig. -) A magnet is provided on the back of the remote so that it can be attached a refrigerator or other iron surface. However, do not operate the remote while it is attached in this manner. Note Do not place the remote commander near magnetic cards such as credit cards. Setting the clock for the first time This unit is preset to the current EST (Eastern Standard Time) at the factory, and is powered by the back up battery. All you need to do the first time is just plug it in, select your time zone. 1 Plug in the unit. The current EST (Eastern Standard Time) appears in the display. 2 Press TIME ZONE. Area number "2" appears in the display. 3 Press TIME ZONE repeatedly to select the number as follows: Area number Time zone 1 Atlantic standard Time 2 (default setting) Eastern standard Time 3 Central standard Time 4 Mountain standard Time 5 Pacific standard Time 6 Yukon standard Time 7 Hawaiian standard Time The area number appears in the display for a few seconds and then the display returns to the current time. After the current time reappears, press TIME ZONE to check the area number. Note Though the clock is correctly set at the factory, discrepancies may arise during transport or storage. If necessary, set the clock to the correct time by referring to "Setting the clock manually". When daylight saving time (summer time) begins This model automatically adjusts for daylight saving time (summer time). " " is displayed from the beginning of daylight saving time (summer time) and disappears at the end of the daylight saving time (summer time) automatically. Daylight saving time (summer time) begins at: 2:00 AM on the second Sunday of March. Standard time begins at: 2:00 AM on the first Sunday of November. Setting the clock manually 1 Plug in the unit. 2 Hold down CLOCK/DATE until a short beep sounds. The year starts to flash in the display. 3 Turn the TIMER jog dial towards + or - repeatedly until the correct year appears in the display. 4 Push TIMER. 5 Repeat steps 3 and 4 to set the month, the day, hour, and minute, and then push TIMER. Notes The clock setting will be canceled if you press OFF while setting the clock. If you do not press a button for about 65 seconds while setting the clock, the clock setting will be canceled. To display the year and date Press CLOCK/DATE once for the date, and within 4 seconds press it again for the year. The display shows the date or year for about 4 seconds and then changes back to the current time. To change to daylight saving time (summer time) indication Hold down OFF and TIME ZONE until two short beeps sound. "OFF" appears for a few seconds, and then " " disappears. To activate the daylight saving time (summer time) function, hold down OFF and TIME ZONE until two short beeps sound again. " " is displayed, "On" appears for a few seconds, and then the time changes to daylight saving time (summer time). Playing a CD An 8 cm (3-inch) CD can be played without an adaptor. 1 Press OPEN/CLOSE, and insert a CD onto the disc tray. 2 Press OPEN/CLOSE to close the disc tray. Do not force the disc tray closed with your finger, as this may damage the unit. 3 Press CD . "TRACK 01" appears in the display. The player plays all the tracks once. 4 Adjust the volume with the VOL control (VOL + or - on the remote). To Press Pause CD (on the remote) Resume play after pause CD again (on the remote) Cue to the beginning of the current track (AMS*) ** Cue to the beginning of the next track (AMS*) ** Go back at high speed Hold down ** Go forward at high speed Hold down ** Locate a previous track (AMS*) repeatedly** Locate a succeeding track (AMS*) Stop play repeatedly** * AMS = Automatic Music Sensor ** These operations are possible during both play and pause. About CD-Rs/CD-RWs This unit is compatible with CD-Rs/CD-RWs but playback capability may vary depending on the quality of the disc, the recording device and application software. To handle compact discs Correct Handle the disc by its edge. Incorrect Do not touch the surface. Do not stick paper or tape on the surface. Note Discs with non-standard shapes (e.g., heart, square, star) cannot be played on this unit. Attempting to do so may damage the unit. Do not use such discs. Various modes of CD playback You can play tracks repeatedly or in random order. Press MODE. Each press changes the play mode as follows: Display Indication Play Mode None (normal play) All the tracks are played once. " 1" (single-track repeat) A single track is played repeatedly. "" (all repeat) All the tracks are played repeatedly. "SHUF" (shuffle play) All the tracks are played once in random order. "SHUF " (shuffle repeat) All the tracks are played repeatedly in random order. Listening to the radio - Manual Tuning 1 Press RADIO/BAND to turn on the radio. "RADIO" appears in the display. The display shows the band and frequency for 10 seconds, and then changes back to the current time. 2 Press RADIO/BAND repeatedly to select the desired band. Each press changes the band as follows: When using FM1 or FM2 preset mode, you may listen to the radio on either mode (See "Presetting your favorite station"). 3 Use TUNE/TRACK or to tune in to the desired station. Two short beeps sound when the minimum frequency of each band is received during tuning. 4 Adjust the volume with the VOL control (VOL + or - on the remote). To turn off the radio, press OFF . To check the frequency of the current station, press RADIO/BAND. The display shows the band and frequency for 10 seconds, and then changes back to the current time. Improving the reception FM: Extend the AC power cord fully to improve FM reception. AM: When installing the unit, rotate the unit horizontally for optimum reception and then install the unit. A ferrite bar antenna is built into the unit. Presetting your favorite station - Preset Tuning You can preset 10 FM stations and 5 AM stations. 1 Follow steps 1 to 4 in "Listening to the radio" and manually tune in to the station you wish to preset. 2 Hold down the PRESET TUNING button you wish to preset for more than 2 seconds. Example: Display window when you preset FM 90 MHz in the PRESET TUNING 2 button for FM2. The display shows the frequency for a few seconds and then changes back to the current time. To preset another station, repeat these steps. To change the preset station, tune in to the desired station and hold down the PRESET TUNING 1 to 5 button. The new station will replace the previous station on the PRESET TUNING button. Tuning in to a preset station 1 Press RADIO/BAND to turn on the radio. 2 Press RADIO/BAND repeatedly to select FM 1, FM2 or AM. 3 Press the desired PRESET TUNING button. "P" and the PRESET TUNING button number appear in the display. 4 Adjust the volume with the VOL control (VOL + or - on the remote). After a few seconds, the display returns to the current time, but the preset button number is remained. Note Holding down the desired PRESET TUNING button for 2 seconds or more in step 3 will replace the previous station on the PRESET TUNING button with the station you tuned in. Switching between monaural and stereo Stereo reception is the default setting for the radio. " " will appear in the display when an FM broadcast is clearly received. If FM stereo reception is poor, change to "FM MONO (monaural)". Noise will be reduced although the sound will not be in stereo. 1 Press RADIO/BAND to turn on the radio. 2 Press RADIO/BAND repeatedly to select FM 1 or FM 2. 3 Press MODE. A short beep sounds. "FM MONO" appears in the display. To change back to stereo mode, press MODE again. Listening to the sound from a connected optional digital music player 1 Connect the built-in audio cable with the stereo-miniplug on the top of the unit to the line output jack or headphones jack on the optional component (e.g., digital music player). Built-in audio cable To the line output jack or headphones jack (optional digital music player) 2 Press AUDIO IN. "AUDIO IN" appears in the display. 3 Play the optional digital music player. 4 Adjust to the volume with the VOL control (VOL + or - on the remote). To turn off the AUDIO IN function, press OFF . Notes Connect the cable firmly to prevent a malfunction. Keep digital music players away from the speakers. Attaching the supplied digital music player holder The supplied digital music player holder allows you to place your digital music player onto the unit. Attach the holder as shown below. digital music player holder (supplied) Note Do not place a digital music player weighing more than 500 grams (17.6 oz) on the holder; as this may damage the holder. Useful function Obtaining powerful bass Press MEGA BASE. The "MEGA BASS" system produces a powerful bass sound. Operating the cooking timer (countdown timer) The timer can be set for durations of 1 minute to 120 minutes. 1 Turn the TIMER jog dial towards + until the desired time appears in the display. "TIMER" appears in the display. After setting the time, the current time is displayed again if you do not perform any operation for more than 65 seconds. 2 Push TIMER once. TIMER indicator lights and a short beep sounds. While the timer is operating, the display shows the time remaining. Pressing the CLOCK/DATE will cause the current time to appear for a few seconds. Cooking timer ON- When the time has elapsed, the buzzer will sound and the TIMER indicator will flash. Even if the CD, the radio, or AUDIO IN function is being played, the buzzer of the timer sounds together. While the buzzer sounds, the volume of the CD, the radio, or AUDIO IN function is decreased. The volume returns to the previous volume level when the buzzer stops. Cooking timer OFF- The buzzer is turned off automatically after 60 minutes and the display shows current time. To stop cooking timer Push TIMER to turn off the buzzer. Pressing function button or OFF button will turn off the buzzer also. To deactivate cooking timer Push TIMER. The TIMER indicator goes off and the current time appears in the display. When carrying the unit When carrying the unit, do the following to lock the CD mechanism in order to prevent damaging it. 1 Remove the disc from the disc tray. 2 Disconnect the AC power plug. Unlocking the CD mechanism 1 Reconnect the AC power plug. The unit is unlocked.
-
 1
1 -
 2
2
 |
 |