Sony KDL-26S3000G Instructions (SU-WL100 Wall-mount Bracket) - Page 10
Step 6:Installing the TV on the wall, with the TV to the TV.
 |
View all Sony KDL-26S3000G manuals
Add to My Manuals
Save this manual to your list of manuals |
Page 10 highlights
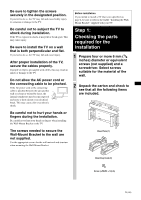
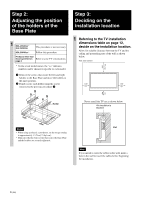
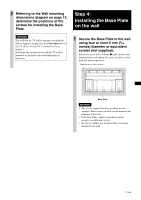
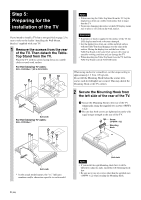
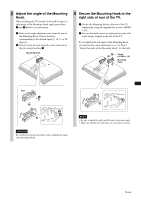
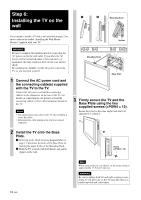
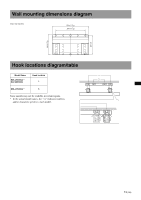
Step 6: Installing the TV on the wall 1 2 Mounting Hook If you intend to install a TV that is not specified on page 2, be sure to refer to the leaflet "Installing the Wall-Mount Bracket" supplied with your TV. Holder WARNING Be sure to complete the installation before connecting the AC power cord to the wall outlet. If you allow the AC power cord to be pinched under or between pieces of equipment, this may result in a short circuit or an electric shock. Be careful not to stumble over the AC power cord or the TV, as you may hurt yourself. 1 Connect the AC power cord and the connecting cable(s) supplied with the TV to the TV. Connect the AC power cord and the connecting cable(s) to the connectors on the rear of the TV. For details on connecting the AC power cord and the connecting cable(s), refer to the instruction manual of the TV. Notes • You cannot connect the cables to the TV after installing it on the Base Plate. • Subcontract the cable routing in the wall to a licensed contractor. Mounting Hook Base Plate 3 Firmly secure the TV and the Base Plate using the two supplied screws (+PSW4 × 12). Secure the screw to the same angle mark that you adjusted in 3 of Step 5. 2 Install the TV onto the Base Plate. 1 Referring to the Hook locations diagram/table on page 13, determine the holes of the Base Plate for latching the upper hooks of the Mounting Hook. 2 Hold the TV securely with both hands, and gently align it on the wall. Screw (+PSW4 × 12) 10 (GB) Note When using an electric screwdriver, set the torque setting to approximately 1.5 N·m {15 kgf·cm}. WARNING Be sure to tighten both left and right securing screws firmly. If you fail to do so, the TV may fall when it is pushed upward and cause injury.
-
 1
1 -
2
-
3
-
4
-
 5
5 -
 6
6 -
 7
7 -
 8
8 -
 9
9 -
 10
10 -
 11
11 -
 12
12 -
 13
13 -
 14
14 -
 15
15 -
16
-
17
-
18
-
19
-
20
-
21
-
22
-
23
-
24
-
25
-
26
-
27
-
28
-
29
-
30
-
31
-
32
-
33
-
34
-
35
-
36
-
37
-
38
-
39
-
40
-
41
-
42
-
43
-
44
-
45
-
46
-
47
-
48
-
49
-
50
-
51
-
52
-
53
-
54
-
55
-
56
-
57
-
58
-
59
-
60
-
61
-
62
-
63
-
64
-
65
-
66
-
67
-
68
-
69
-
70
-
71
-
72
-
73
-
74
-
75
-
76
-
77
-
78
-
79
-
80
-
81
-
82
-
83
-
84
-
85
-
86
-
87
-
88
-
89
-
90
-
91
-
92
-
93
-
94
-
95
-
96
-
97
-
98
-
99
-
100
-
101
-
102
-
103
-
104
-
105
-
106
-
107
-
108
-
109
-
110
-
111
-
112
 |
 |
