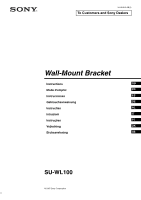
Sony KDL-26S3000R Instructions (SU-WL100 Wall-mount Bracket) - Page 6
Step 2:Adjusting the position of the holders of the Base Plate
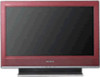 |
View all Sony KDL-26S3000R manuals
Add to My Manuals
Save this manual to your list of manuals |
Page 6 highlights
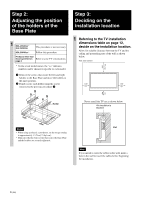
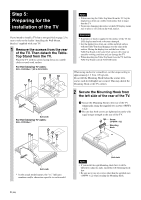
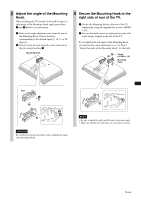
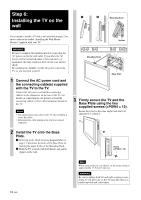
Step 2: Adjusting the position of the holders of the Base Plate 1 KDL-26S30xx * KLV-26V300A This procedure is not necessary. KDL-20S30xx * Follow this procedure. Products other than those specified on Refer to your TV's instructions. page 2 * In the actual model names, the "xx" indicates numbers and/or characters specific to each model. 1 Remove the screws that secure the left and right holders to the Base Plate and move the holders to the inner position. 2 Firmly secure each holder using the screws removed in the previous procedure 1. Step 3: Deciding on the installation location 1 Referring to the TV installation dimensions table on page 12, decide on the installation location. Allow for suitable clearance between the TV and the ceiling and protruding parts of the wall as shown below. Unit: mm (inches) (11 7/8) 300 100 100 (4) (4) (4) 100 Holder Never install the TV set as shown below: Air circulation is blocked. Notes • When using an electric screwdriver, set the torque setting to approximately 1.5 N·m {15 kgf·cm}. • Make sure that the four screws that secure the Base Plate and the holders are securely tightened. Wall Note If you intend to route the cables in the wall, make a hole in the wall to insert the cables before beginning the installation. 6 (GB)
-
 1
1 -
 2
2 -
 3
3 -
 4
4 -
 5
5 -
 6
6 -
 7
7 -
 8
8 -
 9
9 -
 10
10 -
 11
11 -
 12
12 -
13
-
14
-
15
-
16
-
17
-
18
-
19
-
20
-
21
-
22
-
23
-
24
-
25
-
26
-
27
-
28
-
29
-
30
-
31
-
32
-
33
-
34
-
35
-
36
-
37
-
38
-
39
-
40
-
41
-
42
-
43
-
44
-
45
-
46
-
47
-
48
-
49
-
50
-
51
-
52
-
53
-
54
-
55
-
56
-
57
-
58
-
59
-
60
-
61
-
62
-
63
-
64
-
65
-
66
-
67
-
68
-
69
-
70
-
71
-
72
-
73
-
74
-
75
-
76
-
77
-
78
-
79
-
80
-
81
-
82
-
83
-
84
-
85
-
86
-
87
-
88
-
89
-
90
-
91
-
92
-
93
-
94
-
95
-
96
-
97
-
98
-
99
-
100
-
101
-
102
-
103
-
104
-
105
-
106
-
107
-
108
-
109
-
110
-
111
-
112
 |
 |
