Sony KDL-32XBR950 Instructions (SU-LW1 Wall-Mount Bracket) - Page 16
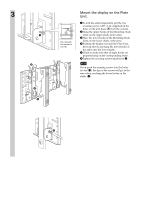
Step 6: Install the display on the Plate Unit
 |
View all Sony KDL-32XBR950 manuals
Add to My Manuals
Save this manual to your list of manuals |
Page 16 highlights
Step 6: Install the display on the Plate Unit WARNING Do not connect the power cord to a wall outlet before the installation is completed. If the power cord is pinched, a short circuit may occur, causing an electric shock. Be careful not to stumble over the cables or the display. 1 KLV-26HG2 Rear of the display The supplied screws (+PSW5 × L16) Mounting Hook Units Soft cloth Align the holes on the Mounting Hook Units with the corresponding holes on the rear of the display. Secure them to the display using four screws. For the KLV-26HG2, use the screws supplied (+PSW5 × L16). For the KDL32XBR950 and the KLV30XBR900, use the screws you removed in Step 5. Notes • Lay the display face down on a soft cloth. • When using an electric screwdriver to tighten the screws, the torque must be approx. 2 N•m. KDL32XBR950/KLV30XBR900 The screws removed in Step 5 Rear of the display Mounting Hook Units Soft cloth 16 (US)
-
 1
1 -
2
-
3
-
4
-
5
-
6
-
7
-
8
-
9
-
10
-
 11
11 -
 12
12 -
 13
13 -
 14
14 -
 15
15 -
 16
16 -
 17
17 -
 18
18 -
 19
19 -
 20
20 -
 21
21 -
22
-
23
-
24
-
25
-
26
-
27
-
28
-
29
-
30
-
31
-
32
-
33
-
34
-
35
-
36
-
37
-
38
-
39
-
40
-
41
-
42
-
43
-
44
-
45
-
46
-
47
-
48
-
49
-
50
-
51
-
52
-
53
-
54
-
55
-
56
-
57
-
58
-
59
-
60
-
61
-
62
-
63
-
64
 |
 |
