Sony KDL-42XBR950 Quick Start Guide - Page 1
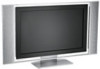
Sony KDL-42XBR950 - 42" Flat Panel Lcd Wega™ Xbr Television Manual
 |
View all Sony KDL-42XBR950 manuals
Add to My Manuals
Save this manual to your list of manuals |
Page 1 highlights
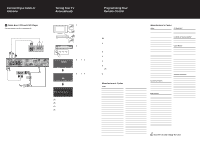
KDL32XBR950 KDL42XBR950 1 Checking the Supplied Accessories Connecting the Display Unit to the Media Receiver Unit 3 4 Connecting a Cable or Antenna Quick Start Guide Thank you for purchasing this Sony product. After following this step by step guide you will be able to: - Insert batteries into the remote control. - Connect the display unit to the media receiver unit. - Connect a cable or antenna to your TV. - Tune your TV . - Program your remote control Now you are ready for viewing TV programs. US © 2003 Sony Corporation Printed in Japan 4-102-399-01(1) Remote Control (RM-Y1000): Two size AA Display Interface batteries (R06 Type): Cable: Antenna Cable: Two AC power cords: • Speaker jack covers (KDL42XBR950 only) • Operating Instructions • Quick Start Guide • Warranty Card 2 Inserting Batteries into the Remote Control 1 Open the battery compartment as illustrated below. 2 Insert two size AA batteries (supplied) by matching the e and E terminals on the batteries to the diagram inside the battery compartment. 3 Close the battery compartment. Remove the batteries to avoid damage from possible battery leakage whenever you anticipate that the remote control will not be used for an extended period. Handle the remote control with care. Avoid dropping it, getting it wet, placing it in direct sunlight, near a heater, or where the humidity is high. 1 Connect the display interface cable (supplied) to the DISPLAY SIGNAL IN jacks, and the AC power cord (supplied) to the AC IN jack of the unit. KDL32XBR950 KDL42XBR950 SONY EXCLUSIVE CABLE ONLY WHITE BLACK DISPLAY SIGNAL IN Tighten the screw Display Interface slowly until the cable (supplied) screw is stabilized. AC power cord (supplied) When you install KDL42XBR950, use the optional accessories as follows: • SONY TABLE TOP STAND: SU-P42T2 • SONY WALL-MOUNT BRACKET: SU-PW2 • SONY FLOATING STAND: SU-PF1 2 Connect the other end of display interface cable to the media receiver unit's DISPLAY SIGNAL OUT jacks, and connect the media receiver unit's AC power cord (supplied) to the AC IN jack . S400 (TS/DV/MICROMV) i.LINK VHF/UHF CABLE WHITE BLACK ~ AC IN DISPLAY SIGNAL OUT Display Interface cable (supplied) AC power cord (supplied) Tighten the screw slowly until the screw is stabilized. Be sure to use the supplied AC power cords. When connecting optional components, do not connect the AC power cords to wall outlets until you have completed making all connections. Do not tighten the screws too much. It may damage the screws. Do not use damaged cables, such as cables whose connectors are deformed. Handle the display interface cable with care. This unit may fall and cause injury if accidently knocked or pulled by the connected cable. To store the AC power cord and the display interface cable in the stand; (KDL32XBR950) See "Storing the AC power cord and the display interface cable into the stand (KDL32XBR950 only)" on page 28 of the operating instructions. (KDL42XBR950) See the operating instructions for the optional tabletop stand. The way in which you will connect your TV varies, depending on how your home receives a signal (cable, cable box, antenna) and whether or not you plan to connect a VCR or other optional AV equipment. See examples A, B or C to connect your TV. For details on other connection examples, see pages 31 to 54 of the operating instructions. A Cable or Antenna For best results, use this connection if you are connecting a cable or an antenna and you; • Do not need a cable box to unscramble channels. • Do not intend to connect a VCR. For antenna connection, use the supplied antenna cable. Rear of Media Receiver Unit S400 (TS/DV/MICROMV) i.LINK VHF/UHF CABLE WHITE BLACK ~ AC IN DISPLAY SIGNAL OUT Antenna cable (supplied) or 75-ohm coaxial cable (not supplied) When using an indoor antenna, such as rabbit-ear or dipole-antenna, keep the antenna away from the display unit. If not, noise may appear on the screen. B Cable Box and Cable For best results, use this connection if; • Your cable company scrambles some channels, such as premium channels (which requires you to use a cable box), but does not scramble all channels. • You do not have a VCR. CATV cable IN OUT Splitter 75-ohm coaxial cable Cable Box (not supplied) Antenna cable (supplied) 75-ohm coaxial cable (not supplied) Rear of Media Receiver Unit S400 (TS/DV/MICROMV) i.LINK WHITE VHF/UHF CABLE BLACK ~ AC IN DISPLAY SIGNAL OUT
-
 1
1 -
 2
2
 |
 |
