Sony KP-65WS510 Operating Instructions - Page 37
Adjusting the Convergence Manually, If the cross that you selected has red edges - focus
 |
View all Sony KP-65WS510 manuals
Add to My Manuals
Save this manual to your list of manuals |
Page 37 highlights
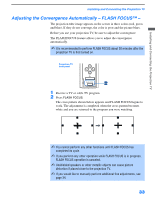
Installing and Connecting the Projection TV Adjusting the Convergence Manually The Manual Convergence feature gives you more control over the TV's picture than the Flash Focus feature, allowing you to fine-tune the color alignment of each section of the TV screen. ✍ Before using Manual Convergence, you must first perform Flash Focus (as described on page 33). ✍ Use the joystick of your remote control to perform the steps below. z For details on using the Setup Menu, see page 60. 1 Press MENU to display the Menu. 2 Move the joystick B or b to highlight the Setup icon and press . 3 Move the joystick to highlight Convergence and press . A pattern of white crosses appears, with a yellow around one of the crosses. Aligned crosses (which do not need adjustment) look white and have little or no red or blue showing. Crosses that are not aligned show red or blue shades beyond their edges. - - < Full/Normal Move < < < Select: End: menu ✍ You can scroll up and down through the 9 x 7 field of crosses to manually converge all portions of the screen. 4 Using the joystick, move the to surround a cross that you want to adjust. Press . The changes to red. 5 If the cross that you selected has red edges, move the joystick until the red image is replaced with a white cross. Once you have finished this (or the cross does not have red edges), press . The changes to blue. 6 If the cross you selected has blue edges, move the joystick until the blue image is replaced with a white cross. Once you have finished this, press . The changes to yellow again. 7 Repeat steps 4 to 6 to adjust other crosses. When finished, press MENU to exit the manual convergence screen and the Setup menu. 34
-
 1
1 -
2
-
3
-
4
-
5
-
6
-
7
-
8
-
9
-
10
-
11
-
12
-
13
-
14
-
15
-
16
-
17
-
18
-
19
-
20
-
21
-
22
-
23
-
24
-
25
-
26
-
27
-
28
-
29
-
30
-
31
-
 32
32 -
 33
33 -
 34
34 -
 35
35 -
 36
36 -
 37
37 -
 38
38 -
 39
39 -
 40
40 -
 41
41 -
 42
42 -
43
-
44
-
45
-
46
-
47
-
48
-
49
-
50
-
51
-
52
-
53
-
54
-
55
-
56
-
57
-
58
-
59
-
60
-
61
-
62
-
63
-
64
-
65
-
66
-
67
-
68
-
69
-
70
-
71
-
72
-
73
-
74
-
75
-
76
-
77
-
78
-
79
-
80
-
81
-
82
-
83
-
84
-
85
-
86
 |
 |
