Sony MDR-10RBT Quick Start Guide - Page 1
Sony MDR-10RBT Manual
 |
View all Sony MDR-10RBT manuals
Add to My Manuals
Save this manual to your list of manuals |
Page 1 highlights
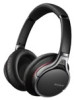
Wireless Stereo Headset Casque stéréo sans fil Auriculares estéreo inalámbricos Quick Start Guide US Guide de prise en main FR Guía de inicio rápido ES Connecting with the smartphone by one-touch functions By touching the unit with the smartphone, the unit is turned on automatically and then proceeds to pairing and Bluetooth connection. 1 Unlock the screen of the smartphone. If you installed the app "NFC Easy Connect" in the smartphone, start the app "NFC Easy Connect." 2 Touch this unit with the smartphone. Touch the smartphone on the N marked part of this unit. Refer to the manual of the smartphone for the designated location to be touched on the smartphone. Follow the on-screen instructions to complete the connection. To disconnect, touch the smartphone again. You can select the sound from other NFC compatible Bluetooth devices. For details, refer to the Help Guide. Listening and Calling Operate the unit after making Bluetooth connection with your Bluetooth device. Listening to music Profile: A2DP, AVRCP Start playback on the Bluetooth device. MDR-10RBT English © 2013 Sony Corporation Printed in China 4-477-579-11(1) Charging the unit Connect the unit and the computer booted using the micro-USB cable supplied. When the unit and the computer are connected, charging starts and the indicator (red) lights up. Charging is completed in about 2.5 hours at most and the indicator (red) goes off automatically. Use the micro-USB cable supplied. You may not be able to charge the unit with other cables. One-touch connection with a smartphone (NFC) Refer to the "Pairing and connecting with the BLUETOOTH device" section to connect to a BLUETOOTH device that is not compatible with the one-touch connection (NFC function). NFC (Near Field Communication) is a technology enabling short-range wireless communication between various devices, such as mobile phones and IC tags. Thanks to the NFC function, data communication can be achieved easily just by touching the relevant symbol or designated location on NFC compatible devices. By using the NFC function, the unit is turned on automatically and then paired and connected with a Bluetooth device. Compatible smartphones Smartphones with the NFC function built-in (OS: Android 2.3.3 or later, excluding Android 3.x) Preparation on the smartphone 1 Download and install the app "NFC Easy Connect" on the smartphone. Access the following Web site: https://play.google.com/store/apps/details?id=com.sony.easyconnect By the two-dimensional code: Use a two-dimensional code reader app. Tip If your smartphone has an NFC function, such as that of Android 4.1 or later, you may not need to install "NFC Easy Connect" to connect the unit with your smartphone by one touch. In that case, you do not need to perform this step. The operation and specifications may be different from the description here. For details, refer to the manual supplied with your smartphone. 2 Set the smartphone so that the NFC function can be used. For details, refer to the instructions of the smartphone. About "NFC Easy Connect" App "NFC Easy Connect" is Sony's original app for Android Phone available at Google Play Store. To find out more about the functions, search for "NFC Easy Connect" and download the free app. The App may not be available in some countries and/or regions. VOLUME + VOLUME − Note Play/pause: Press . Stop: Hold down. Next/previous: Press /. Fast forward/fast reverse: Hold / down. The available functions may vary depending on the BLUETOOTH device. When you operate the button illustrated above, it may operate differently or may not work at all. The sound quality is set to the standard mode (SBC high quality mode) before shipment. When you connect a BLUETOOTH device compatible with AAC or aptX, you can change the setting as described in the Help Guide to enjoy music playback at a higher level of sound quality. Making a call/Receiving a call Profile: HSP, HFP Operate your mobile phone to make a call. Press the button on the unit when an incoming call arrives. Operate in the same way when an incoming call arrives while you are listening to the music. The music playback pauses during a call and resumes automatically when the call is over. Note Music playback may not resume automatically with some BLUETOOTH devices. To terminate a call, press the button on the unit again. Volume for a call and listening to music can be adjusted independently. Pairing and connecting with the Bluetooth device Before pairing, charge this unit. 1 Place the Bluetooth device within 1 meter (3 feet) of this unit. 2 Enter pairing mode on this unit. Press and hold the POWER button for more than 7 seconds. Make sure that the indicator flashes blue and red alternately after you release the button. Blue Red 3 Perform the pairing procedure on the Bluetooth device to detect this unit. When the list of detected devices appears on the display of the Bluetooth device, select "MDR-10RBT." If passkey input is required on the display of a Bluetooth device, input "0000." 4 Make the Bluetooth connection from the Bluetooth device. Connecting with the paired device 1 Turn on the unit. Press and hold the POWER button for about 2 seconds while this unit is turned off. Make sure that the indicator flashes blue after you release the button. Blue 2 Make the Bluetooth connection from the Bluetooth device. Using the unit by connecting the supplied cord You can use the unit as ordinary wired headphones by connecting the supplied cord. Supplied cord Notes The BLUETOOTH function is disabled. VOLUME and / buttons cannot be used. On how to operate the unit in detail, please read the Help Guide on your computer or smart phone. http://rd1.sony.net/help/mdr/10rbt/uc/ The Bluetooth word mark and logos are owned by the Bluetooth SIG, Inc. and any use of such marks by Sony Corporation is under license. The N Mark is a trademark or registered trademark of NFC Forum, Inc. in the United States and in other countries. Android is a trademark of Google Inc. The aptX® mark and the aptX logo are trade marks of CSR plc or one of its group companies and may be registered in one or more jurisdictions. Other trademarks and trade names are those of their respective owners. Français Chargement de l'appareil Connectez l'appareil à un ordinateur allumé à l'aide du câble micro-USB fourni. Lorsque l'appareil et l'ordinateur sont connectés, le chargement commence et le témoin (rouge) s'allume. Le chargement dure environ 2,5 heures au maximum et le témoin (rouge) s'éteint automatiquement. Utilisez le câble micro-USB fourni. Il pourra s'avérer impossible de charger l'appareil avec d'autres câbles. Connexion une touche avec un smartphone (NFC) Consultez la section « Pairage et connexion avec le périphérique BLUETOOTH » pour la connexion avec un appareil BLUETOOTH non compatible avec la connexion une touche (NFC). NFC (Near Field Communication) est une technologie permettant d'établir une communication sans fil à courte portée entre divers périphériques, tels que des téléphones portables et des étiquettes électroniques. Grâce à la fonction NFC, la communication de données peut être réalisée facilement en touchant simplement le symbole pertinent ou l'emplacement désigné sur les périphériques compatibles avec NFC. À l'aide de la fonction NFC, l'appareil est mis automatiquement sous tension, puis apparié et connecté à un périphérique BLUETOOTH. Smartphones compatibles Smartphones avec la fonction NFC intégrée (SE : Android 2.3.3 ou ultérieur, sauf Android 3.x) Préparation sur le smartphone 1 Téléchargez et démarrez l'application « Connexion NFC facile » sur le smartphone. Consultez le site Web suivant : https://play.google.com/store/apps/details?id=com.sony.easyconnect Par code en deux dimensions : Utilisez une application de lecture de code en deux dimensions. Conseil Si votre smartphone dispose d'une fonction NFC, comme avec Android 4.1 ou ultérieur, l'installation de « Connexion NFC facile » ne sera pas forcément nécessaire pour établir une connexion une touche entre l'appareil et votre smartphone. Dans ce cas, vous n'avez pas besoin de suivre cette étape. Le fonctionnement et les spécifications peuvent différer de la présente description. Pour plus de détails, consultez le manuel fourni avec votre smartphone. 2 Réglez le smartphone pour que la fonction NFC puisse être utilisée. Pour plus de détails, consultez les instructions du smartphone. À propos de l'application « Connexion NFC facile » « Connexion NFC facile » est une application Sony originale pour Android disponible sur Google Play Store. Pour en apprendre plus sur ces fonctions, cherchez « Connexion NFC facile » et téléchargez l'application gratuite. Il est possible que l'application ne soit pas disponible dans certains pays et/ou dans certaines régions. Connexion avec le smartphone à l'aide des fonctions une touche En mettant l'appareil en contact avec le smartphone, l'appareil est automatiquement mis sous tension, puis procède au pairage et à la connexion BLUETOOTH. 1 Déverrouillez l'écran du smartphone. Si vous avez installé l'application « Connexion NFC facile » sur le smartphone, démarrez l'application « Connexion NFC facile ». 2 Mettez l'appareil en contact avec le smartphone. Placez le smartphone sur la partie marquée d'un N sur l'appareil. Consultez le manuel du smartphone pour connaître le point de contact du smartphone. Suivez les instructions à l'écran pour terminer la connexion. Pour déconnecter, mettez de nouveau le smartphone en contact avec l'appareil. Vous pouvez sélectionner le son d'autres périphériques BLUETOOTH compatibles avec NFC. Pour plus de détails, consultez le Manuel d'aide. Écoute et appel Utilisez l'appareil après avoir établi la connexion BLUETOOTH avec votre périphérique BLUETOOTH. Écoute de musique Profil : A2DP, AVRCP Démarrez la lecture sur le périphérique BLUETOOTH. VOLUME + VOLUME − Remarque Lecture/pause : Appuyez sur . Stop : Maintenez enfoncé. Suivant/précédent : Appuyez sur /. Avance rapide/retour rapide : Maintenez / enfoncé. Les fonctions disponibles peuvent varier selon l'appareil BLUETOOTH. Lorsque vous utilisez le bouton illustré ci-dessus, celui-ci pourra fonctionner différemment ou ne pas fonctionner du tout. La qualité sonore est réglée sur le mode standard (mode haute qualité SBC) avant expédition. Lorsque vous connectez un périphérique BLUETOOTH compatible avec AAC ou aptX, vous pouvez modifier le réglage comme décrit dans le manuel d'aide pour profiter de la musique à un niveau supérieur de qualité sonore. Passer un appel/Recevoir un appel Profil : HSP, HFP Utilisez votre téléphone portable pour passer un appel. Appuyez sur le bouton sur l'appareil lorsqu'un appel entrant se produit. Procédez de la même façon lorsqu'un appel entrant se produit quand vous écoutez de la musique. La lecture de musique se met en pause pendant un appel et reprend automatiquement lorsque l'appel est terminé. Remarque La lecture de musique pourra ne pas reprendre automatiquement sur certains peripheriques BLUETOOTH. Pour mettre fin à un appel, appuyez de nouveau sur le bouton de l'appareil. Le volume sonore d'un appel et celui de la musique peuvent être réglés séparément. Pairage et connexion avec le périphérique BLUETOOTH Avant le pairage, chargez l'appareil. 1 Placez le périphérique BLUETOOTH dans un rayon de 1 mètre (3 pieds) par rapport à l'appareil. 2 Entrez en mode de pairage sur l'appareil. Appuyez sur le bouton POWER et maintenez-le enfoncé plus de 7 secondes. Vérifiez que le témoin clignote alternativement en bleu et en rouge lorsque vous relâchez le bouton. Bleu Rouge 3 Effectuez la procédure de pairage sur le périphérique BLUETOOTH pour détecter l'appareil. Lorsque la liste de périphériques détectés apparaît sur l'écran du périphérique BLUETOOTH, sélectionnez « MDR-10RBT ». Si un code est demandé sur l'écran d'un périphérique Bluetooth, saisissez « 0000 ». 4 Effectuez la connexion BLUETOOTH sur le périphérique BLUETOOTH.
-
 1
1 -
 2
2
 |
 |
