Sony MHS-CM5/V Operating Instructions - Page 1
Sony MHS-CM5/V - High Definition Mp4 Bloggie™ Camera; Violet Manual
 |
UPC - 027242788855
View all Sony MHS-CM5/V manuals
Add to My Manuals
Save this manual to your list of manuals |
Page 1 highlights
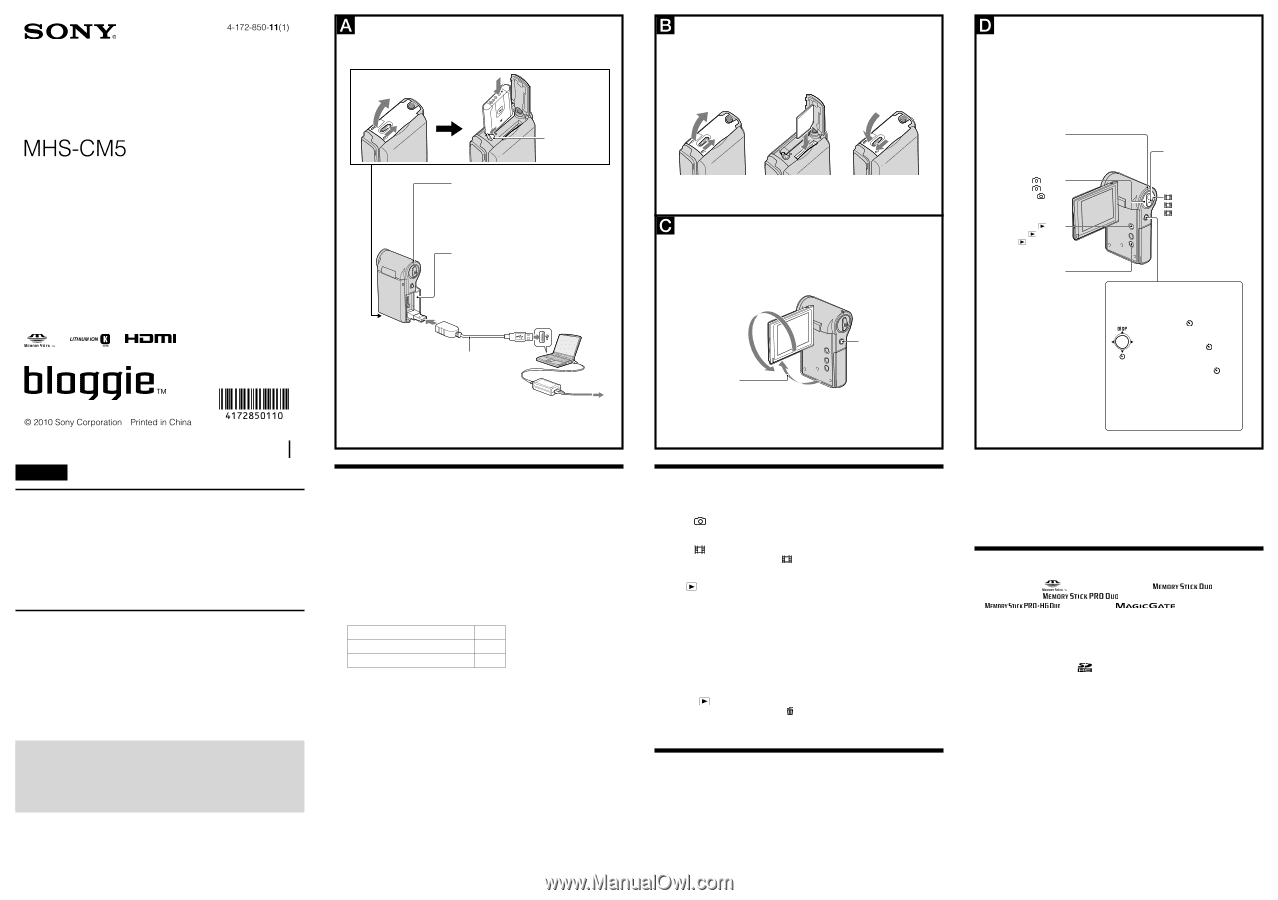
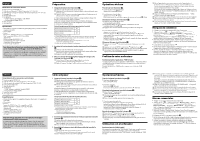
Mobile HD Snap Camera/Instruction Manual Appareil photo numérique Snap HD mobile/Mode d'emploi Cámara fotográfica digital HD (Alta Definición) compacta/Manual de instrucciones Charging the battery Charge de la batterie Carga de la batería Battery eject lever Levier d'éjection de la batterie Palanca de expulsión de la batería Power/Charge lamp Témoin d'alimentation/de charge Indicador luminoso de alimentación/carga Jack cover Cache de la prise Cubierta de la toma USB connection support cable (supplied) Câble prenant en charge la connexion USB (fourni) Cable de soporte de conexión USB (suministrado) Inserting the memory card Insertion de la carte mémoire Inserción de la tarjeta de memoria Turning the power on Mise sous tension Encender la alimentación 90 degrees (max.) 90 degrés (maximum) 90 grados (máx.) Multi-selector Sélecteur multidirectionnel Selector múltiple Identifying parts Identification des pièces Identificación de las partes Power/Charge lamp Témoin d'alimentation/de charge Indicador luminoso de alimentación/carga (Photo) (Photo) (Foto) (Play) (Lecture) (Reproducir) MENU Zoom lever Manette de zoom Palanca de zoom (Movie) (Film) (Película) Multi-selector Sélecteur multidirectionnel Selector múltiple Menu on Menu off : DISP/ Menu activ Menu désactivé : DISP/ Menú activado Menú desactivado : DISP/ English Checking the accessories supplied Rechargeable battery pack NP-BK1 (1) A/V connecting cable (Sony Corporation 1-823-156-) (1) USB connection support cable (Sony Corporation 1-836-378-) (1) Wrist strap (1) Lens Cap (1) CD-ROM (1) "PMB" (software, including "PMB Help") bloggie Handbook (PDF) Instruction Manual Important Notice Specifications Effective Pixel: Approx. 5.0 Megapixels (still images), Approx. 2.0 Megapixels (1080 30P) Optical zoom Format Still: JPEG Exif ver 2.21, DCF compliant Movie: MPEG-4 AVC/H.264 compliant (.MP4) Power Rechargeable Battery Pack NP-BK1, 3.6V Power Consumption 1.9 W [1280 × 720 30P] Operating Temperature 0°C - 40°C (32°F - 104°F) Getting further detailed information from the "bloggie Handbook" on the supplied CD-ROM Sufficient information on the basic operations is described below. If you want further detailed information, however, refer to the "bloggie Handbook" on supplied CD-ROM. The "bloggie Handbook" is a user guide designed to be read on a computer screen. Getting started 1 Charging the battery pack (See illustration ). Open the battery/memory card cover. Press and hold the battery eject lever and insert the battery pack, then close the cover. Open the jack cover, and connect the camera to the computer with the USB connection support cable. The Power/Charge lamp lights up in orange while charging the battery, and turns off when charging is finished. The time required to charge the battery fully is approx. 300 minutes. We recommend that you connect the AC Adaptor to the computer before you start charging the battery pack. Approximate recording/playback time (min.) Continuous recording time 105 Typical recording time 50 Playback time 150 The image size: [1280 × 720 30P] Typical recording time shows the time when you repeat recording start/stop, turning the power on/off and zooming. Recording and playing back condition: When using the camera at 25°C (77°F). The battery is fully charged. Do not use a deformed or damaged battery pack. 2 Inserting the memory card (sold separately) (See illustration ). Open the battery/memory card cover. Insert the memory card (sold separately) all the way in as shown in the illustration until it clicks. Close the battery/memory card cover. 3 Turning the camera on/setting the language and clock (See illustration ). Open the LCD screen to turn the camera on. The Power/Charge lamp lights up in green. Set the language and clock using the multi-selector. Basic Operations Shooting images (See illustration ). When shooting still images: Press the (Photo) button. When shooting movies: Press the (Movie) button. To stop shooting movies, press the (Movie) button again. Viewing images (See illustration ). Press (Play) button. Index screen appears. Select the image you want to play back with the multi-selector tilt to Press the multi-selector to display a still image. When playing back movies: Press the multi-selector to play back a movie. Tilt to to fast forward, to rewind. (Press the multi-selector to return to normal playback.) Tilt to to display the volume control screen, then adjust the volume with /. Deleting images (See illustration ). Press the (Play) button and select an image you want to delete. Press the MENU button and select (Delete) with Select [This Image] with / and press the multi-selector. Select [OK] with the multi-selector tilted to , and press the multi-selector. Enjoying with your computer Operating the "PMB Portable" This camera has an application "PMB Portable". You can use this application to upload images easily to a blog or other media service. For details on "PMB Portable", see the "PMB Portable" help. Turn the power of the camera on, then connect the camera and a computer with a USB connection support cable. And then Autoplay Wizard appears. Click [×] to close the AutoPlay Wizard for any unnecessary drives. If the desired AutoPlay Wizard does not appear, click [Computer] (in Windows XP, [My Computer]) [PMBPORTABLE], then double‑click [PMBP_Win.exe]. Click [PMB Portable] (in Windows XP, [PMB Portable] [OK]). The Language Selection screen appears. After selecting the desired language, the Region Selection screen appears. Select the appropriate [Region] and [Country/Area], and then click [OK]. The User Agreement screen appears. Read the agreement carefully. If you accept the terms of the agreement, click [I Agree]. "PMB Portable" starts up. Trademarks "bloggie" is a trademark of Sony Corporation. "Memory Stick", " ", " Memory Stick Duo", " ", "Memory Stick PRO Duo", " ", "Memory Stick PRO‑HG Duo", " ", "MagicGate", " ", "MagicGate Memory Stick" and "MagicGate Memory Stick Duo" are trademarks or registered trademarks of Sony Corporation. Microsoft, Windows, Windows Media, Windows Vista, and DirectX are either registered trademarks or trademarks of Microsoft Corporation in the United States and/or other countries. SDHC logo is a trademark. HDMI, the HDMI logo and High-Definition Multimedia Interface are trademarks or registered trademarks of HDMI Licencing LLC. In addition, system and product names used in this manual are, in general, trademarks or registered trademarks of their respective developers or manufacturers. However, the or marks are not used in all cases in this manual.
-
 1
1 -
 2
2
 |
 |