Sony MSFD-20U User’s Guide - Page 1
Sony MSFD-20U Manual
 |
View all Sony MSFD-20U manuals
Add to My Manuals
Save this manual to your list of manuals |
Page 1 highlights
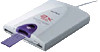
4-667-170-12(1) USB 2x Speed Floppy Disk Drive with "Memory Stick" Slot User's Guide Before you use the drive for the first time, you must install the driver software on your computer. Before connecting the drive to your computer for the first time, make sure that you perform the procedures outlined in the Setup Guide. MSFD-20U 2002 Sony Corporation Printed in China List of Accessories When you unpack the carton, make sure that it contains all the accessories listed below. If anything is missing or damaged, contact your retailer. • MSFD-20U • Driver Software CD-ROM • User's Guide • Setup Guide Specifications Floppy disk drive Data transfer rate 2HD 1 M bps Max. 2DD 500 K bps Max. Compatible disks 3.5-in. 2HD (1.44 MB, 1.2 MB) 3.5-in. 2DD (720 KB) "Memory Stick" slot Data transfer rate Up to 500 KB/s* * Maximum read and write speeds depend on the capabilities of the computer and the type of "Memory Stick" used. Compatible "Memory Stick" "Memory Stick" "MagicGate Memory Stick" Interface USB 2.0 Full-Speed (compatible with USB 1.1) Operating and storage environments Temperature range Operating temperature 5°C to 35°C Storage temperature -20°C to 55°C Relative humidity Operating humidity (No condensation) Storage humidity (No condensation) 20% to 80% 15% to 90% Power supply/Miscellaneous Power supply DC + 5 V (supplied by the USB connector) Power consumption 0.5 A (2.5W) Size Approx. 104 × 24.3 × 143 mm (W × H × D, excluding projections) Mass Approx. 350 g These specifications and the appearance of the product are subject to change without notice. Introduction The MSFD-20U (hereafter referred to as the "drive") has the following features: ❏ Floppy disk drive with a 2× read/write speed. ❏ Comes equipped with a "Memory Stick" slot. ❏ The drive is powered by your computer's USB connector, so there is no need to connect it to an external power source. ❏ Has a compact, lightweight design for portability. System Requirements The drive can be used with a computer with the following specifications: ❏ CPU: Pentium II 400 MHz or faster ❏ RAM: 64 MB or more ❏ OS: Windows 98 Second Edition (Windows 98 SE) Windows 2000 Professional (Windows 2000) Windows Millennium Edition (Windows Me) Windows XP Home Edition Windows XP Professional (Windows XP) ❏ Computer with a USB connector ❏ Computer with a CD-ROM drive (used to install the driver software) ∗ Not supported by the NEC PC98 series. Names and Functions of Parts 6 5 4 3 21 1 USB Connector Connect to the USB connector of your computer. 2 Eject Button Press this button to remove the floppy disk. 3 Floppy Disk Slot Insert the floppy disk here. 4 Floppy Disk Busy Indicator When data on a floppy disk is accessed, the indicator lights. 5 "Memory Stick" Busy Indicator When you insert a "Memory Stick" into the "Memory Stick" slot, the indicator lights. When data on the "Memory Stick" is accessed, the indicator flashes. 6 "Memory Stick" Slot Insert the "Memory Stick" here. Inserting and Removing Floppy Disks To Insert a Floppy Disk 1 Insert the floppy disk into the floppy disk slot. Push until the floppy disk is fully inserted. To Remove a Floppy Disk CAUTION Make sure that the floppy disk busy indicator is off before removing the floppy disk. Removing the floppy disk while the indicator is on may cause loss of data. 1 Make sure that the floppy disk busy indicator is off, and then press the eject button. The floppy disk is ejected. Floppy disk busy indicator Eject button 2 Remove the floppy disk from the drive. Inserting and Removing "Memory Stick" To Insert a "Memory Stick" CAUTION • Make sure that the floppy disk busy indicator is off before inserting a "Memory Stick". Inserting a "Memory Stick" while the floppy disk busy indicator is on may cause the drive to malfunction. • Do not insert a "Memory Stick" into the floppy disk slot. • Make sure that the "Memory Stick" is inserted in the correct direction. Inserting a "Memory Stick" in the wrong direction may damage the "Memory Stick" slot and/or "Memory Stick". 1 Make sure that the floppy disk busy indicator is off, Floppy disk busy indicator and then insert the "Memory Stick" into the "Memory Stick" slot. Insert the "Memory Stick" until you hear a click. Insert in the direction of v To Remove a "Memory Stick" CAUTION Make sure that the "Memory Stick" busy indicator is off before removing the "Memory Stick". Removing the "Memory Stick" while the indicator is on may cause loss of data. 1 Make sure that the "Memory Stick" busy indicator "Memory Stick" busy indicator is off, and then push the "Memory Stick". 2 Move your hand away and remove the "Memory Stick". When you move your hand away, the "Memory Stick" is partially ejected so that you can remove it from the slot. Usage Notes Usage with other USB devices Because the drive is a highpowered device (bus-powered; draws 500 mA of current or less), it may malfunction if the power from the computer is not stable. Therefore, the drive operation is not guaranteed in the following situations. • When using the drive at the same time as other high-powered USB devices such as hard disks, CDROM drives, scanners, and printers. • When multiple drives are connected at the same time. • When using the drive at the same time as a bus-powered hub. • When you insert a "Memory Stick" at the same time a floppy disk is being accessed. (Before inserting a "Memory Stick" make sure that the floppy disk busy indicator is off.) Connection to the USB hub • Connect the drive directly to your computer's USB connector (root hub). Operation is not guaranteed when you connect the drive to other bus-powered hubs such as keyboard hubs. Disconnection from the computer The drive can be connected and disconnected to your computer while it is on. However, before disconnecting the drive with Windows XP, 2000, and Me, you must click the taskbar icon and perform the procedure to stop and remove the hardware below. • Windows XP/2000 Stop "Sony USB Floppy" and "Sony MS Reader/Writer". • Windows Me Stop "USB Floppy" and "USB Disk". Operating and storage environments • Do not place the drive close to heat sources or in direct sunlight; place it in dusty, dirty, or humid locations; place it under precipitation such as rain; or leave it in a vehicle with the windows closed. • If the drive interferes with the reception of radio or television signals, move the drive away from the radio or television. • When using the drive, do not wrap it in cloth, sheets or covers as this may be the cause of malfunctions or fire. Troubleshooting Before consulting your Sony representative, verify the following. If you are still unable to identify or solve your problem, consult your retailer or Sony representative. Problem The computer does not detect the drive. Under Widows Me, 2000, and 98 SE, the "Memory Stick" Reader/Writer icon is not displayed in the "My Computer" window when the drive is connected. Cannot insert a floppy disk or "Memory Stick" into the drive. Cause/Solution t Your computer and the drive may not be properly connected. Disconnect the drive from the computer and reconnect it. t In Windows Me, 2000, and 98 SE, the "Memory Stick" Reader/Writer appears as a "Removable Disk" icon. t You may be trying to insert a floppy disk or "Memory Stick" in the wrong direction. Make sure that you insert them in the correct direction.
-
 1
1 -
 2
2
 |
 |
