Sony MVC-FD95 Operating Instructions - Page 5

Table of contents, Getting started, Basic operations, Advanced operations, Additional information - effects

Page 5 highlights

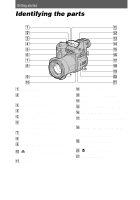
Table of contents Getting started Identifying the parts 6 Preparing the power supply 8 Setting the date and time 12 Inserting a floppy disk 14 Basic operations B Recording Recording still images 15 Recording moving images 21 B Playback Playing back still images 22 Playing back moving images .........23 Viewing images using a personal computer 25 Image file storage destinations and image file names 27 Advanced operations Before performing advanced operations How to use the PLAY/STILL/ MOVIE selector 29 How to use the control button .......29 How to change the menu settings ..31 B Various recording Setting the image size (IMAGE SIZE 36 Recording still images for e-mail (E-MAIL 37 Adding audio files to still images (VOICE 37 Recording text documents (TEXT 38 Recording images in macro ...........38 Focusing manually 39 Using the PROGRAM AE function 40 Using the Spot light - metering function 41 Adjusting the exposure (EXPOSURE 41 Adjusting the white balance (WHITE BALANCE 42 Recording the date and time on the still image (DATE/TIME) .......43 Enjoying picture effects (PICTURE EFFECT 43 B Various playback Playing back six images at once (INDEX 44 Enlarging a part of the still image (Zoom and trimming 45 Playing back the still images in order (SLIDE SHOW 46 Viewing images on a TV screen ....47 B Editing Preventing accidental erasure (PROTECT 48 Deleting images (DELETE) ..........49 Changing the recorded still image size (RESIZE 50 Copying images (COPY 50 Copying all the information on your floppy disk (DISK COPY) ......52 Selecting still images to print (PRINT MARK 53 Format 54 Additional information Precautions 55 Using your camera abroad 57 Troubleshooting 58 Warning and notice messages .......61 Self-diagnosis display 63 Specifications 64 LCD screen/finder indicators ........65 Index 67 5

  • 1
  • 2
  • 3
  • 4
  • 5
  • 6
  • 7
  • 8
  • 9
  • 10
  • 11
  • 12
  • 13
  • 14
  • 15
  • 16
  • 17
  • 18
  • 19
  • 20
  • 21
  • 22
  • 23
  • 24
  • 25
  • 26
  • 27
  • 28
  • 29
  • 30
  • 31
  • 32
  • 33
  • 34
  • 35
  • 36
  • 37
  • 38
  • 39
  • 40
  • 41
  • 42
  • 43
  • 44
  • 45
  • 46
  • 47
  • 48
  • 49
  • 50
  • 51
  • 52
  • 53
  • 54
  • 55
  • 56
  • 57
  • 58
  • 59
  • 60
  • 61
  • 62
  • 63
  • 64
  • 65
  • 66
  • 67
  • 68

5
Table of contents
Identifying the parts
.........................
6
Preparing the power supply
.............
8
Setting the date and time
...............
12
Inserting a floppy disk
...................
14
B
Recording
Recording still images
...................
15
Recording moving images
.............
21
B
Playback
Playing back still images
...............
22
Playing back moving images
.........
23
Viewing images using a personal
computer
.................................
25
Image file storage destinations and
image file names
.....................
27
How to use the PLAY/STILL/
MOVIE selector
.....................
29
How to use the control button
.......
29
How to change the menu settings ..31
B
Various recording
Setting the image size
(IMAGE SIZE)
.......................
36
Recording still images for e-mail
(E-MAIL)
................................
37
Adding audio files to still images
(VOICE)
.................................
37
Recording text documents
(TEXT)
....................................
38
Recording images in macro
...........
38
Focusing manually
........................
39
Using the PROGRAM AE
function
...................................
40
Using the Spot light
– metering function
.................
41
Adjusting the exposure
(EXPOSURE)
.........................
41
Adjusting the white balance
(WHITE BALANCE)
.............
42
Recording the date and time on the
still image (DATE/TIME)
.......
43
Enjoying picture effects
(PICTURE EFFECT)
..............
43
B
Various playback
Playing back six images at once
(INDEX)
..................................
44
Enlarging a part of the still image
(Zoom and trimming)
.............
45
Playing back the still images in order
(SLIDE SHOW)
......................
46
Viewing images on a TV screen
....
47
B
Editing
Preventing accidental erasure
(PROTECT)
............................
48
Deleting images (DELETE)
..........
49
Changing the recorded still image size
(RESIZE)
...............................
50
Copying images (COPY)
...............
50
Copying all the information on your
floppy disk (DISK COPY)
......
52
Selecting still images to print
(PRINT MARK)
.....................
53
Format
............................................
54
Precautions
....................................
55
Using your camera abroad
.............
57
Troubleshooting
.............................
58
Warning and notice messages
.......
61
Self-diagnosis display
....................
63
Specifications
................................
64
LCD screen/finder indicators
........
65
Index
..............................................
67
Getting started
Basic operations
Advanced operations
Before performing
advanced operations
Additional information