Sony NEX-VG900 Operating Guide - Page 20
Step 4: Attaching the lens, To attach the supplied mount adaptor
 |
View all Sony NEX-VG900 manuals
Add to My Manuals
Save this manual to your list of manuals |
Page 20 highlights
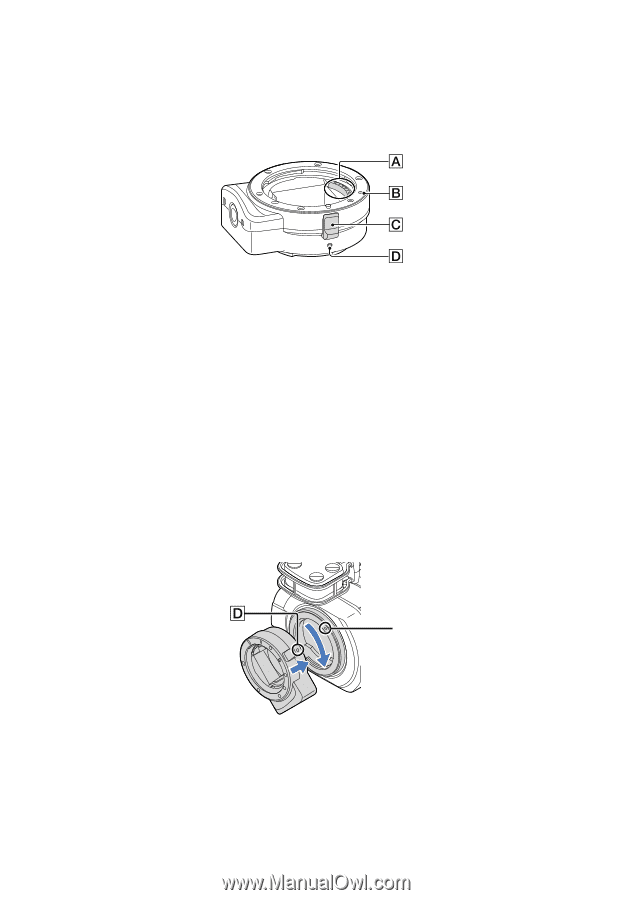
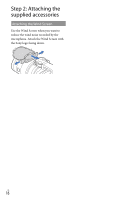
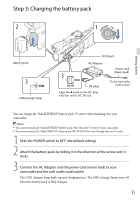
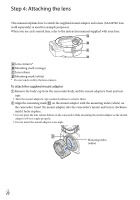
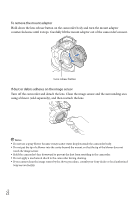
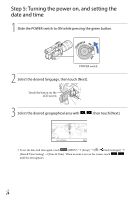
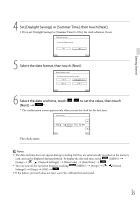
Step 4: Attaching the lens This manual explains how to attach the supplied mount adaptor and a lens (SAL2470Z lens (sold separately) is used for example purposes). When you use an E-mount lens, refer to the instruction manual supplied with your lens. Lens contacts* Mounting mark (orange) Lens release Mounting mark (white) * Do not touch or dirty the lens contacts. To attach the supplied mount adaptor Remove the body cap from the camcorder body, and the mount adaptor's front and rear caps. Turn the mount adaptor's caps counterclockwise to remove them. Align the mounting mark on the mount adaptor with the mounting index (white) on the camcorder. Insert the mount adaptor into the camcorder's mount and turn it clockwise until it locks in place. Do not press the lens release button on the camcorder while mounting the mount adaptor as the mount adaptor will not couple properly. Do not insert the mount adaptor at an angle. Mounting index (white) US 20
-
 1
1 -
2
-
3
-
4
-
5
-
6
-
7
-
8
-
9
-
10
-
11
-
12
-
13
-
14
-
 15
15 -
 16
16 -
 17
17 -
 18
18 -
 19
19 -
 20
20 -
 21
21 -
 22
22 -
 23
23 -
 24
24 -
 25
25 -
26
-
27
-
28
-
29
-
30
-
31
-
32
-
33
-
34
-
35
-
36
-
37
-
38
-
39
-
40
-
41
-
42
-
43
-
44
-
45
-
46
-
47
-
48
-
49
-
50
-
51
-
52
-
53
-
54
-
55
-
56
-
57
-
58
-
59
-
60
-
61
-
62
-
63
-
64
-
65
-
66
-
67
-
68
-
69
-
70
-
71
-
72
-
73
-
74
-
75
-
76
-
77
-
78
-
79
-
80
-
81
-
82
-
83
-
84
-
85
-
86
-
87
-
88
-
89
-
90
-
91
-
92
-
93
-
94
-
95
-
96
-
97
-
98
-
99
-
100
-
101
-
102
-
103
-
104
-
105
-
106
-
107
-
108
-
109
-
110
-
111
-
112
-
113
-
114
-
115
-
116
-
117
-
118
-
119
-
120
-
121
-
122
-
123
-
124
-
125
-
126
-
127
-
128
-
129
-
130
-
131
-
132
-
133
-
134
-
135
-
136
-
137
-
138
-
139
-
140
-
141
-
142
-
143
-
144
-
145
-
146
-
147
-
148
-
149
-
150
-
151
 |
 |