Sony NW-E407 Quick Start Guide - Page 2
Transferring, Playing back - case
 |
View all Sony NW-E407 manuals
Add to My Manuals
Save this manual to your list of manuals |
Page 2 highlights
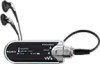
Transferring Playing back Importing audio files to your computer To import audio files from an audio CD Record and store audio files from an audio CD to the SonicStage [My Library]. 1 Double-click SonicStage software starts up. on the desktop. 2 Insert the audio CD that you want to record into the CD drive of your computer. SonicStage screen 3 Place the pointer over [Music Source] and click [Import a CD]. 4 Click to record the songs. To stop recording, click . To change the format and bit rate, click [Settings] before 4. To obtain CD information automatically, connect your computer to the Internet. If CD information does not appear automatically, click [CD Info] before 4 while connected to the Internet. To import audio files from your computer 1 Double-click SonicStage software starts up. on the desktop. 2 Place the pointer over [Music Source] and click [Import Music Files]. 3 Click an audio file you want to import. You can select several audio files simultaneously using the CTRL key. 4 Click [Import]. z Tip You can import audio files using the [Import] of [File] menu in the following 3 ways. • Scan Folder • Music File • M3U File What is CD information? CD information is a track name, an artist name and an album name included in an audio file. When you insert an audio CD into CD drive of your computer, SonicStage will automatically obtain the CD information from CDDB (Gracenote CD DataBase) via Internet. You cannot obtain the CD information from CDDB if the CD is not registered at CDDB. Transferring files to your Network Walkman/Charging Transfer tracks (audio data) stored in SonicStage [My Library] to the Network Walkman. 1 Connect your Network Walkman to your computer and charge it. "USB Connect" appears in the display. to USB jack to USB jack Dedicated USB cable (supplied) The Network Walkman is rechargeable when connected to a computer with the dedicated USB cable When the remaining battery indication of the display shows: , FULL charging is complete. Fully charge the Network Walkman (to FULL in the remaining battery indication of the display) before using it for the first time. 2 Place the pointer over [Transfer] and select [ATRAC Audio Device] from the transfer destination list. SonicStage screen To stop recording, click . 3 Select an audio file(s) or album you want to transfer. 4 Click to start transferring. Notes • The recorded music is limited to private use only. Use of the music beyond this limit requires permission of the copyright holders. • Sony is not responsible for incomplete recording/downloading or damaged data due to problems of the Network Walkman or computer. • Do not disconnect the USB cable while the data is being transferred. If you do, the data being transferred may be destroyed. • When you record an audio CD for the first time, [CD Drive Check] will be performed. Record the audio CD when it is completed. • The number of transfers for an audio file may be limited for reasons of copyright. • If the USB cable is disconnected while the data is being transferred, unnecessary data may be left in the Network Walkman. In this case, transfer usable audio files (included non-audio data) back to your computer and format the Network Walkman. Remaining battery indication The battery icon in the display changes as shown below. The battery power gets low as shown in the battery icon. If "LOW BATTERY" is displayed, you cannot play back with the Network Walkman. In this case, charge the battery by connecting to your computer. Playing back GROUP Normal HOLD 1 Connect headphones to headphone jack. 2 Press Nx to start playback. To stop playback, press Nx again. 3 Press VOL +/- to adjust the volume. If playback does not start Make sure that the Shuttle switch is not set to HOLD. To search tracks Use the Shuttle switch on the Network Walkman. To Shuttle switch operation Skip to the beginning of the next track Rotate the Shuttle switch to >. Skip to the beginning of the current track Rotate the Shuttle switch to .. Go forward/backwards quickly Rotate the Shuttle switch to . / > and hold it. Playing back a song by searching You can search for desired tracks to playback by artist name ( Artist), album name ( Album), or group transferred from your computer using the SonicStage software ( Group). Example of searching Nx Refer to the illustration below. 1 Press SEARCH/MENU to display Shuttle switch the search menu screen. 2 Rotate the Shuttle switch to select " Artist" and press Nx to to > to . confirm. 3 Rotate the Shuttle switch to select " Artist1" from the artist list and press Nx to confirm. SEARCH/MENU 4 Rotate the Shuttle switch to select " Album1" from the album list of Artist1 and press Nx to confirm. The track list of Album1 is displayed. In this case, the track list becomes the Play Range. 5 Rotate the Shuttle switch to select " Track1" from the track list and press Nx to confirm. Playback starts from Track1. Playback will stop automatically at the end of Track3 (in this case, the end of the Play Range). On the search flow and Play Range Press SEARCH/MENU to display the search menu screen. Proceed to the next stage by pressing Nx, and return to the previous stage by pressing SEARCH/MENU on the search menu screen. The searched songs ( as shown in the illustration below) become a Play Range (coverage of playback). Search menu screen * All Track Artist Album Group Artist list All Artist Artist1 Artist2 Album list of searched artist All Album Album1 Album2 Track list (Play Range) All tracks (artist order) Track1 Track2 Track3 All tracks of the selected artist (album order) Track1 Track2 Track3 Tracks in the selected album Track1 Track2 Track3 Album list All Album Album1 Album2 All tracks (album order) Track1 Track2 Track3 Tracks in the selected album Track1 Track2 Track3 Group list All Group Group1 Group2 All tracks (group order) Track1 Track2 Track3 Tracks in the selected group Track1 Track2 Track3 * When you select "All Track", all track lists are displayed and the Play Range will be "All". Changing playback mode Nx Shuttle switch SEARCH/MENU to > to . REPEAT/SOUND 1 Press and hold SEARCH/MENU for half a second in stop mode. The menu screen is displayed. 2 Rotate the Shuttle switch to select "Repeat Mode>" and press Nx to confirm. 3 Rotate the Shuttle switch to select "Track Rep" and press Nx to confirm. 4 Press SEARCH/MENU repeatedly to return to the playback screen. 5 Press REPEAT/SOUND repeatedly to select the repeat mode you want. none (Normal play) (Repeat) (Single Repeat) (Shuffle Repeat) Additional Information Q&A Q1 Is there a limitation to transfer audio files to the Network Walkman? A1 You can transfer up to 65,535 songs, and 4,096 groups to the built-in flash memory using SonicStage software. One group can contain up to 999 songs. However, not be transfer to the Network Walkman may not be possible if the built-in flash memory contains large size audio files, although the limitation is not exceeded. In such a case, delete unnecessary files, transfer audio files not listened to back to your computer, or change the bit rate of audio files. Bit rate indicates the data amount per second. The rate is reflected in bps (bits per second). If the bit rate is large, that means the sound quality is better though a large amount of information is used to play music. The Network Walkman is 64 kbps at factory setting. Click [Settings] on the SonicStage transfer screen to change the bit rate. Q2 Do MP3 audio files allow for use in the Network Walkman? A2 You can import MP3 audio files to the SonicStage software and transfer MP3 audio files to the Network Walkman using SonicStage. (You cannot play back an audio file copied directly from Windows Explorer to the Network Walkman. You also cannot transfer the audio tracks in an audio CD to your Network Walkman in MP3 format.) MP3 format files to be used: - MPEG-1 Audio Layer-3 - Sampling frequency: 44.1 kHz - Bit rate: 32 to 320 kbps, variable bit rate-compliant Q3 Can the Network Walkman record itself? A3 The Network Walkman cannot record itself. Import desired audio files to the SonicStage software and transfer them to the Network Walkman using SonicStage. Q4 Can I expand the built-in flash memory? A4 You cannot expand the built-in flash memory. Q5 Can the Network Walkman be protected against accidental operation? A5 You can protect the Network Walkman by pushing the Shuttle switch to the HOLD position. The HOLD function will prevent unnecessary power consumption caused by accidental operation when carrying it. All operation buttons are disabled and if you press buttons while the HOLD function is activated, "HOLD" blinks in the display. Q6 Can I store non-audio data into the Network Walkman? A6 You can transfer data from the hard disk of your computer to the built-in flash memory using Windows Explorer. The built-in flash memory is displayed in Windows Explorer as an external drive (for example: as the D drive). If you store a lot of non-audio data into the builtin flash memory, the space for audio data is reduced by the same amount.
-
 1
1 -
 2
2
 |
 |
