Sony NW-HD5 Quick Start Guide - Page 2
Transferring Audio Data to the Player - software
 |
View all Sony NW-HD5 manuals
Add to My Manuals
Save this manual to your list of manuals |
Page 2 highlights
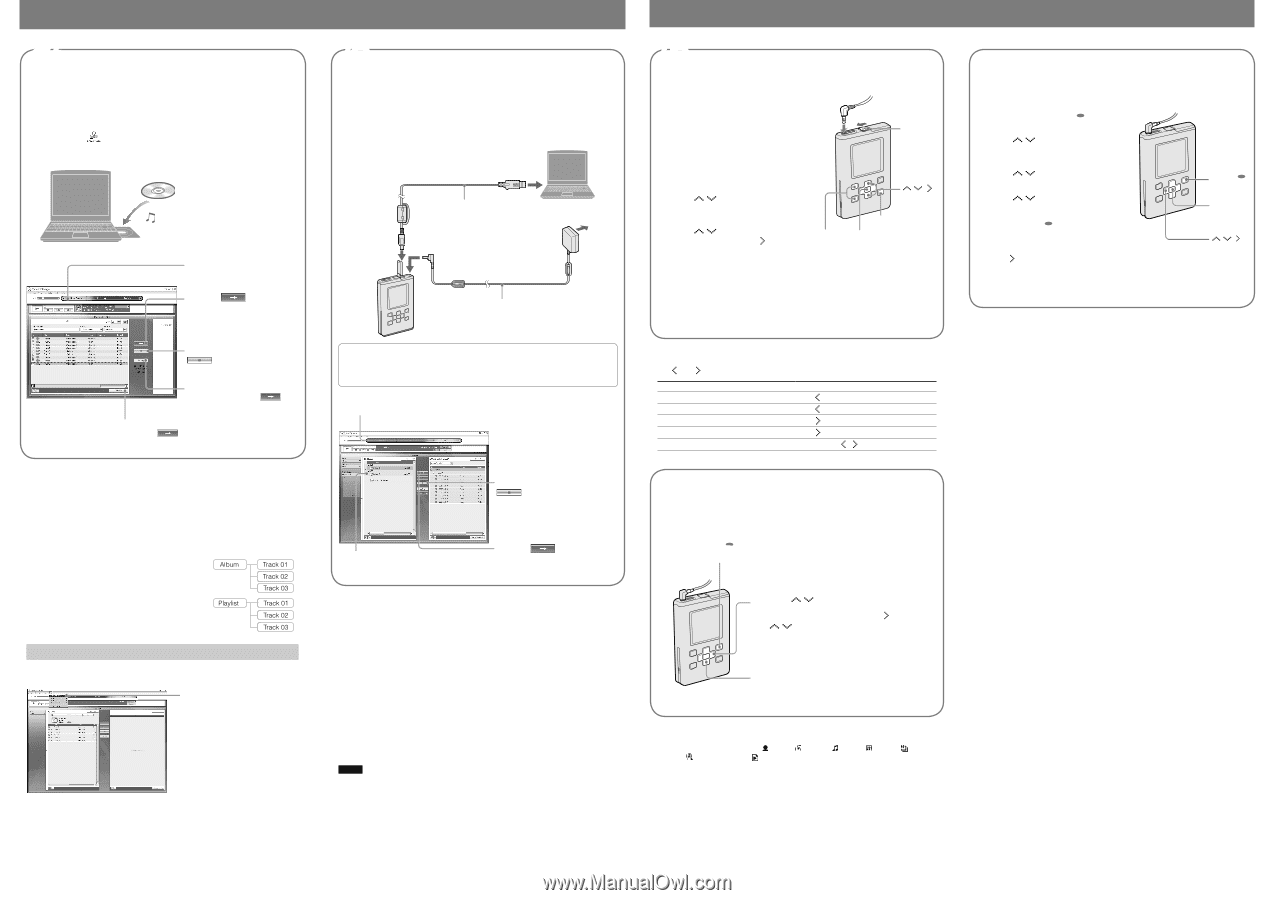
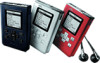
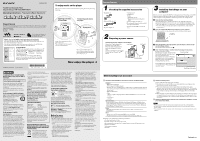
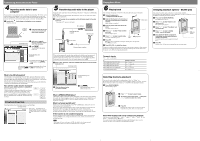
Transferring Audio Data to the Player 4 Importing audio data to your computer Record and store tracks (audio data) from an audio CD to the SonicStage "My Library" on the hard disk drive of your computer. If you want to obtain CD information (artist name, track titles, etc.) automatically, connect your computer to the Internet beforehand. To import audio data from the Internet or the hard disk of your computer, refer to the "SonicStage Help." Double-click (SonicStage) on the desktop of your computer. SonicStage starts up. Insert the audio CD that you want to record into the CD drive of your computer. SonicStage window Point to of "Music Source," and select "Import a CD" from the menu. Click . The recording of the selected tracks starts. To stop recording, click . To change the format and bit rate, click "Settings" before clicking in step . If CD information does not appear automatically, click "CD Info" before clicking in step while connecting to the Internet. What is the CD information? CD information refers to information about audio CDs, such as an album name, an artist's name, track titles, etc. Using SonicStage, you can obtain CD information for free from the Gracenote CDDB (Gracenote Compact Disc DataBase) service automatically via the Internet when you insert the audio CD into the CD drive of your computer. Note that you cannot obtain CD information of CDs that are not registered with CDDB. You can change the CD information only on SonicStage. How will the audio data be managed? SonicStage manages albums and playlists as explained in the diagram shown on the right. A playlists enables you to group and play back your favorite tracks or tracks that are sorted by a certain theme, such as movie, etc. You can play back transferred playlists on the player by selecting "Playlist" in the Find display of the player. Refer to "Managing Tracks and Albums" in SonicStage Help for details. Using SonicStage Help SonicStage Help provides further details on how to use SonicStage. SonicStage window Select "Help" - "SonicStage Help" to display the Help. The player is explained as "ATRAC Audio Device" in SonicStage Help. 5 Transferring audio data to the player Transfer the tracks (audio data) stored in SonicStage "My Library" to the player in ATRAC3plus or MP3 format. The audio data to be transferred includes the information, such as an artist name and an album name in the track information. Connect the player to your computer and the AC power adaptor in the order of to . "Connecting to PC" appears in the display. to USB port Dedicated USB cable (supplied) to AC outlet to USB jack to DC IN jack AC power adaptor (supplied) You can also automatically transfer albums include tracks which have not been previously transferred to the player (Automatic Transfer function). To use the Automatic Transfer function, follow the instructions on the screen. For details, see the SonicStage Help. When you transfer the tracks manually, close the window and proceed to step . Point to of "Transfer," and select "ATRAC Audio Device" from the transfer destination list. SonicStage window To stop transferring, click . Click the album or tracks you want to transfer. Click . The transferring of the selected albums or tracks starts. What is ATRAC3/ATRAC3plus? ATRAC3plus (Adaptive Transform Acoustic Coding3plus) is an audio compression technology that satisfies the demand for high sound quality and high compression rates. ATRAC3plus is a more advanced version of ATRAC3, and it can compress audio files to about 1/20 of their original size at 64 kbps. What is a format and bit rate? Format refers to the recording format, such as WAV or ATRAC3plus, which can be selected when importing tracks from audio CDs. Bit rate refers to the amount of data processed per second. The larger bit rates provide, better sound quality. However, the larger bit rates require more capacity to store the data. The default setting is OpenMG Audio (ATRAC3plus) for format and 64 kbps for bit rate. To change the format and bit rate, click "Settings" on the right side of the SonicStage window. If the transfer is not completed properly Disconnect the player from a computer, and then install SonicStage software again using the supplied CD-ROM. As the existing audio will not be erased, it will be transferred to the reinstalled SonicStage. Notes • Do not remove the battery or disconnect the USB cable while the data is being transferred. • The number of transfers for a track may be limited for reasons of copyright. Playing Back Music 6 Playing back You can change the language to your own for the menu and the messages in the display. Connect headphones to (headphones)/LINE OUT jack. Slide the HOLD switch in the direction of the arrow in the illustration to unlock the controls. All the buttons are unlocked. HOLD switch Press any button other than on the player. The MENU display appears. // Press / to select "Find," and then press . The Find display appears. Press / to select a search mode. To search a track more, press . VOL+/ (play/pause) VOL- Press . appears on the left bottom of the display and the player starts playback. Press again to pause. Press VOL+/VOL- to adjust the volume. The player is installed with the function which senses the direction of the player. With using this function, the orientation of the display can be changed according to the direction of the player. For details, see the PDF of the Operating Instructions. To search tracks Use and on the player. To Find the beginning of the current track Find the beginning of previous tracks Find the beginning of the next track Find the beginning of succeeding tracks Go forward/backwards quickly Operation on the player Press once. Press repeatedly. Press once. Press repeatedly. Press and hold / . Selecting tracks to play back You can select tracks to play back by searching them in "Artist" or "Album," etc. For details on how to select tracks (search mode) and about the displays, refer to the "Selecting Tracks to Playback (Album, Artist, Genre, etc.)" of the PDF of the Operating Instructions. Press SEARCH/ MENU. The Find display appears. Press / to select a search mode. To search for more tracks, press . Then press / to select an album or an artist. Press . Playback starts from the track you selected or the first track of the item (artist, album, etc.) you selected. About Find displays and search category for playback You can select a search mode from " Artist," " Album," " Track," " Genre," " New Tracks," " Initials Search" or " Playlist." The search category for playback differs depending on the Find display where you start playback. For details, refer to the PDF of the Operating Instructions. Changing playback options - Shuffle play You can play back all the tracks in the player or selected tracks randomly. Playback mode other than Shuffle play, such as Repeat play, Unit play, or Single play, refer to the PDF of the Operating Instructions for details. Press and hold SEARCH/ MENU. The MENU display appears. Press / to select "Options" and then press . The Options display appears. Press / to select "Play Mode" and then press . SEARCH/ MENU Press / to select a "Shuffle Tracks," and then press . Press SEARCH/ MENU to display the Find display, and then select the search category for playback. To narrow down the search category for playback, press . (play/ pause) // Press . Playback starts. All the tracks are played back once in random order.
-
 1
1 -
 2
2
 |
 |