Sony NWZB105FBLK Quick Start Guide - Page 1
Sony NWZB105FBLK - 2GB Walkman MP3 Player Manual
 |
UPC - 027242723009
View all Sony NWZB105FBLK manuals
Add to My Manuals
Save this manual to your list of manuals |
Page 1 highlights
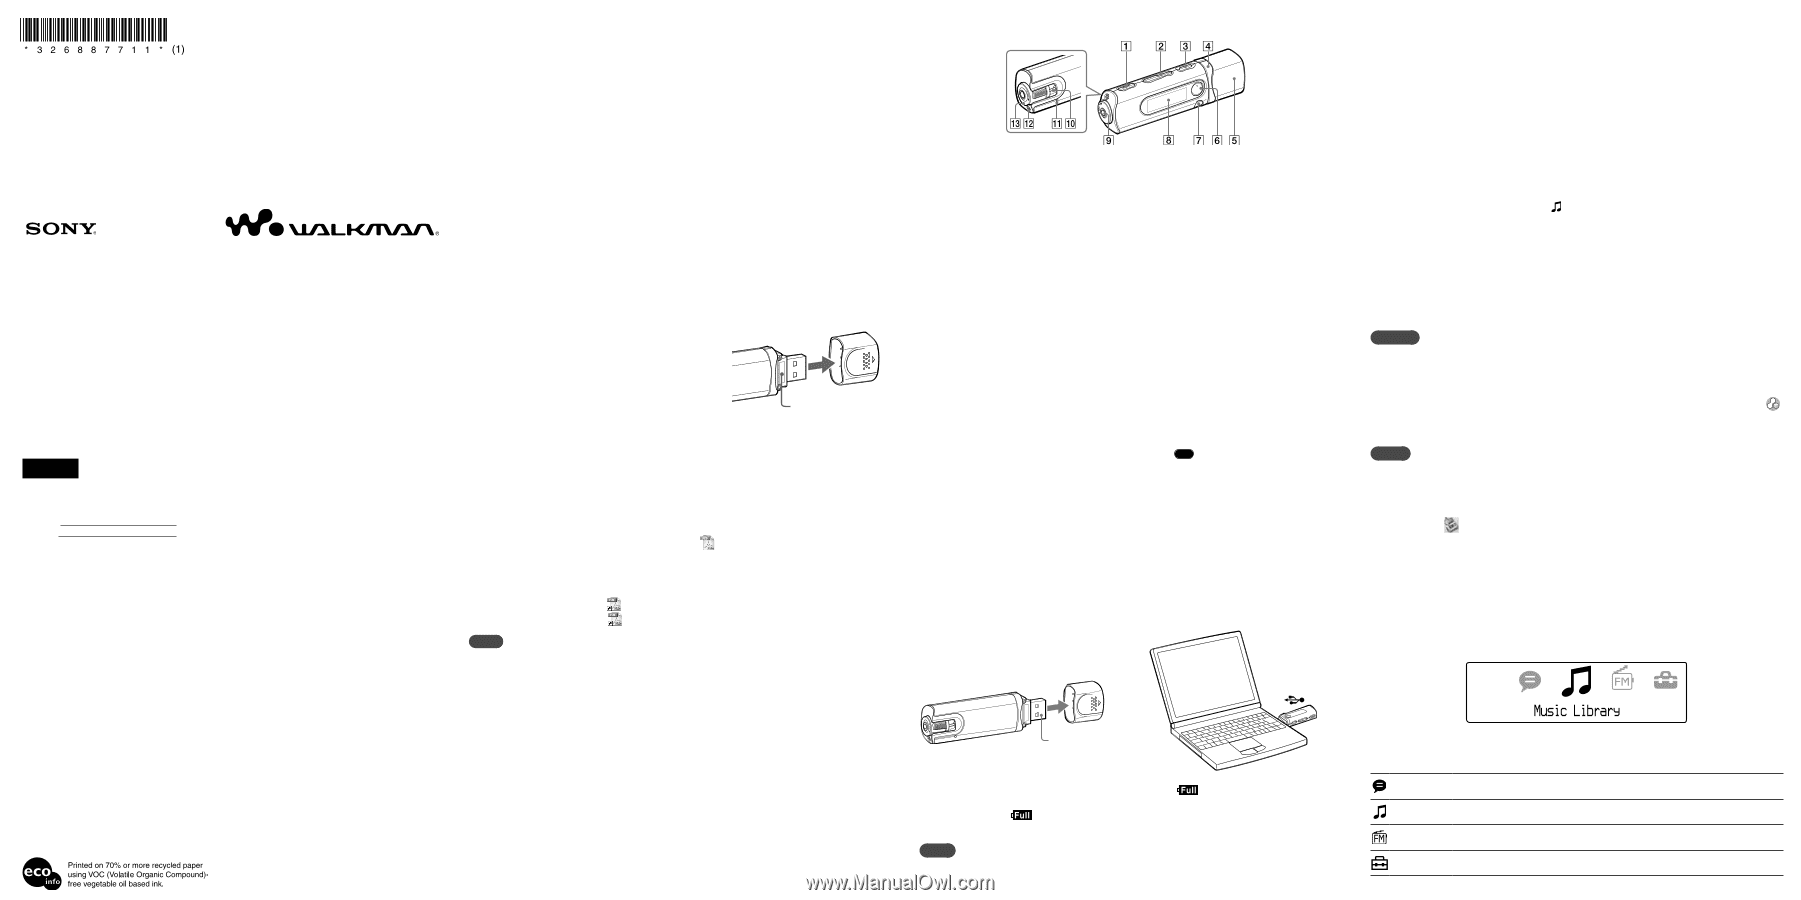
3-268-877-11 (1) © 2007 Sony Corporation Printed in China Quick Start Guide Guide de démarrage NWZ-B103F / B105F English Owner's Record The model and serial numbers are located on the rear of the USB connector base of the player. Record them in the space provided below. Refer to these numbers in the spaces whenever you call upon your Sony dealer regarding this product. Model No. Serial No. On sample audio data The player is pre-installed with sample audio data. To delete this audio data, delete it using Windows Explorer. If you delete sample audio data, you cannot restore it. We cannot supply any replacement data. On Copyrights "WALKMAN" and "WALKMAN" logo are registered trademarks of Sony Corporation. ATRAC is a trademark of Sony Corporation. Microsoft, Windows, Windows Vista and Windows Media are trademarks or registered trademarks of Microsoft Corporation in the United States and/or other countries. Adobe and Adobe Reader are trademarks or registered trademarks of Adobe Systems Incorporated in the United States and/or other countries. MPEG Layer-3 audio coding technology and patents licensed from Fraunhofer IIS and Thomson. IBM and PC/AT are registered trademarks of International Business Machines Corporation. Macintosh is a trademark of Apple Inc. Pentium is a trademark or a registered trademark of Intel Corporation. US and foreign patents licensed from Dolby Laboratories. All other trademarks and registered trademarks are trademarks or registered trademarks of their respective holders. In this manual, TM and ® marks are not specified. This product is protected by certain intellectual property rights of Microsoft Corporation. Use or distribution of such technology outside of this product is prohibited without a license from Microsoft or an authorized Microsoft subsidiary. Content providers are using the digital rights management technology for Windows Media contained in this device ("WM-DRM") to protect the integrity of their content ("Secure Content") so that their intellectual property, including copyright, in such content is not misappropriated. This device uses WM-DRM software to play Secure Content ("WM-DRM Software"). If the security of the WM-DRM Software in this device has been compromised, owners of Secure Content ("Secure Content Owners") may request that Microsoft revoke the WM-DRM Software's right to acquire new licenses to copy, display and/or play Secure Content. Revocation does not alter the WM-DRM Software's ability to play unprotected content. A list of revoked WM-DRM Software is sent to your device whenever you download a license for Secure Content from the Internet or from a PC. Microsoft may, in conjunction with such license, also download revocation lists onto your device on behalf of Secure Content Owners. Program ©2007 Sony Corporation Documentation ©2007 Sony Corporation Getting Started Thank you for purchasing the NWZ-B103F/B105F*1. By transferring songs from your computer to the player by drag and drop, you can enjoy them wherever you go. You can also listen to FM radio and record voice using the player. *1 Depending on the country/region in which you have purchased the player, some models may not be available. About the Manual Use of the player is described in this Quick Start Guide, or in the Operation Guide (PDF file). Quick Start Guide (this manual): Explains basic operation of the player, including charging the battery, transferring, and playing songs. Operation Guide: Explains advanced features of the player and offers troubleshooting information. Install the Operation Guide in the computer according to "Installing the Operation Guide." Supplied Accessories Please check the accessories in the package. Headphones (1) CD-ROM *1 *2 (1) - MP3 Conversion Tool - Operation Guide Quick Start Guide (this manual) (1) *1 Do not attempt to play this CD-ROM in an audio CD player. *2 Depending on the country/region in which you have purchased the player, the supplied software may be different. About the serial number The serial number provided for the player is required for customer registration. The number is shown on the rear of the USB connector base of the player. Installing the Operation Guide Serial number Install the Operation Guide (PDF file) for the player according as follows: 1. Turn on the computer to start Windows. 2. Log on as an administrator. To install the Operation Guide (PDF file), it is required to log on your computer as an administrator. 3. Insert the supplied CD-ROM into your computer. The install wizard will start automatically. Read the messages displayed on the screen carefully, and follow the on-screen instructions. 4. When the install menu appears on the screen, select icon on the left side of the screen, and click [Install] on the right lower side of the screen. Follow the on-screen instructions to install the Operation Guide. To view the Operation Guide (PDF file) After installation is completed, a icon appears on the desktop of the computer. You can view the Operation Guide by clicking the icon. Note You need Adobe Acrobat Reader 5.0 or later, or Adobe Reader software in your computer. Adobe Reader can be downloaded from the Internet for free. For the latest information If you have any questions about or issue with this product, visit the following web sites. For customers in the USA: http://www.sony.com/walkmansupport For customers in Canada: http://www.sony.ca/ElectronicsSupport/ Note on formatting the player Do not format the built-in flash memory using Windows Explorer. If you format the built-in flash memory, format it on the player. For details, see "Settings" in Operation Guide (PDF file). Parts and Controls REC/STOP button Starts/stops recording. You can record the sound from the microphone or the currently received FM program. VOL +*1/- button Adjusts the volume. Power ON/OFF) button Turns on/off the player. / button Selects a song, album, artist, folder or menu item. You can also skip to the beginning of the song/album/artist/folder, fast-forward or fast-rewind. USB cap Remove the USB cap and insert the USB connector of the player to a USB port on your computer. *1 button Starts/pauses song playback or pauses/restarts recording. When a menu appears on the display, use this button to confirm menu item. BACK/HOME*2 button Returns to the previous menu. Press and hold this button to display the HOME menu. Display See "About the HOME menu" of this manual and "Playing Music" in Operation Guide (PDF file). (Headphone) jack When connecting the headphones, insert the plug until it clicks into place. If connected improperly, it may not sound right. Strap hole This is used to attach a strap (sold separately). RESET button Resets the player when you press the RESET button with a small pin, etc. When you turn on the player after resetting it, the player activates resuming the previous setting items. Microphone For recording sound by the player. HOLD switch You can protect the player against accidental operation by using the HOLD switch when carrying it. By rotating the HOLD switch in the direction of the arrow (), all operation buttons are disabled. *1 There are tactile dots. Use them to help with button operations. *2 Functions which are marked near the buttons are activated if you press them. Likewise functions marked near the buttons, are activated if you press and hold them. Before Connecting the Player Before connecting the player to your computer, make sure that the OS is Windows XP (Service Pack 2 or later) or Windows Vista, and the installed Windows Media Player version on your computer is 10 or 11. Charging the Battery The player's battery is recharged while the player is connected to a running computer. Remove the USB cap and insert the USB connector to a USB port on your computer. To USB connector When the remaining battery indication of the display shows: , charging is complete. When you use the player for the first time, or if you have not used the player for a long time, recharge it fully until appears on the screen. Charging takes about 120 minutes when the battery power is completely used up. Note Be careful not to accidentally bump or put stress on the player when it is connected to your computer. It may be damaged. Enjoying Music 1 Connect the player directly to a USB port on your computer. If the screen for selecting what you want Windows to do appears, select [Open folder to view files] and click [OK], and then go to step 3. 2 Open the folder in the hierarchy under [WALKMAN] from [My Computer]. Data hierarchy may differ, depending on your computer environment. 3 Open the folder ([My Music], etc.) from where you want to transfer the audio files, and then drag and drop them onto the player. The audio files are transferred to the player. You can also transfer files to the player by dragging and dropping a folder. 4 Disconnect the player from your computer, and then play transferred songs. Press the / (Power ON/OFF) button until the screen appears. Press the / button to select (Music Library), and then press the button to confirm. The list of "Artist" and "Album," etc., appears. Press the / button to select an item, and then press the button to confirm. To find the song you want, repeat this step. Press the / button to select a desired song, and then press the button to confirm. Playback starts. To delete songs transferred to the player Connect the player to your computer, and then delete any unnecessary audio files using Windows Explorer. Hints You can also transfer audio files using Windows Media Player 10 or 11. For details about usage, or support on Windows Media Player, refer to the Windows Media Player information from the following web site: http://support.microsoft.com/ ATRAC files need to be converted using the supplied MP3 Conversion Tool. (Audio data purchased from a music distribution service on the Internet cannot be converted.) To use the supplied MP3 Conversion Tool, install the supplied CD-ROM on your computer and select the icon from the left side of the install menu, then click [Start] on the bottom-right. Note that when converting ATRAC files to MP3 files, the ATRAC files are not deleted. You can also delete the ATRAC files by setting the Option. Notes Only MP3/WMA files can be played on the player. Data hierarchy may differ, depending on your computer environment. Do not disconnect the player while files are being transferred. If you do, the file being transferred will be damaged. When disconnecting the player from your computer, follow the procedure below. Double-click (Remove Hardware) in the task tray in the lower right portion of the screen. In the windows that appears, click [USB Mass Storage Device] or [USB Disk], and then click [Stop]. Click [OK]. When "Safe To Remove Hardware" appears on the screen, disconnect the player from the computer. The icon and the messages displayed may be different depending on the installed OS. About the HOME menu The HOME menu appears when you turn on the player or press and hold the BACK/HOME button of the player. The HOME menu is the starting point to play songs, listen to FM radio, play recorded sound files, or change settings. 4 icons appear in the HOME menu with the current selection in the center. The current icon changes depending on the function you use. By pressing the / button, you can select an icon, and then press the button to confirm. Voice Music Library FM Settings Plays/deletes recorded sound file. For details, see "Listening/Recording Voice" in Operation Guide (PDF file). Plays transferred songs on the player. For details, see "Playing Music" in Operation Guide (PDF file). Plays FM radio, or plays back or deletes a recorded FM program. For details, see "Listening/Recording FM Radio" in Operation Guide (PDF file). Sets function settings of music, FM, voice recording, or the player. For details, see "Settings" in Operation Guide (PDF file).
-
 1
1 -
 2
2
 |
 |