Sony PCV-LX920 VAIO User Guide - Page 139
Installing Memory, Caution, To avoid damaging the DIMM slot
 |
View all Sony PCV-LX920 manuals
Add to My Manuals
Save this manual to your list of manuals |
Page 139 highlights
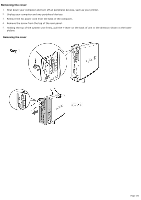
Installing Memory 1. Shut down your computer and turn off all peripheral devices, such as your printer. 2. Unplug your computer and any peripheral devices. 3. Remove the cover as described in Removing the cover. 4. If necessary, remove any cables, add-on cards, or other components to access the DIMM slots. 5. Handle the DIMM only by the edges, and remove it from its anti-static package. 6. Locate the notches on the bottom edge of the DIMM. 7. Align the DIMM over the slot. Caution: To avoid damaging the DIMM slot, move the DIMM latches slightly outward to relieve pressure. The module clicks into place. 8. Firmly insert the bottom edge of the DIMM into the slot. 9. Press evenly against the DIMM's upper corners. The end latches snap into position to hold the module in place. 10. Reinstall any add-on cards or components you removed. 11. Replace the cover and reinsert the screw at the top of the rear panel. Page 139
-
 1
1 -
2
-
3
-
4
-
5
-
6
-
7
-
8
-
9
-
10
-
11
-
12
-
13
-
14
-
15
-
16
-
17
-
18
-
19
-
20
-
21
-
22
-
23
-
24
-
25
-
26
-
27
-
28
-
29
-
30
-
31
-
32
-
33
-
34
-
35
-
36
-
37
-
38
-
39
-
40
-
41
-
42
-
43
-
44
-
45
-
46
-
47
-
48
-
49
-
50
-
51
-
52
-
53
-
54
-
55
-
56
-
57
-
58
-
59
-
60
-
61
-
62
-
63
-
64
-
65
-
66
-
67
-
68
-
69
-
70
-
71
-
72
-
73
-
74
-
75
-
76
-
77
-
78
-
79
-
80
-
81
-
82
-
83
-
84
-
85
-
86
-
87
-
88
-
89
-
90
-
91
-
92
-
93
-
94
-
95
-
96
-
97
-
98
-
99
-
100
-
101
-
102
-
103
-
104
-
105
-
106
-
107
-
108
-
109
-
110
-
111
-
112
-
113
-
114
-
115
-
116
-
117
-
118
-
119
-
120
-
121
-
122
-
123
-
124
-
125
-
126
-
127
-
128
-
129
-
130
-
131
-
132
-
133
-
 134
134 -
 135
135 -
 136
136 -
 137
137 -
 138
138 -
 139
139 -
 140
140
 |
 |
