Sony PCV-R558DS User Guide - Page 30
Enabling, Enabling Ethernet, Ethernet
 |
View all Sony PCV-R558DS manuals
Add to My Manuals
Save this manual to your list of manuals |
Page 30 highlights
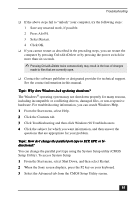
VAIO Digital Studio™ Computer User Guide 2 Click the System icon. The System Properties window appears. 3 Click the Device Manager tab. 4 Click Sony i.LINK(1394) Adapter. The Sony i.LINK(1394) Adapter window appears. 5 Click the Enable Device button. 6 Click OK. The Sony i.LINK(1394) Adapter icon should no longer have an "X" on it. This means Smart Connect is now enabled. 7 Close all windows and restart your computer in order for the new settings to take effect. Now your Smart Connect software is ready to use. ✍ When you use Smart Connect to connect two VAIO computers, you must assign each computer a unique name by which it can be identified when the two computers are networked. See the Smart Connect online Help for more information. Enabling Ethernet Your computer comes with a preinstalled Ethernet interface. To enable faster startup, your computer ships with this function disabled. You may, however, enable Ethernet connectivity by following the instructions below. To enable the Ethernet connection: 1 Right-click My Computer on the desktop and select Properties. 2 Click the Device Manager tab. 3 Select "Realtek RTL8139 (A/B/C/8130) PCI Fast Ethernet NIC" under the Network Adapters category. 4 Click Properties. 5 Click Enable Device and then click OK. 6 Click Close. 30
-
 1
1 -
2
-
3
-
4
-
5
-
6
-
7
-
8
-
9
-
10
-
11
-
12
-
13
-
14
-
15
-
16
-
17
-
18
-
19
-
20
-
21
-
22
-
23
-
24
-
 25
25 -
 26
26 -
 27
27 -
 28
28 -
 29
29 -
 30
30 -
 31
31 -
 32
32 -
 33
33 -
 34
34 -
 35
35 -
36
-
37
-
38
-
39
-
40
-
41
-
42
-
43
-
44
-
45
-
46
-
47
-
48
-
49
-
50
-
51
-
52
-
53
-
54
-
55
-
56
-
57
-
58
-
59
-
60
-
61
-
62
 |
 |
