Sony PCV-RS720G VAIO User Guide - Page 9
Universal Serial Bus USB 2.0 ports, Secure Digital SD/MultiMediaCard - hard disk
 |
View all Sony PCV-RS720G manuals
Add to My Manuals
Save this manual to your list of manuals |
Page 9 highlights
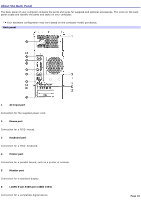
15 Hard disk drive and optical disc drive access indicator Light is amber while reading and writing data. 16 Memory Stick® memory card reader Reads and writes data from and to Memory Stick®, Memory Stick Pro , and Memory Stick Duo media. 17 Secure Digital (SD)/MultiMediaCard (MMC) memory card reader Reads and writes data from and to a Secure Digital (SD) or MultiMediaCard (MMC). 18 Universal Serial Bus (USB 2.0) ports3 Connections for compatible high/full/low-speed USB devices. 19 i.LINK 4-pin S400 port (IEEE 1394) Connection for a compatible digital device. 1 T he media ac c es s indic ator lights when reading or writing data with the Sec ure Digital (SD), M emory Stic k®, xD-P ic ture C ard , or C ompac tFlas h® /M ic rodrive s lots . 2 Not available on all models . See your online s pec ific ations s heet for details . 3 T he number of U SB ports may vary depending on the model purc has ed. For your convenience, your computer includes USB and i.LINK ports on both the front and back panels. The 4-pin i.LINK port is located on the front panel and the 6-pin i.LINK port is located on the back. Additional information Your computer is equipped with one or more optical disc drives that have a drive eject button on the drive door. After pushing the eject button, wait for the drive to stop reading the CD or DVD. It may take a few moments for the drive tray to eject. Gently push the drive tray in, when closing the optical drive door. Do not force the door or handle roughly. After closing the drive door, wait a few moments for the drive to begin reading the CD or DVD. Page 9
-
 1
1 -
2
-
3
-
 4
4 -
 5
5 -
 6
6 -
 7
7 -
 8
8 -
 9
9 -
 10
10 -
 11
11 -
 12
12 -
 13
13 -
 14
14 -
15
-
16
-
17
-
18
-
19
-
20
-
21
-
22
-
23
-
24
-
25
-
26
-
27
-
28
-
29
-
30
-
31
-
32
-
33
-
34
-
35
-
36
-
37
-
38
-
39
-
40
-
41
-
42
-
43
-
44
-
45
-
46
-
47
-
48
-
49
-
50
-
51
-
52
-
53
-
54
-
55
-
56
-
57
-
58
-
59
-
60
-
61
-
62
-
63
-
64
-
65
-
66
-
67
-
68
-
69
-
70
-
71
-
72
-
73
-
74
-
75
-
76
-
77
-
78
-
79
-
80
-
81
-
82
-
83
-
84
-
85
-
86
-
87
-
88
-
89
-
90
-
91
-
92
-
93
-
94
-
95
-
96
-
97
-
98
-
99
-
100
-
101
-
102
-
103
-
104
-
105
-
106
-
107
-
108
-
109
-
110
-
111
-
112
-
113
-
114
-
115
-
116
-
117
-
118
-
119
-
120
-
121
-
122
-
123
-
124
-
125
-
126
-
127
-
128
-
129
-
130
-
131
-
132
-
133
-
134
-
135
-
136
-
137
-
138
-
139
-
140
-
141
-
142
-
143
-
144
-
145
-
146
-
147
-
148
-
149
-
150
-
151
-
152
-
153
-
154
-
155
-
156
-
157
-
158
-
159
-
160
-
161
 |
 |