Sony PCV-RZ30GN4 VAIO User Guide (primary manual) - Page 99
Transferring songs (Check-In/Check-Out), To check-out songs to an external device, Check-In/Out Window
 |
View all Sony PCV-RZ30GN4 manuals
Add to My Manuals
Save this manual to your list of manuals |
Page 99 highlights
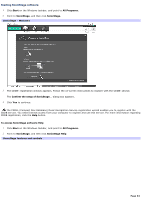
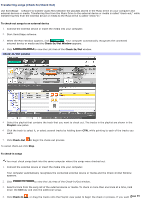
Transferring songs (Check-In/Check-Out) Use SonicStage software to transfer audio files between the playlists stored in the Music Drive on your computer and external devices or media. Transferring files from the Music Drive to the external device or media is called "check-out," while transferring files from the external device or media to the Music Drive is called "check-in." To check-out songs to an external device 1. Connect the external device or insert the media into your computer. 2. Start SonicStage software. 3. When the Main Window appears, click . Your computer automatically recognizes the connected external device or media and the Check-In/Out Window appears. 4. Click Check- In/Out window to view the List Area of the Check-In/Out window. 5. Select the playlist that contains the track that you want to check out. The tracks in the playlist are shown in the Playlist view panel. 6. Click the track to select it, or select several tracks by holding down CTRL while pointing to each of the tracks you want. 7. Click Check-Out to begin the check-out process. To cancel check-out click Stop. To check-in songs You must check songs back into the same computer where the songs were checked out. 1. Connect the external device or insert the media into your computer. Your computer automatically recognizes the connected external device or media and the Check-In/Out Window appears. 2. Click to view the List Area of the Check-In/Out window. 3. Select a track from the song list of the external device or media. To check in more than one track at a time, hold down the Ctrl key and click the additional songs. 4. Click Check-In , or drag the tracks onto the Playlist view panel to begin the check-in process. If you want tPoage 99
-
 1
1 -
2
-
3
-
4
-
5
-
6
-
7
-
8
-
9
-
10
-
11
-
12
-
13
-
14
-
15
-
16
-
17
-
18
-
19
-
20
-
21
-
22
-
23
-
24
-
25
-
26
-
27
-
28
-
29
-
30
-
31
-
32
-
33
-
34
-
35
-
36
-
37
-
38
-
39
-
40
-
41
-
42
-
43
-
44
-
45
-
46
-
47
-
48
-
49
-
50
-
51
-
52
-
53
-
54
-
55
-
56
-
57
-
58
-
59
-
60
-
61
-
62
-
63
-
64
-
65
-
66
-
67
-
68
-
69
-
70
-
71
-
72
-
73
-
74
-
75
-
76
-
77
-
78
-
79
-
80
-
81
-
82
-
83
-
84
-
85
-
86
-
87
-
88
-
89
-
90
-
91
-
92
-
93
-
 94
94 -
 95
95 -
 96
96 -
 97
97 -
 98
98 -
 99
99 -
 100
100 -
 101
101 -
 102
102 -
 103
103 -
 104
104 -
105
-
106
-
107
-
108
-
109
-
110
-
111
-
112
-
113
-
114
-
115
-
116
-
117
-
118
-
119
-
120
-
121
-
122
-
123
-
124
-
125
-
126
-
127
-
128
-
129
-
130
-
131
-
132
-
133
-
134
-
135
-
136
-
137
-
138
-
139
-
140
-
141
-
142
-
143
-
144
-
145
-
146
-
147
-
148
-
149
-
150
-
151
-
152
-
153
-
154
-
155
-
156
-
157
-
158
-
159
-
160
-
161
-
162
-
163
-
164
-
165
-
166
-
167
-
168
-
169
-
170
-
171
-
172
-
173
-
174
-
175
-
176
-
177
-
178
-
179
-
180
-
181
-
182
-
183
-
184
-
185
-
186
-
187
-
188
-
189
-
190
-
191
-
192
-
193
-
194
-
195
-
196
-
197
-
198
-
199
-
200
-
201
-
202
-
203
-
204
-
205
-
206
-
207
-
208
-
209
-
210
-
211
-
212
-
213
-
214
-
215
-
216
-
217
-
218
-
219
-
220
-
221
-
222
-
223
 |
 |
