Sony PCV-RZ49 VAIO User Guide - Page 43
Removing the drive holder, Attaching the drive screws
 |
View all Sony PCV-RZ49 manuals
Add to My Manuals
Save this manual to your list of manuals |
Page 43 highlights
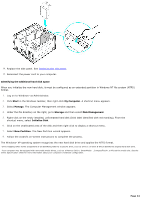
5. Detach the power and drive cables from the original hard disk drive that is preinstalled in your computer. 6. Unlock the drive holder from the chassis by pulling the drive holder tab up at a slight angle. 7. Slide the drive holder out. Rem ov ing the driv e holder 8. Slide the new drive into the drive holder and align the holes on each side of the drive bay. 9. Secure the drive to the drive holder with screws, through the holes on each side of the drive holder. Attaching the driv e screws Your new hard disk drive is supplied with the necessary screws. Do not overtighten these screws when securing the drive to the drive holder. 10. Align the drive holder with the tracks on the inside of the chassis. Slide the drive holder in completely. 11. Push down on the drive holder tab to lock the drive into position. 12. Connect the second drive connector to the new drive. Orient the connector to align pin 1 on the red side of the ribbon cable with pin 1 on the new drive. 13. Connect the second power connector to the new drive following the instructions supplied with the drive. Replacing the driv e holder Page 43
-
 1
1 -
2
-
3
-
4
-
5
-
6
-
7
-
8
-
9
-
10
-
11
-
12
-
13
-
14
-
15
-
16
-
17
-
18
-
19
-
20
-
21
-
22
-
23
-
24
-
25
-
26
-
27
-
28
-
29
-
30
-
31
-
32
-
33
-
34
-
35
-
36
-
37
-
 38
38 -
 39
39 -
 40
40 -
 41
41 -
 42
42 -
 43
43 -
 44
44 -
 45
45 -
 46
46 -
 47
47 -
 48
48 -
49
-
50
-
51
-
52
-
53
-
54
-
55
-
56
-
57
-
58
-
59
-
60
-
61
-
62
-
63
-
64
-
65
-
66
-
67
-
68
-
69
-
70
-
71
-
72
-
73
-
74
-
75
-
76
-
77
-
78
-
79
-
80
-
81
-
82
-
83
-
84
-
85
-
86
-
87
-
88
-
89
-
90
-
91
 |
 |
