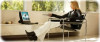
Sony PCV-V100G VAIO User Guide (primary manual) - Page 76
About the PC Card Slot, Inserting a PC Card, Safely Remove Hardware, Removing a PC Card
 |
View all Sony PCV-V100G manuals
Add to My Manuals
Save this manual to your list of manuals |
Page 76 highlights
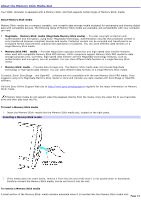
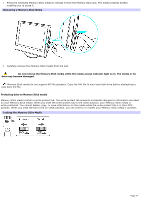
About the PC Card Slot Your computer has a card bus PC Card slot that supports Type I or Type II PC (PCMCIA) Cards. You do not need to shut down your computer when inserting a PC Card. For more information, see the instructions supplied with your PC Card. Inserting a PC Card 1. With the label facing up, insert the PC Card into the PC Card slot. Inserting a PC Card 2. Push the PC Card gently into the slot. The card is automatically detected and the icon appears in the Windows® taskbar. Safely Remove Hardware If the PC Card does not insert easily, remove it from the PC Card slot and verify that it is not upside-down or backwards. Carefully reinsert the PC Card, without forcing it into the slot. Removing a PC Card 1. Close all software programs that may access the PC Card, to avoid data loss. 2. Double-click the Safely Remove Hardware icon in the Windows® taskbar. 3. Click to select the name of the card that you want to eject and click Stop. The Stop a Hardware Device window appears. Click OK. 4. When the message "Safe to Remove Hardware" appears, push the PC Card Eject button on the right panel of the computer. Extend the Eject button out from the computer before attempting to eject the card. Rem ov ing a PC Card Page 76
-
 1
1 -
2
-
3
-
4
-
5
-
6
-
7
-
8
-
9
-
10
-
11
-
12
-
13
-
14
-
15
-
16
-
17
-
18
-
19
-
20
-
21
-
22
-
23
-
24
-
25
-
26
-
27
-
28
-
29
-
30
-
31
-
32
-
33
-
34
-
35
-
36
-
37
-
38
-
39
-
40
-
41
-
42
-
43
-
44
-
45
-
46
-
47
-
48
-
49
-
50
-
51
-
52
-
53
-
54
-
55
-
56
-
57
-
58
-
59
-
60
-
61
-
62
-
63
-
64
-
65
-
66
-
67
-
68
-
69
-
70
-
 71
71 -
 72
72 -
 73
73 -
 74
74 -
 75
75 -
 76
76 -
 77
77 -
 78
78 -
 79
79 -
 80
80 -
 81
81 -
82
-
83
-
84
-
85
-
86
-
87
-
88
-
89
-
90
-
91
-
92
-
93
-
94
-
95
-
96
-
97
-
98
-
99
-
100
-
101
-
102
-
103
-
104
-
105
-
106
-
107
-
108
-
109
-
110
-
111
-
112
-
113
-
114
-
115
-
116
-
117
-
118
-
119
-
120
-
121
-
122
-
123
-
124
-
125
-
126
-
127
-
128
-
129
-
130
-
131
-
132
-
133
-
134
-
135
-
136
 |
 |
