Sony PCWA-DE50 Quick Start Guide - Page 2
Configuring the Access Point, Installing the Wireless LAN Converter, Device Connection Enabling, - firmware
 |
View all Sony PCWA-DE50 manuals
Add to My Manuals
Save this manual to your list of manuals |
Page 2 highlights
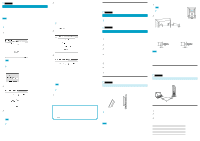
Procedure 4 Configure the Wireless LAN Converter Display the Wireless LAN Converter Setup Page and configure the required settings. Compatible browsers: Internet Explorer 5.0 or later Netscape Communicator 4.78 or later Netscape 6.1 or later Notes • To display the Wireless LAN Converter Setup Page from the PCWA-DE50 Setup Utility software, set one of the Web browsers above as your computer's default Web browser. • If your Web browser is configured to use a proxy server, set the browser proxy settings so the browser does not use a proxy sever for the IP address of the Wireless LAN Converter and the 5GHz Wireless LAN devices such as Access Point. For details on how to disable proxy settings, see "Case 4: Cannot display Wireless LAN Converter Setup Page" in the Troubleshooting Guide. z Hints • The Wireless LAN Converter Setup Page is saved in the internal memory of the Wireless LAN Converter. • The displayed page may differ slightly, depending on the firmware version of the Wireless LAN Converter. 1 Click "Start", point to "Programs" (when using Windows XP, select "All Programs"), and click "Wireless LAN", "PCWA-DE50 Setup". The PCWA-DE50 Setup Utility starts, and automatically displays the Wireless LAN Converter Setup Page (Home Page). Note The computer and Wireless LAN Converter must be connected in a one-on-one configuration. (If two or more computers are connected to the Wireless LAN Converter using a hub, or if two or more Wireless LAN Converters are connected to one computer, an error will occur.) z Hints • If the "IP Address Setup" screen appears, temporarily change the converter IP address to the one on the screen. However, if you are using several devices to build a network, make sure that the new IP address does not duplicate the address of another device or computer on the network. If it does, you will not be able to open the Wireless LAN Converter Setup Page. Change the IP address as necessary before clicking "Execute Setup". • If an error occurs, refer to the Troubleshooting Guide or Online Help. 2 Click "Easy Setup". The Easy Setup screen appears. 3 Enter the Network Name (SSID) of the Access Point. • If Access Point setup has been completed: Use the same Network Name as set for the Access Point. • If Access Point setup has not been completed: Refer to the documentation of the Access Point and enter the default Network Name. Note The Network Name (SSID) is an ID that serves to identify the wireless network. It is required for communication with the Access Point. z Hint To search for Access Points in the vicinity, click the "Scan" button. 4 Configure the settings for "Encryption (WEP)", "Key Length", and "Enter WEP Key". • If Access Point setup has been completed: Use the same values as set for the Access Point. • If Access Point setup has not been completed: Refer to the documentation of the Access Point and enter the default values. Encryption (WEP) Key Length Enter WEP Key : Select whether to use data encryption or not. : Select the Encryption (WEP) key length. The number of characters for the key string depends on this setting. : Enter a character string to be used as Encryption (WEP) key. The length of the string must match the encryption key length setting. For verification, the string must be entered once more in the "Re Enter WEP Key" field. z Hints • Encryption of wireless communications data (as selected by "Encryption (WEP)") is used in order to prevent unauthorized access by a third party. The Encryption (WEP) key becomes the password necessary to participate in a network using data encryption. • Clicking or brings up Online Help. 5 When setup is completed, click "Next". The setup confirmation screen appears. 6 Make sure that the settings are as desired, and click "Execute Setup". The setup completed screen appears. When you click "Execute Setup", the Wireless LAN Converter restarts. If the status indicator on the front panel of the Wireless Unit flashes slowly in white, communication with the Access Point has been established. Note If the read-in condition continues and the Wireless LAN Setup Page does not change, check the status indicator on the front panel of the Wireless Unit. If the indicator flashes slowly in white, setup was completed normally and wireless communication is possible. z Hint If the status indicator flashes in red, communication with the Access Point could not be established. Refer to Read This First or Online Help. 7 Close the Web browser. What to do now When setting up the Access Point for the first time, go to Procedure 5 and Procedure 6. If the Access Point has already been set up, go to Procedure 7. For details on the Wireless LAN Converter setup, refer to the Online Help. To display Online Help Click the "Start" button, point to "Programs" (when using Windows XP, select "All Programs"), and click "Wireless LAN", "PCWA-DE50 Setup Help". To call up Online Help for the Wireless LAN Converter Setup Page Click or on the Wireless LAN Converter Setup Page. Configuring the Access Point If the Encryption (WEP) key has not been enabled for the Access Point, it is highly recommended that you enable it by carrying out Procedures 5 and 6. If it is already enabled, go to Procedure 7. Procedure 5 Configure settings for the Access Point Refer to the documentation of the Access Point and configure the appropriate settings. z Hint If the Access Point is the PCWA-A500, click "Setup.exe" in the "AccessPoint" folder on the supplied CD-ROM to install the Access Point Scan Utility. Then click "Start", point to "Programs" (when using Windows XP, select "All Programs"), and click "Wireless LAN", "Access Point Scan". Procedure 6 Reconfigure the Wireless LAN Converter When Access Point settings have been changed, the connection will be lost. You need to reconfigure the Wireless LAN Converter with the Network Name (SSID) and Encryption (WEP) key settings that were chosen for the Access Point. 1 Click "Start", point to "Programs" (when using Windows XP, select "All Programs"), and click "Wireless LAN", "PCWA-DE50 Setup". 2 The Wireless LAN Converter Setup Page appears. Click "Easy Setup". 3 Select the SSID of the Access Point from the Scan button or enter the SSID same as the Access Point in the Network Name field. 4 Configure the settings for "Encryption (WEP)", "Key Length", and "Enter WEP Key", using the same values as selected for the Access Point. For verification, the Encryption (WEP) key string must be entered once more in the "Re Enter WEP Key" field. 5 When setup is completed, click "Next". 6 Make sure that the settings are as desired, and click "Execute Setup". The Wireless LAN Converter restarts. 7 Close the Web browser. Installing the Wireless LAN Converter Procedure 7 Wireless LAN Converter installation Install the Wireless LAN Converter in a stable location where it will not tip over or fall. Arrange the cable depending on the installation location. Installation sample: • Tabletop installation • Wall mounting z Hint The white flashing pattern of the status indicator indicates the signal condition. For details, refer to Read This First (reverse page). If the computer used for setup is the same as the computer for which wireless communication is to be enabled, the installation is now completed. Notes • Install the Wireless LAN Converter on a stable surface. • Do not install the Wireless LAN Converter on a shelf or other place where jarring or vibration might cause it to fall. • Do not install the Wireless LAN Converter in any location where passers-by might accidentally come in contact with the Wireless LAN Converter or its cabling. • When installing the Wireless LAN Converter, be sure to refer to the Read This First supplement. Mounting the unit on a wall 1 Slide the rear cover of the Wireless Unit in the arrow direction. Note Be cautious when removing or attaching the cover of the Wireless Unit. z Hint To attach the rear cover, align the rails on the rear of the Wireless Unit with the grooves on the cover, and slide the cover upwards. 2 Using screws or nails, mount the unit onto the wall. Approx. 0.94 inch (24 mm) Approx. 0.12 inch (3 mm) The Wireless LAN Converter is not supplied with mounting hardware. Use sturdy screws or nails to properly support the weight of the Wireless LAN Converter. s Recommended screws • Roundhead screws (shaft diameter 0.13 inch (3.1 mm)) • Flathead screws (shaft diameter 0.13 inch (3.1 mm)) Ø0.23 (5.7) Ø0.13 (3.1) 0.1 (2.3) Ø0.25 (6.2) unit: inch (mm) Ø0.13 (3.1) 0.08 (1.8) Notes • Always use two screws or nails and make sure that the unit is securely set on the wall. • Select a location that will hold the weight of the unit when mounting it on the wall. If the location cannot hold the weight of the unit, it may drop and cause an accident. • When mounting the Wireless Unit on walls made of plasterboard or other fragile material, make sure that the material is strong enough to support the unit's weight and use special screw fasteners or other fixtures that are designed for use with that material. If the unit is fastened with ordinary screws, there is a danger that it may fall. • When mounting the unit on the wall, be careful not to drop the unit or the tools used for doing the work. Dropping the unit or tools could result in unforeseeable accidents. Device Connection Enabling Wireless Communication (other than the computer used for setup) Procedure 8 Connect to a device equipped with Ethernet connector Disconnect the computer used for setup from the Ethernet connector of the Wireless LAN Converter and reconnect the Wireless LAN Converter to the device for which wireless communication is to be enabled. (Skip this step if the device is the computer used for setup.) Device equipped with an Ethernet connector Reset to Factory Defaults 1 Turn on the power of the Wireless LAN Converter. 2 Press the reset switch on the bottom of the Wireless Unit with the end of a paper clip or a similar object for at least one second. 3 When the status indicator flashes, release the reset switch. The Wireless LAN Converter restarts automatically, and all settings revert to the factory defaults. The factory default settings are shown below. Items Network Name (SSID) Encryption (WEP) Connection Mode IP Address Setting STATUS Indicator (LED) Settings Blank (not set) Disabled Access Point Network Obtain an IP address automatically (DHCP) ON
-
 1
1 -
 2
2
 |
 |