Sony PRS-T2 Quick Start Guide - Page 1
Sony PRS-T2 Manual
 |
View all Sony PRS-T2 manuals
Add to My Manuals
Save this manual to your list of manuals |
Page 1 highlights
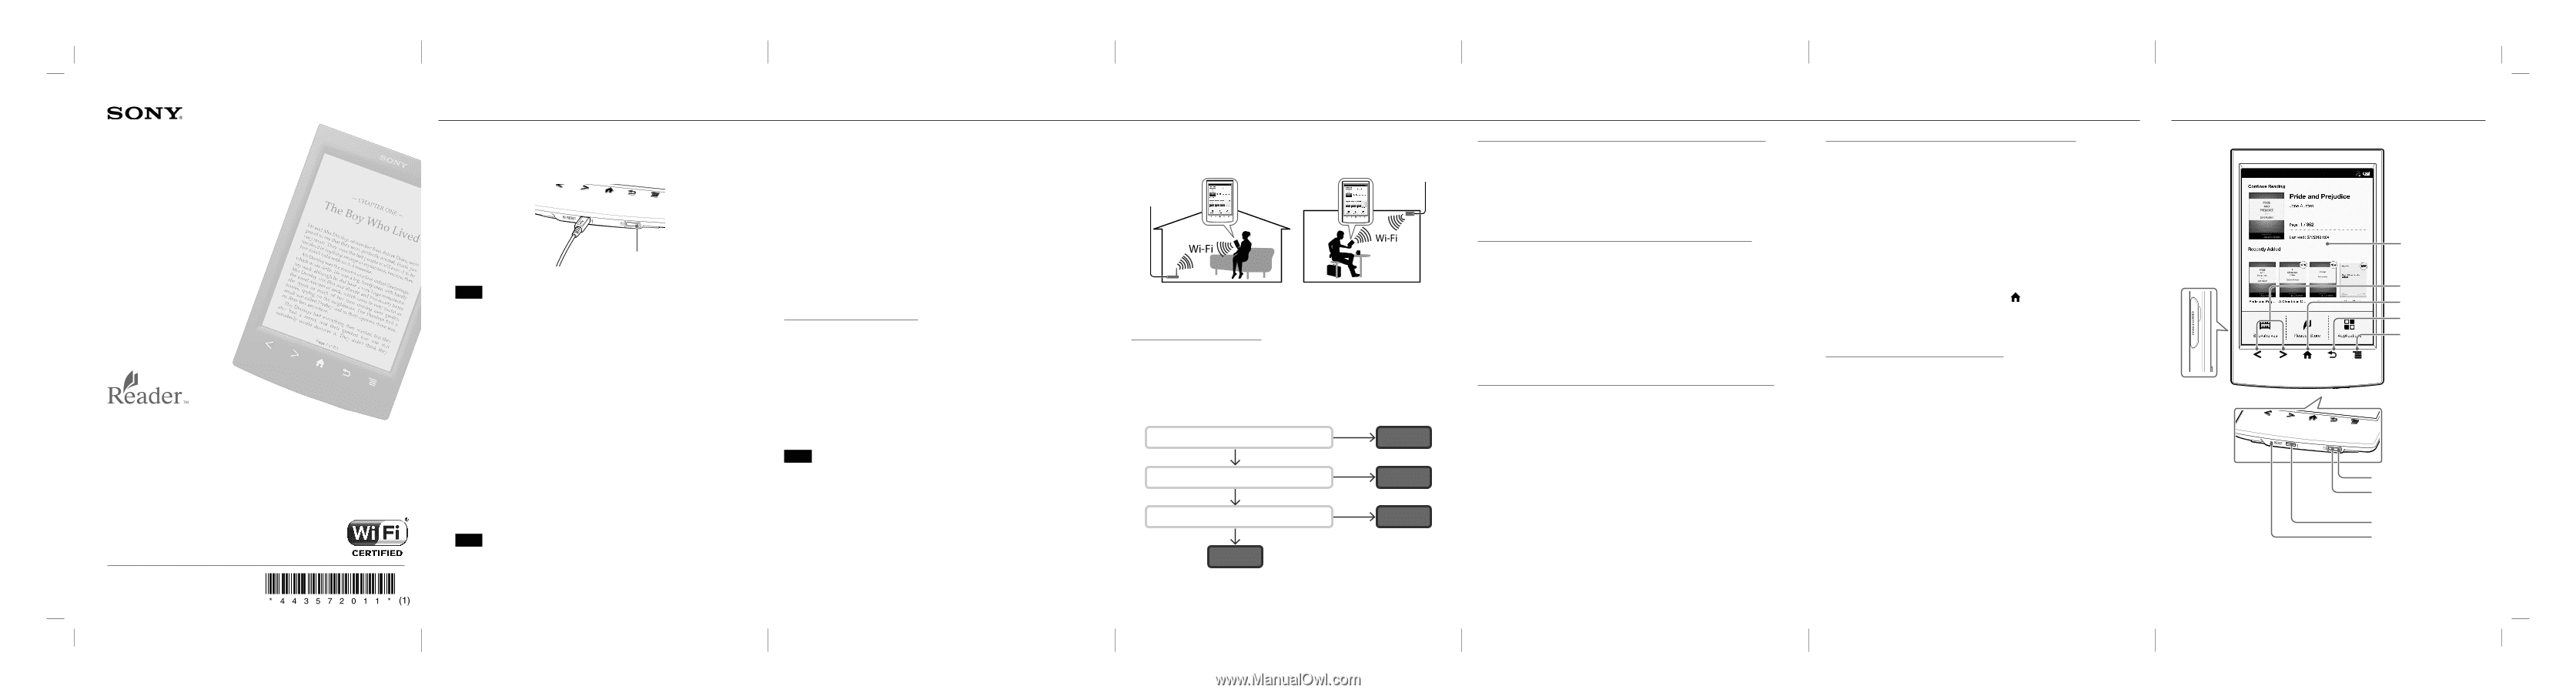
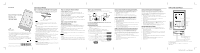
Quick Start Guide Guide de démarrage There are two instruction guides provided for your reference. Please review this Quick Start Guide. For more detailed information, the User Guide can be found in [Bookshelves] [Books] on the [Home] screen of your Reader™. Deux guides d'utilisation vous sont fournis à titre de référence. Veuillez consulter ce Guide de démarrage. Pour en savoir plus, vous trouverez le Guide de l'utilisateur dans [Étagères de livres] [Livres] sur l'écran [Accueil] de votre Reader™. ©2012 Sony Corporation / Printed in China LET'S GET STARTED Step 1: Connecting your Reader to the Computer 1. Connect your Reader to the computer with the supplied USB cable. The Reader will turn on automatically and while connecting to the computer, the Reader will start charging. Charge/Busy indicator Connect to your computer Note If the ambient temperature is too cold or too hot for the Reader to charge, adjust the room temperature to between 5 °C and 35 °C, disconnect and reconnect the USB cable. Tip The Charge/Busy indicator will light up in red while charging. It may take up to 2.5 hours to fully charge. Until the Reader becomes ready, the Charge/Busy indicator may blink in red 3 times if the (Power) button is pressed. To use the Reader while it is charging from a fully-depleted battery, the AC adapter PRSA-AC10 or PRSA-AC1A (sold separately) is recommended. When the computer is in sleep mode or powered off, disconnect the USB cable from the Reader to retain the charge in the battery. 2. Perform initial settings on the Reader. Set [Menu Language], [Country / Region], and [Date & Time Settings] from the options displayed. When the settings are completed, [Do you want the computer to recognize this device?] appears on your Reader. Tap [Yes] to install Reader for PC™ or Reader for Mac™ application, or transfer content. Tap [No] to use Reader independently of the computer. Charging will continue while the USB cable is connected. Note The message [Do you want the computer to recognize this device?] will display when a USB cable connection is established. For USA, Canada and Australia, after setting [Country / Region], you should set [Time Zone] before [Date & Time Settings]. Step 2: Installing the Reader Software To install on Windows computers: From your computer, click on the "Start" menu "Computer" ("My Computer" for Windows XP users) double-click the "SETUP" drive double-click "Setup Reader for PC". To install on Mac computers: When the Reader is connected to your Mac, the "SETUP" and "READER" drives will appear on the desktop. Double-click the "SETUP" drive double-click "Setup Reader for Mac". Follow the on-screen instructions to complete the installation of the Reader software. Step 3: Shop at the Reader Store Shop using your computer You can access the Reader Store from your computer. To read purchased books with Adobe DRM (Digital Rights Management) protection, you need to authorize your computer and Reader using the Reader software. Follow the on-screen instructions to authorize your computer and the Reader. An Internet connection is required to your computer. Your personal content can be transferred onto your Reader via the Reader software. For details on how to use the Reader software, refer to the [Help] menu of the Reader software. Note When a Wi-Fi connection is established, you can also purchase items from the Reader. [Reader Store] application may be found on the Home screen. Tap [Reader Store] icon and follow the on-screen instructions to purchase and download the content of your choice. [Reader Store] application may not appear depending on chosen country or region. Step 4: Join a Wi-Fi Network Your Reader must be configured to connect to a Wi-Fi network for a wireless Internet access. INTERNET INTERNET First, follow the COMMON INSTRUCTIONS below, then refer to your case for further instructions. COMMON INSTRUCTIONS 1. Tap [Applications] [Settings] [Wireless Network Settings] on your Reader. 2. Turn on Wi-Fi by tapping [Wi-Fi]. 3. Tap [Wi-Fi Settings] to show the [Wi-Fi Settings] screen. The following questions will determine the most suitable case for connecting your Reader to a Wi-Fi network. NO 1. Are you using a home Wi-Fi connection? Case D YES 2. Is your Wi-Fi router WPS* compatible? NO Case C YES NO 3. Does your Wi-Fi router have a WPS button? Case B YES Case A * WPS: Wi-Fi Protected Setup CASE A: A WPS-compatible Wi-Fi router with WPS button Note: Make sure that your Reader shows the [Wi-Fi Settings] screen. Otherwise, follow the steps under COMMON INSTRUCTIONS first. 1. Tap [WPS Push-Button Configuration]. 2. Tap [Start]. 3. Press the WPS button on your Wi-Fi router within 2 minutes. 4. After your Reader screen shows the setup completion, tap [OK]. CASE B: A WPS-compatible Wi-Fi router with PIN Input Note: Make sure that your Reader shows the [Wi-Fi Settings] screen. Otherwise, follow the steps under COMMON INSTRUCTIONS first. 1. Tap [Add Wi-Fi Network]. 2. Tap [WPS PIN Method]. 3. Tap [Start]. A PIN (Personal Identification Number) will be shown on the screen of your Reader. 4. Enter the PIN into your Wi-Fi router. Please refer to your Wi-Fi router's instruction manual for further details. 5. After entering the PIN tap [OK]. After a moment, the Reader connects to the wireless network automatically. CASE C: Connecting to a Wi-Fi router without WPS support Note: Make sure that your Reader shows the [Wi-Fi Settings] screen. Otherwise, follow the steps under COMMON INSTRUCTIONS first. Check if the Wi-Fi router to be connected requires a password. A password may also be called a WEP key/WPA key/encryption key/network key, or similar. 1. Tap [Scan] to show a list of all available Wi-Fi networks. 2. Find and tap your Wi-Fi router's SSID (Service Set Identifier) in the [Wi- Fi Networks] list. 3. If prompted for a password, tap the input area and type in the password using on-screen keyboard. 4. Tap [Connect]. CASE D: Connecting to an available Wi-Fi network Note: Make sure that your Reader shows the [Wi-Fi Settings] screen. Otherwise, follow the steps under COMMON INSTRUCTIONS first. Check if the available Wi-Fi network requires a username and a password. A password may be also called a WEP key/WPA key/encryption key/ network key, or similar. 1. Tap [Scan] to show a list of all available Wi-Fi networks. 2. Find and tap your Wi-Fi network SSID (Service Set Identifier) in the [Wi- Fi Networks] list. 3. If prompted for a password, tap the input area and type in the password using the on-screen keyboard. 4. Tap [Connect]. 5. The [Browser] application may start automatically. Otherwise, start the browser application manually; press the (Home) button, tap [Applications] and tap [Browser]. 6. The browser screen may show further information to complete the connection. Follow any instruction(s) where applicable. Manually setting a Wi-Fi connection Note: Make sure that your Reader shows the [Wi-Fi Settings] screen. Otherwise, follow the your Wi-Fi router's COMMON INSTRUCTIONS first. 1. Tap [Add Wi-Fi Network]. 2. Tap [Manual Registration]. 3. Tap the [SSID] input area and type in using the on-screen keyboard. 4. Tap the [Security Method] menu (default value is [Open]) and tap the supported security type. 5. Tap [Save]. 6. Tap the saved network SSID in the [Wi-Fi Networks] list on the [Wi-Fi Settings] screen. 7. If prompted for a password, tap the input area and type in the password using the on-screen keyboard. 8. Tap [Connect]. PORTS AND CONTROLS microSD card slot Touchscreen Page Turn Home Back Menu Charge/Busy indicator Power button (Press to turn on/off) Micro USB connector RESET button The stylus packaged with the Reader may be used for more convenient touchscreen operation. To open the application screen, tap the on-screen page icon [Applications]. PRS-T2 [GB, FR] 4-435-720-11(1)
-
 1
1 -
 2
2
 |
 |