Sony RDR VX511 Operating Instructions - Page 47
Recording using the Quick Timer, One-touch Timer Recording, Checking the disc status while, recording
 |
UPC - 027242681354
View all Sony RDR VX511 manuals
Add to My Manuals
Save this manual to your list of manuals |
Page 47 highlights
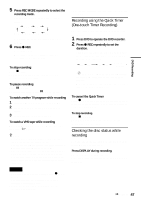
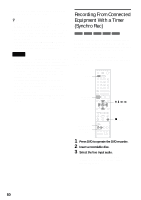
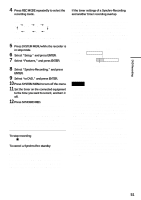
5 Press REC MODE repeatedly to select the recording mode. The display changes on the TV screen as follows: HQ HSP SP LSP SEP SLP EP LP For details about the recording mode, see page 45. 6 Press z REC. Recording starts. Recording continues until you stop the recording or the disc is full. To stop recording Press x STOP. Note that it may take a few seconds for the recorder to stop recording. To pause recording Press X PAUSE. To restart recording, press X PAUSE again. To watch another TV program while recording 1 Slide the TV/DVD·VIDEO switch to TV. 2 Press TV/VIDEO to set the TV to the TV input. 3 Select another channel on the TV. To watch a VHS tape while recording Press VIDEO to operate the VCR, insert a tape, then press H PLAY. z Hints • To play a disc recorded with this recorder on other equipment, finalize the disc (page 86). • You can use the number buttons for channel selection. Enter the channel number, and press SET. • You can select a video source from the LINE 1 IN or LINE 2 IN jacks using the INPUT SELECT button. • You can turn off the TV during recording. If you are using a cable box or a satellite receiver, make sure to leave it on. Notes • Recording may not start immediately after z REC is pressed. • You cannot change the recording mode during recording or recording pause. • If there is a power failure, the program you are recording may be erased. DVD Recording • You cannot change the channel or input source during recording. Recording using the Quick Timer (One-touch Timer Recording) You can set the recorder to record in 30-minute increments. 1 Press DVD to oparate the DVD recorder. 2 Press z REC repeatedly to set the duration. Each press increases the time by 30 minutes, up to eight hours (12 hours for DVD+R DL (Double Layer) discs). 0:30 1:00 7:30 8:00 (normal recording) "c" and "OTR" light up, and the remaining recording time appears in the front panel display. When the counter reaches "0:00," the recorder stops recording and turns off. To cancel the Quick Timer Press z REC repeatedly until the counter appears in the front panel display. The recorder returns to normal recording mode. To stop recording. Press x STOP twice. Note that it may take a few seconds for the recorder to stop recording. Checking the disc status while recording You can check the recording information such as recording time or disc type. Press DISPLAY during recording. The information display appears. Press the button repeatedly to change the display (page 43). ,continued 47
-
 1
1 -
2
-
3
-
4
-
5
-
6
-
7
-
8
-
9
-
10
-
11
-
12
-
13
-
14
-
15
-
16
-
17
-
18
-
19
-
20
-
21
-
22
-
23
-
24
-
25
-
26
-
27
-
28
-
29
-
30
-
31
-
32
-
33
-
34
-
35
-
36
-
37
-
38
-
39
-
40
-
41
-
 42
42 -
 43
43 -
 44
44 -
 45
45 -
 46
46 -
 47
47 -
 48
48 -
 49
49 -
 50
50 -
 51
51 -
 52
52 -
53
-
54
-
55
-
56
-
57
-
58
-
59
-
60
-
61
-
62
-
63
-
64
-
65
-
66
-
67
-
68
-
69
-
70
-
71
-
72
-
73
-
74
-
75
-
76
-
77
-
78
-
79
-
80
-
81
-
82
-
83
-
84
-
85
-
86
-
87
-
88
-
89
-
90
-
91
-
92
-
93
-
94
-
95
-
96
-
97
-
98
-
99
-
100
-
101
-
102
-
103
-
104
-
105
-
106
-
107
-
108
-
109
-
110
-
111
-
112
-
113
-
114
-
115
-
116
-
117
-
118
-
119
-
120
-
121
-
122
-
123
-
124
 |
 |
