Sony SLV-N60 Operating Instructions - Page 21
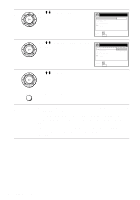
Set MANUAL SET to ADD and press OK., Select TUNER PRESET and press OK.
 |
View all Sony SLV-N60 manuals
Add to My Manuals
Save this manual to your list of manuals |
Page 21 highlights
4 The AUTO PRESET starts. SET UP TUNER PRESET AUTO PRESET PROCESSING CH 2 4 SET UP SET UP IS DONE Getting Started PLEASE WAIT Normal display 4 Preset the cable box output channel (usually 2, 3 or 4). For details, see page 33. 1 Press MENU, then select SETTINGS and press OK. 2 Select TUNER PRESET and press OK. SETTINGS TUNER PRESET SET VCR Plus+ CHANNELS CLOCK SET LANGUAGE RETURN 3 Enter the cable box output channel. 4 Set MANUAL SET to ADD and press OK. SELECT : SET : OK QUIT : MENU Cable box output channel 5 Press MENU to exit the menu. TUNER PRESET ANTENNA / CABLE AUTO PRESET MANUAL SET AFT FINE TUNING RETURN SELECT : SET : OK QUIT : MENU CH 3 CABLE ADD ERASE You have now completed hookup. If you want to use the VCR Plus+ system for recording, go to page 37 (SLV-N60/AX20 only). Automatic clock setting Once you've set up the VCR, it automatically sets the clock the first time you turn off the VCR. "ACS" (Auto Clock Set) will flash in the display window and search for a time signal provided by some TV channels. After that, whenever you turn off the VCR, it checks the time and adjusts the clock, even for Daylight Saving Time. If you want to use the timer to record right away, or if the channels in your area do not carry time signals, set the clock manually. For details, see page 28. Notes • To use the Auto Clock Set feature, set the A/B switch to "A." • If the clock is not set, "ACS" will flash in the display window whenever the VCR is turned off. During this time, the VCR will search for a time signal. Hookups 21
-
 1
1 -
2
-
3
-
4
-
5
-
6
-
7
-
8
-
9
-
10
-
11
-
12
-
13
-
14
-
15
-
 16
16 -
 17
17 -
 18
18 -
 19
19 -
 20
20 -
 21
21 -
 22
22 -
 23
23 -
 24
24 -
 25
25 -
 26
26 -
27
-
28
-
29
-
30
-
31
-
32
-
33
-
34
-
35
-
36
-
37
-
38
-
39
-
40
-
41
-
42
-
43
-
44
-
45
-
46
-
47
-
48
-
49
-
50
-
51
-
52
-
53
-
54
-
55
-
56
-
57
-
58
-
59
-
60
-
61
-
62
-
63
-
64
-
65
-
66
-
67
-
68
-
69
-
70
-
71
-
72
-
73
-
74
-
75
-
76
-
77
-
78
-
79
-
80
-
81
-
82
-
83
-
84
 |
 |
