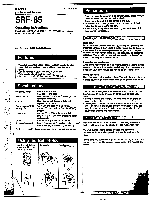
Sony SRF-85 Operating Instructions - Page 3
Fm Band
 |
View all Sony SRF-85 manuals
Add to My Manuals
Save this manual to your list of manuals |
Page 3 highlights
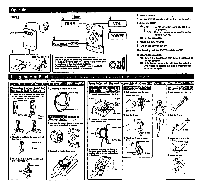
Operation Front Dial Scale 5 Rear ( TUNE 3 FM BAND 4 VOL 2 POWER Size AA (R8) x 1 01 When the AVL$ selector Is set to either position 1 or 2, Wound 95 d8,15 dB respectively) the volume will be kept at a moderate level without degradation ci the sound quality, even if you attempt to turn the volume up higher. When the AVI.8 selector is turned off, you will be able to enjoy the full volume capability of your radio. I insert a battery. • 2 Set the POWER switch to ON to turn on the radio. 3 Select the BAND. "A rDX : for FM reception, normally set it to DX position. I-LOCAL: if a very strong signal causes noise, set it to LOCAL AM : for AM reception. 4 Adjust the VOL (volume). 5 Tune in the desired station. After listening, set the POWER switch to OFF. To improve the reception FM : Extend the headphone cord fully. It functions as an FM antenna AM :A ferrite bar antenna Is built into the radio for AM reception. Rotate the radio horizontally for optimum reception. Using the Arm Band When you use the unit while doing sports. use the arm band to attach the unit to your hand or arm ktore.ottadinglolyoUr hand 4 Attach nuptial& to the A side. 1 Thread the arm band to the lower side of the mount. The arm band which has Velcro tape must be above. tWcer side Saw A side V 8 side side Velcro true .Moniroting Inount to 1 Connect the mount that le attached the arm band to the knob of the unit. 2 Thread the A side to the upper side of the mount. Upper aide pw tOktiach the unitjo vourilintgarnilE • Detach the B side from the A side. tut your hand Into the loop. Upper B A side Upper side Lower elds(i9 Lower side 2 Putt the B side. 2 Extend the loop to be able to insert your hand or arm. Upper side B side 3 Attach the B side to the A Lower side side. A side A side 2 Fasten the shaft using a coin. a 3 Attach the A skie to the band C) and extend the loop Ida A side Pull :4)11, If you want to adjust the length of the band more tightly, change the position of the A side and reattach to the bend. A aids B side IX=Inalt- % Put your sort kilo the loop Pull the B side. B side 3 3 Attach the B skis to the A side A aide 8 side Rotate Ow to*.
-
 1
1 -
 2
2 -
 3
3 -
 4
4 -
 5
5
 |
 |
